
Introduction
Legacy vs New Analysis Module
This article concerns the legacy analysis module.
- If you are currently using this version, we recommend migrating to the newest release.
- If you are a new customer, you will use the latest release by default.
See Using Dimensions for full details.
Who is Extended Business Analysis for?
Extended Business Analysis lets you look at the performance of your enterprise beyond a single company-wide Profit and Loss, Sales, and Balance Sheet view. It best suits businesses more complex businesses, selling multiple products in multiple locations. If your business operations are straightforward, Extended Business Analysis may not be necessary.
About Dimensions and Dimension Elements
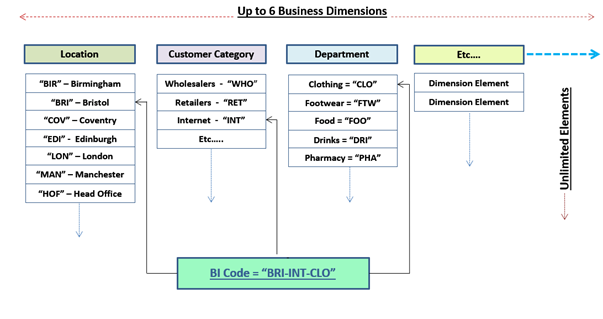
Dimensions can be used to track the performance of different areas of your business in combination with General Ledger Codes. You can create up to six Dimensions, based on your business needs, such as product types, activities, or projects. For each of these Dimensions, you can create multiple Dimension Elements, each with a unique Code. For example:
- A Dimension called Location with Dimension Elements representing its business locations.
- A Dimension called Customer Category with Dimension Elements representing categories such as Retailer, Wholesaler, Distributor, Internet, Industrial).
- A Dimension called Department with Dimension Elements representing departments such as Clothing, Footwear, Food, Drinks, and Pharmacy.

Info: Regions and Areas
Some Dimensions may duplicate Codes set up under Codes Maintenance, such as Regions and Areas. Dimensions provide P&L reporting, whereas Codes provide Sales Analyses.
About BI Codes
BI Codes are analysis tools that can be recorded against transactions. They can then be used in BI reports to summarise data. In addittion they can be used with New Workflow Approval. We recommend setting up BI Codes in a test environment first to ensure all reports are running correctly before switching to a live system.
API Integrations support the mapping of BI coding. This is useful when using external systems to record transactions.
After Dimensions and their elements have been set up, they can be assigned to BI (Business Intelligence) Codes. For example, a BI Code for use in the final stage of Manufacturing in the Northern Branch could be NOR-A02-QCL, broken down as follows:
- Northern Branch as the element NOR in the Dimension Location.
- Manufacturing Division as the element A02 in the Dimension Activity.
- Department as the element QCL (Quality Control) in the Dimension Department.
Importing BI Codes
This article details BI Codes manually. If you have multiple BI Codes to set up, you can create them in bulk using the BI Codes Data Importer.
User Permissions
Only admin users can manage BI Codes. For more on user roles, see Setting Up System Users.
In the Maintain User Profile screen, select the following:
- Data Importer: To create BI Codes using the data importer. For more details, see BI Codes Data Importer.
- Dimensions and BI Codes: For manual entry as described in this article.
Managing BI Codes at Consolidation level
BI Codes can be set up at Group or Entity level. If you use the same BI Code name in multiple entities, it must be tagged with the same Dimension Elements for Consolidated reporting to work correctly. To simplify this process, you can enforce the setup and management of BI Codes centrally. See Using Multi-Company Consolidation for more details.
- In the group layer, click Consolidation Manager.
- Tick Centrally Manage Dimensions & Elements. All BI Codes set up at Group level will automatically be available in Entities.

See:
 BI Analysis Overview (14.0) - AIQ Academy on Vimeo
 Add / Edit Dimensions and Elements (14.1) - AIQ Academy on Vimeo
 Add / Edit BI Codes (14.2) - AIQ Academy on Vimeo
 BI Reporting (14.3) - AIQ Academy on Vimeo


 Using Extended Business Analysis for Job or Project Analysis

Create Dimensions and Elements
Step One: Set the naming convention
You can rename the term BI Code to one which suits your business, for example, Cost Centre.
- In the blue banner, go to Setup > Dimensions to open the Business Intelligence Setup screen.

- In the Add & Tag BI Code tab, enter the name you want BI Codes to have in your company and click Save. This new name will now be used throughout the system, for example, in transaction entry.

Step Two: Set up Dimensions
- In the Set up Dimensions tab, click (+ Add New Dimension).
- In the Dimension Name field, enter a Dimension relevant to your business.
- Code length ensures that the subsequently combined BI Code is not unwieldy. You will get an error if you make the code longer but not if it is shorter.
- Click Save.
- Repeat the process to add up to six Dimensions.

Step Three: Set up Dimension Elements
- In the relevant Dimension tab (in this case ‘Location’), click Add Element.

- Enter the 3-letter Element Code for that Dimension, along with a description.
- Click Save. After this, only the name can be updated. The Element Code cannot be changed. However, Elements can be deleted if they have not been tagged to a BI Code used in a transaction.

- Repeat the process to add all the elements needed to each of the Dimensions you set up.
Create BI Codes
Now, you can combine the Dimension Elements you created to produce BI Codes. Only make combinations that reflect your reporting requirements. Reducing the number and scope of BI Codes makes selection easier during data entry.
Create BI Codes
- Go to Setup > BI Codes.

- In the Add & Tag BI Code tab, click Add BI Code to open the Edit BI Code screen.

- Complete the Code field (normally made up of the Dimension Elements separated by dashes. This must be alphanumeric. The only special characters allowed are -_+!). For historical or other reasons, you may already have a BI Code system with a different logic than Dimensions and Elements, for example numbering. If you want to maintain this, enter the number as the BI Code and tag it to the relevant elements.
- Complete the Description field.
- Under Tag BI Code to Dimensions, use the dropdowns to tag the BI Code with the appropriate Dimension Elements.
- Click Add.

- Repeat the process with the remaining BI Codes.
See:
 Using Extended Business Analysis for Job or Project Analysis
Edit and Deactivate BI Codes
Edit a BI-Code
- Click Edit beside the entry you want to modify.
- Make the required update.
- When you click Save, all the existing transactions with the current code will change to the new code. To retain the existing Codes, click Cancel when prompted and create a new BI Code for all subsequent transactions.

Deactivate or Reactivate a BI Code
A BI Code cannot be deleted unless it has not been used in a transaction, but you can deactivate it. Inactive BI Codes are still accessible for reporting.
- Click Edit beside the entry you want to inactivate.
- Tick or untick Active? as needed.
- Click Save.

Using BI Codes in Transactions, Reports, and Budgets
Using BI Codes in Transactions
Here is a Purchase Invoice entry with a BI Code. The header BI Code is pulled from the Supplier record but can be overridden at line level:

BI Codes (and GL Codes) on transactions let you identify the Location, Customer Category, Department, or other Dimensions you set up. Every transaction line using BI Codes carries the following:
- General Ledger Expense/Revenue Code.
- BI Code, such as BRI-INT-CLO.
- Up to six individual Dimension Element Codes, all of which are individual database access keys, such as BRI, INT, and CLO.
Using BI Codes in reporting
BI Codes and Dimension Elements can be used along with GL Codes as parameters in reporting.
Reports are available in the following locations:
- Report Manager: Enter BI in the search field to view a list of the available reports or select Extended Business Analysis. See Using the Report Manager for more details.

-
GL Explorer: Here you can perform quick reports using a single Dimension Element.

-
Transaction Browser: Depending on the stage you are at in the month-end process, you can edit the BI Code and then rerun the reports. Click Edit against the relevant transaction, followed by the pencil icon. Edit the BI Code and click Process Edits and rerun your reports.

Using BI Codes in budgets
When you enter Budget data against General Ledger and BI Codes, it will be available for inquiry and reporting purposes against the Actual data.
To enable the production of budgets at GL Code level, combined with BI Codes, go to General > Download Budget Template. Tick Include BI Code Analysis.

Using BI Codes in Workflow Approval
BI Codes can be used to route transactions to the correct approver. See New Workflow Approval for full details.
See:


BI Code Management Best Practices
Use BI Codes without Dimensions
If your Company has quite limited requirements in Business Analysis, use the BI Codes without any attached Dimensions. Alternatively, implement Business Analytics in a limited way and then, add Dimensions as needed.
Avoid Redundant BI Codes
Do not create unnecessary BI Codes. For example, if a branch doesn’t sell a particular product there is no need to combine their Dimension Elements.
For example, if you have Dimensions:
- Region
- Branch
- Product Group
- Product Type
The temptation is to set up your BI Code as RE-BR-PG-PR:
- RE represents the Region.
- BR represents the Branch.
- PG represents the Product Group.
- PR represents the Product Type.
However, in this example, this would create redundancy. Glasgow is only in Scotland and Televisions can only belong to a Product Group Electrical. Therefore, it is not necessary to include the Region Code and the Product Group Code in the BI Code. The Code should only comprise BR and PR which can then be tagged to the Region and the Product Group (as well as to the Branch and Product Type).

Remember that other parts of the system might meet your requirements instead of the proposed Dimensions. For example, the standard Sales and Purchasing Analysis Reports can accommodate Product Type.
Use default BI Codes on Master Records
Set up BI Codes at the Master Record level (Customer and Supplier) so that they become defaults. This ensures accuracy and reduces data entry for transactions. However, you can still override BI Codes on individual transactions.

Enforce BI Code use on GL Accounts
If you want to immediately use BI Codes, enforce their use for transaction entries against GL Codes. If you want yo introduce them gradually, you may not want to do this. Instead, you could implement the system initially without any Business Analysis, then add it for Revenue GL Codes, and then extend it to Expense Codes.
To save time when setting up new accounts, set a BI Code as a default in Default Settings:

This default can then be overridden on an account level as follows:
- Go to GL > General Ledger Accounts and open the relevant account.
- Select a BI Code and tick Use BI Code. If you do not tick this, the GL Code will not require a BI Code, but you can still add one during transaction entry.
- Complete the other details and click Process.

Amend BI Codes to meet evolving needs
As your enterprise evolves, you can:
- Add new Dimensions.
- Add new Elements to existing Dimensions for new Branches, or Product Groups.
- Merge BI Codes: You can merge Dimension Elements if Branches close or amalgamate by re-assigning an old BI Codes to new Dimension Element. For example, to merge a Coventry Branch with a Manchester Branch, tag the relevant Coventry BI Codes as Manchester. For historical purposes, retain the transactions with the redundant BI Codes or convert and transfer them over to the new BI Codes.
- Deactivate redundant or historical BI-Codes: If you want to prevent the use of the old Codes in the future, you should de-activate them (see Editing and Deleting BI Codes section).