Introduction
The Data Importer lets you populate predefined Excel templates and import them into the system. The Import Templates are available in Office 97-2003 and Office 2007 formats.
Info: User Permissions
Any user can have access to the data importer if their user profile is set with that permission. For more on user permissions, see Setting Up System Users. User role then determines the range of available imports. Admin users have access to the full suite, while Users only have access to a subset.
The Data Importer can import:
- Static information such as Chart of Accounts, and BI Codes.
- Supplier or Customer records for company setup, including codes, names, addresses, contacts, and bank details.
- Transactional information such as invoices or payroll journals.
With the Transactions Importer, you can import the following:
- Purchase transactions
- Sales transactions
Warning
- Risk of Data Corruption: The data importer is a powerful tool that should be used with extreme caution and its use should be limited to users who have received the correct level of training. Misuse of the tool can cause data corruption.
- If your company has received training and you have this training guide, any fixes about the imported data required from us will incur charges.
If in doubt, or if you receive an error message that you cannot resolve, contact your Support team for help.
Guidelines for successful importing
Warning: During import, log out all other users
You can import data at any time. However, when you are using the Data Importer from Setup > Data Importer, no other user can be logged into the system. If another user enters transactions during import, transactions can become corrupted.
Use separate templates for each company
You must download the Import Templates from each company individually. It is not recommended to import data using a template from a different company as this company may have a different setup. Before attempting to import data, set the correct currencies, financial year, and client locale during the creation routine or in the main system.
Use newly downloaded templates each time
Use a newly downloaded template each time as it will contain any changes made in the system, for example, updates to the General Ledger codes, Supplier defaults, or Customer information. Make sure you download the Import Templates from the correct database.
Use the correct template format
The template is available to download in file format. Any Excel version after 2007 is compatible. Excel for Mac is not compatible with the Transaction Importer and will not generate the data file.
Use a test Entity
Always import in a test entity first to check that the transaction types are correct.
See:

 GL Journal Importing from Excel
 Trial Balance and Banks Importer
 Opening Financial Position Importer
Clean Up
Warning
Always perform cleanup before proceeding with a new import. This avoids the risk of duplicating data from the previous import in the new import.
Clean-up should only be completed when a data import is complete, and the files are no longer required. If you are satisfied with your import and would like to clear any previously uploaded template before a new import:
- Go to Data Importer > Validation > Clean Up.
- Click Clean Up.

Downloading the Template
When completing a worksheet, always read the instructions provided in each worksheet.
- Go to Setup > Data Importer > Start >Transactions Importer.

- Click the link to download the Transactions Template File and save the file as a Microsoft Excel Macro-enabled file (.xlsm format).

- If Macros are not enabled, click Enable Content and Enable Editing.


- Fill in the required fields, following the Guidelines for Data Entry, below. See the sections relating to each of the worksheets:
- Purchases Transactions
- Sales Transactions
- Save the file.
Info: Line Limits
We recommend not exceeding 1000 lines per import. If you have a large quantity of lines, you will need to do multiple data imports. It is better for data quality to import multiple journals with fewer lines rather than performing one large import.
Guidelines for Data Entry
Follow these guidelines before you import the data. The data must be prepared appropriately before attempting to import.
General:
- The import tool cannot accept data prepared from any other workbook format. It must be downloaded from the Setup > Data Importer.
- Complete each field according to the requirements provided in the worksheet.
- Complete each field according to the requirements provided. For help filling in the template, click on the + in the top left-hand corner of the template to show the guidance for each column.
- Select data from each dropdown list, for example, General Ledger codes.
- Do not change column headings or worksheet names.
- Do not add or delete any columns in the existing worksheets.
- Populate the templates from the first row (row 5) and do not leave any blank rows.
- Do not leave blanks in the Code columns.
- Check for blanks in the mandatory fields.
- Do not change or delete tab names.
- Do not add extra tabs.
Entering transactions:
- If you create PI/PN in Purchase Transactions and SI/SN in Sales Transactions tabs, this will respectively create Purchase Batch Invoice/Debit Notes and Sales Batch Invoice/Credit notes (not Item invoices).
- When importing invoices/Credit notes for Customers/Suppliers in a foreign currency, make sure you have a correct difference between the Total amount and Base Currency Amount. The template will not apply an exchange rate to the imported value.
- We suggest importing in smaller chunks (approx. 1000 lines) as they will be easier for you to check once imported. This will lessen the risks of the data importer timing out and partially importing transactions.
- The Maximum number of lines in one invoice is 100 lines however we don’t advise going over 20-30 lines as above 30 lines, the invoice PDF may get distorted.
Using Codes:
- Only use Bank GL codes in the GL code (Column F) if you are raising a PP Purchase Payment or an SR Sales Receipt.
- Make sure to use correct GL Codes to avoid incorrect transaction types being applied and incorrect postings.
- Check that the customer and supplier codes exist in the system and are spelt correctly.
Formatting non-numerical data:
- Do not use special characters (e.g., apostrophes, ampersands, accents, etc.).
- Save non-numerical data according to the requirements example, for example, save dates using the date format.
- Ensure that dates are valid.
Formatting numerical data:
- Use the ‘Paste Values’ option when pasting data into the template. This will eliminate any formulas used to calculate those values.
- Numerical data must correlate with the type of transaction.
- Values must be two decimals. Round the values to two decimals before pasting them into the template (use the =ROUND () Excel formula).
- Ensure that there are no totals added to the bottom of any worksheet.
- Ensure that the financial information is accurate.
Entering Data not found in a dropdown
If you see a triangle in the top-left corner of any cell containing a dropdown list, it means what you have typed in or copied in doesn’t exist from the list of choices. To override the dropdown cells, copy the code from another spreadsheet and “paste as value” in the template.
Purchases Transactions Template
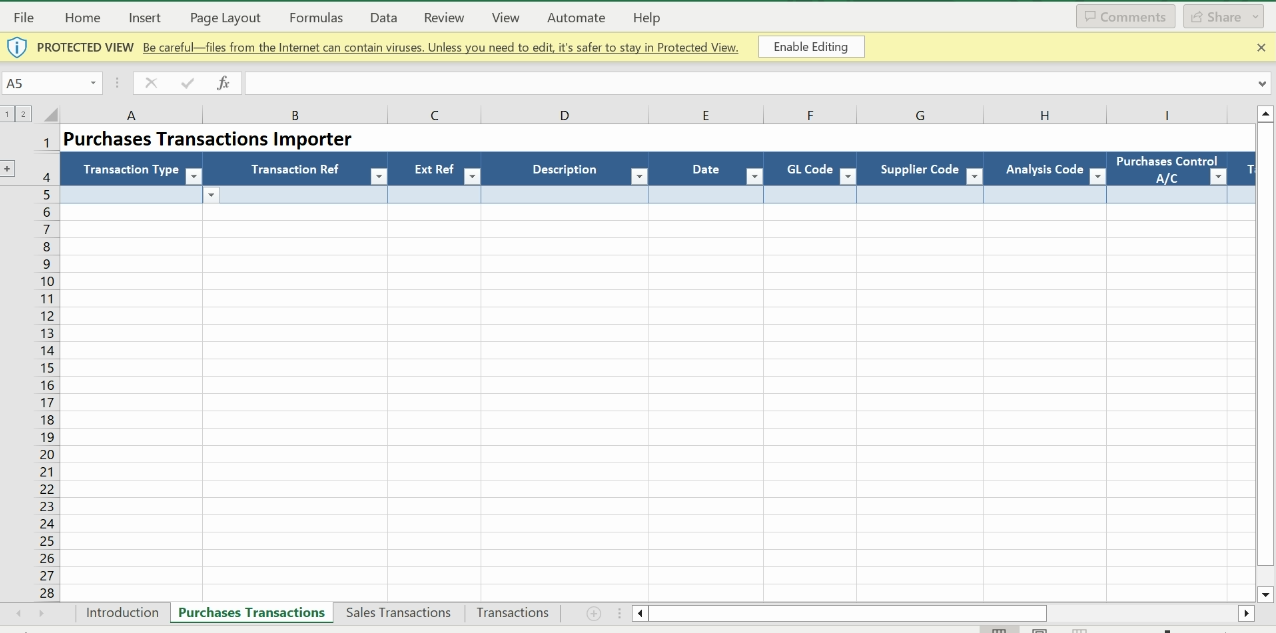
Complete the following:
-
Transaction Type (Mandatory): Nominate the transaction type from the dropdown (see additional notes on each in the next section):
- PI Purchase Invoice
- PN Purchase Debit Note
- PP Purchase Payment
- PC Purchase Credit Journal
- PD Purchase Debit Journal
-
Transaction Ref (Mandatory): This must be numerical.
- For PI and PN, it is used to group transactions into one invoice but does not appear in the system. It can be 1, 2, and so on. You can re-use the same Transaction Ref in the next template as it will not have any effect on the auto-incremented number generated by the system.
- For PP, PC, and PD, the Transaction Ref will be recognized in the entity as Int. No.
- Ext Ref (Mandatory): This is the invoice number. It allows you to identify the invoice in the Purchase Ledger.
- Description (Mandatory): Add a description Line.
- Date (Mandatory): Populate with the transaction date. Dates should be in the European format dd/mm/yyyy. If the dates are in US format (mm/dd/yyyy), the checkbox option: "Interpret the dates in the uploaded CSV file as US Date Format" will be available before import.
- GL Code (Mandatory): Enter the General Ledger account code. This must have the same Control Account as the Supplier.
- Supplier Code (Mandatory): Enter the Supplier code that relates to the transaction.
- Analysis Code: Select from the list of available BI codes for each line where applicable.
- Purchase Control A/C (Mandatory): Nominate the control account from the dropdown. This control account needs to be the same default control account nominated for the Supplier (Vendor).
- Tax Code: Nominate the Tax code from the dropdown.
- Tax GL account: Nominate the Purchase Tax (VAT) account from the dropdown.
- Net Value: This is the Amount without tax. If a foreign supplier, this must be in the currency of the supplier.
- Tax Value: This is the Tax amount. If a foreign supplier, this must be in the currency of the supplier.
- Total Value (Mandatory): This is the Total amount of the invoice with Tax. If a foreign supplier, this must be in the currency of the supplier.
- Base Currency Total Value (Mandatory): This is the amount in Entity’s Base currency.
Warning
- The template will not check if the Purchase Control A/C for a particular Supplier is correct. It will import the data as it is. Make sure it is the one nominated against the supplier in the system.
- The template will not check if you have imported the correct Purchase Tax GL account. If you input another GL code, it will incorrectly raise as a journal instead.
Purchases Transaction Types Reference (PI/PN/PP/PC/PO)
Reference Types
There are three types of References in the system:
- Ref: This is the Audit Trail Reference and auto increments from 1 on all transaction types.
- Int. No: These have a different auto-incremented number depending on which type of transactions (SI, SN, BP, BC). For the SI Sales Invoice and SN Sales Credit Note, it is the invoice number.
- Ext. Ref: This is a free text alphanumerical Reference given by the user. For the PI and PN, it is the invoice number.
Purchase Invoice (PI)

If you want to create one invoice with three different lines, you need the same:
- Transaction type
- Transaction ref
- Ext ref
- Date and supplier code
Enter the Net, Tax, Total, and Base Currency values as positive values.
This will show as one Batch Invoice with three lines.
Transaction Ref is not taken into account as Int No is auto-numbered by the system. The system will create an auto-numbered Int No starting from 000001, 000002, incrementing only for Purchase Invoices.
Warning
If you re-import the file as it is, you will see an error message saying that you have already used this Ext Ref (Column C).
Purchase Debit Notes (PN)

Enter the Net, Tax, Total, and Base Currency values as negative values.
View the transaction in the Batch Invoice listing grid.
Transaction Ref is not taken into account as Int No is auto-numbered by the system. The system will create an auto-numbered Int No starting from 000001, 000002 incrementing only for Purchase Debit Notes.
Remember to allocate the PN to the PI via the Payments & Allocation screen if necessary. See Using Purchase Payments and Allocations for more details.
Purchases Payments (PP)

- Leave the following columns blank: Tax code, Tax GL Code, Net Value, and Tax Value.
- Enter the Total Value in the supplier currency with negative values.
- Enter Base Currency value with negative values.
- Enter a bank GL code in the GL code (Column F).
- The system will use the Transaction Ref as Int No.
View the double entry in the Transaction Browser.
Remember to allocate the PP to the PI via the Payments & Allocation screen. See Using Purchase Payments and Allocations for more details.
Foreign Currency Transactions
- You can only import payments for suppliers in the same currency as the currency of the bank. If your supplier is EUR, you can only import PP in a EUR bank account.
- If the supplier’s currency is different from the bank’s currency, either request Transaction data importing training or use the Bank payment import. Once your bank statement is imported, you can go to the Payments & Allocation screen to create PPs to match to PIs.
Warning
The system will not check if the Int No (Transaction Ref in template) or the Ext Ref already exists.
Purchases Credit Journal (PC)

- The system will use the Transaction Ref as Int No.
- Leave the following columns blank: Tax code, Tax GL Code, Net Value, and Tax Value.
- Enter Total and Base Currency values as positive values.
View the double entry from the Transaction Browser. See Using the Transaction Browser for more details.
Warning
The system will not check if the Int No (Transaction Ref in template) or the Ext Ref already exists.
Purchases Debit Journal (PD)

- Leave the following columns blank: Tax code, Tax GL Code, Net Value, and Tax Value.
- Enter Total and Base Currency values as negative values.
- The system will use the Transaction Ref as Int No.
View the double entry from the Transaction Browser. See Using the Transaction Browser for more details.
Warning
The system will not check if the Int No (Transaction Ref in template) or the Ext Ref already exists.
Sales Transactions Template
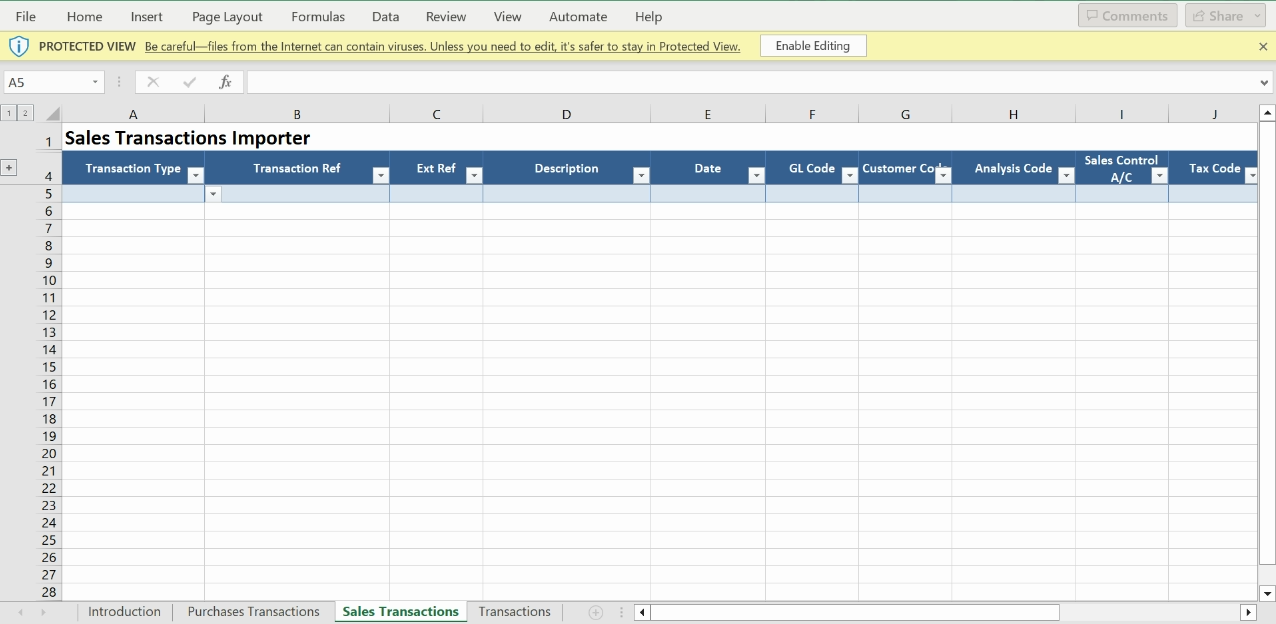
Complete the following:
-
Transaction Type (Mandatory): Nominate the transaction type (see additional notes on each below) from the dropdown:
- SI Sales Invoice
- SR Sales Receipt
- SN Sales Credit Note
- SC Sales Credit Journal
- SD Sales Debit Journal
-
Transaction Ref (Mandatory): This Ref must be numerical.
- For SI and SN, this tells the system to group the transactions into one invoice but will not appear in AIQ. It can be 1, 2, and so on. You can reuse the same Transaction Ref in the next template.
- For SR, SC, and SD, the Transaction Ref will be recognized in the entity as Int. No.
- Ext Ref (Mandatory): This is a secondary Ref provided by the user. It allows you to identify the invoice in the Sales Ledger. Note that this is NOT the Invoice no, the Invoice No is the Int No and is auto-allocated. More details are below.
- Description (Mandatory): Add a Description Line.
- Date (Mandatory): Populate with the transaction date. Dates should be in the European format dd/mm/yyyy. If the dates are in US format (mm/dd/yyyy), the checkbox option: "Interpret the dates in the uploaded CSV file as US Date Format" will be available before import.
- GL Code (Mandatory): Enter the General Ledger account. This must have the same Control Account as the Customer.
- Customer Code (Mandatory): Enter the Customer code that relates to the transaction.
- Analysis Code: Select from the list of available BI codes for each line if applicable.
- Sales Control A/C (Mandatory): Nominate the control account from the dropdown. This control account needs to be the same default control account nominated for the Customer.
- Tax Code: Nominate the Tax code from the dropdown.
- Tax GL account: Nominate the Sales Tax (VAT) account from the dropdown.
- Net Value: This is the amount without tax. For foreign customers, this must be in the currency of the customer.
- Tax Value: This is the tax amount. For foreign customers, this must be in the currency of the customer.
- Total Value (Mandatory): This is the total amount of the invoice with Tax. If the Customer is in foreign currency, then populate with the foreign currency value.
- Base Currency Total Value (Mandatory): This is the amount in Entity’s Base currency.
Warning
- If you put letters in a Transaction Ref, it will be imported as the Int No/Invoice No, however, it will not be possible to print the PDF invoice. You will see an error message: “No data”.
- If you re-import the file with the same Ext. Ref. or Transaction Ref., the system will not check if these already exist.
Sales Transaction Types Reference (SI/SN/SP/SC/SO)
Sales Invoice (SI)

If you want to create one sales invoice with several lines, you need the same:
- Transaction type
- Transaction ref
- Ext ref
- Date
- Customer code
Enter the Net, Tax, Total, and Base Currency values as positive values. This will show as one Batch Invoice with three lines.
Intercompany
If you are using an Intercompany Customer, it will send the corresponding Intercompany Purchase Invoice for acceptance to the linked receiving entity. At arrival, the PI Ext Ref will be validated as it needs to be unique in that database.
Auto-Numbering
Info
If you are planning to have an integration with the Sales Ledger, you won’t be able to have the auto-numbering off.
The system will create an auto-numbered Int No which will be the invoice number. This also applies to Sales Credit notes.
- Go to Setup > Company Details & Settings > Settings tab. See Managing Company Details & Settings for more details.
- Under Customer Numbering, untick Auto Invoice Numbering.
- Enter the desired starting number. In this example, it is set to 000001 so the next available invoice number will be 000002.
- Tick again to save the number.
- Click Save.
If SI auto-numbering is off, the Transaction Ref will become the Int. No. that represents the Sales Invoice No.

Sales Credit Notes (SN)

Enter the Net, Tax, Total, and Base Currency values as negative values. The Batch Invoice will take the next available number as set up in Company Details & Settings (see above).
Remember to allocate the SN to the SI via Receipts & Allocation if necessary. See Using Sales Receipts and Allocations for more.
Sales Receipts (SR)

- Leave the following columns blank: Tax code, Tax GL Code, Net Value, and Tax Value.
- Enter Total Value and Base Currency value with negative values.
- Enter a bank GL code in the GL code (Column F).
- The system will use the Transaction Ref as Int No.
View the double entry from the Transaction Browser. See Using the Transaction Browser.
Remember to allocate the SR to the SI via the Receipts & Allocation screen if necessary. See Using Sales Receipts and Allocations.
Foreign Currency Transactions
- In this tab, you can import receipts for customers in the same currency as the currency of the bank. If your customer is EUR, you can only import SR in a EUR bank account.
- If your customer’s currency is different from the currency of the bank, either request for TRANSACTION tab training or use the Bank payment import. Once your statement is imported, you can go to Receipts & Allocation screen to create your SRs and match them to SIs.
- You can import receipts into different banks. If applicable, please factor the relevant fx rates for transactions into the values correctly.
Warning
The system will not check if the Int No (Transaction Ref in template) or the Ext Ref already exists.
Sales Credit Journals (SC)

- The system will use the Transaction Ref as Int No.
- Leave the following columns blank: Tax code, Tax GL Code, Net Value, and Tax Value.
- Enter Total and Base Currency Total values as negative values.
View the double entry from the Transaction Browser. See Using the Transaction Browser.
Warning
The system will not check if the Int No (Transaction Ref in template) or the Ext Ref already exists.
Sales Debit Journals (SD)

- The system will use the Transaction Ref as Int No.
- Leave the following columns blank: Tax code, Tax GL Code, Net Value, and Tax Value.
- Enter Total and Base Currency Total values as positive values.
View the double entry from the Transaction Browser. See Using the Transaction Browser.
Warning
The system will not check if the Int No (Transaction Ref in template) or the Ext Ref already exists.
Transactions Template
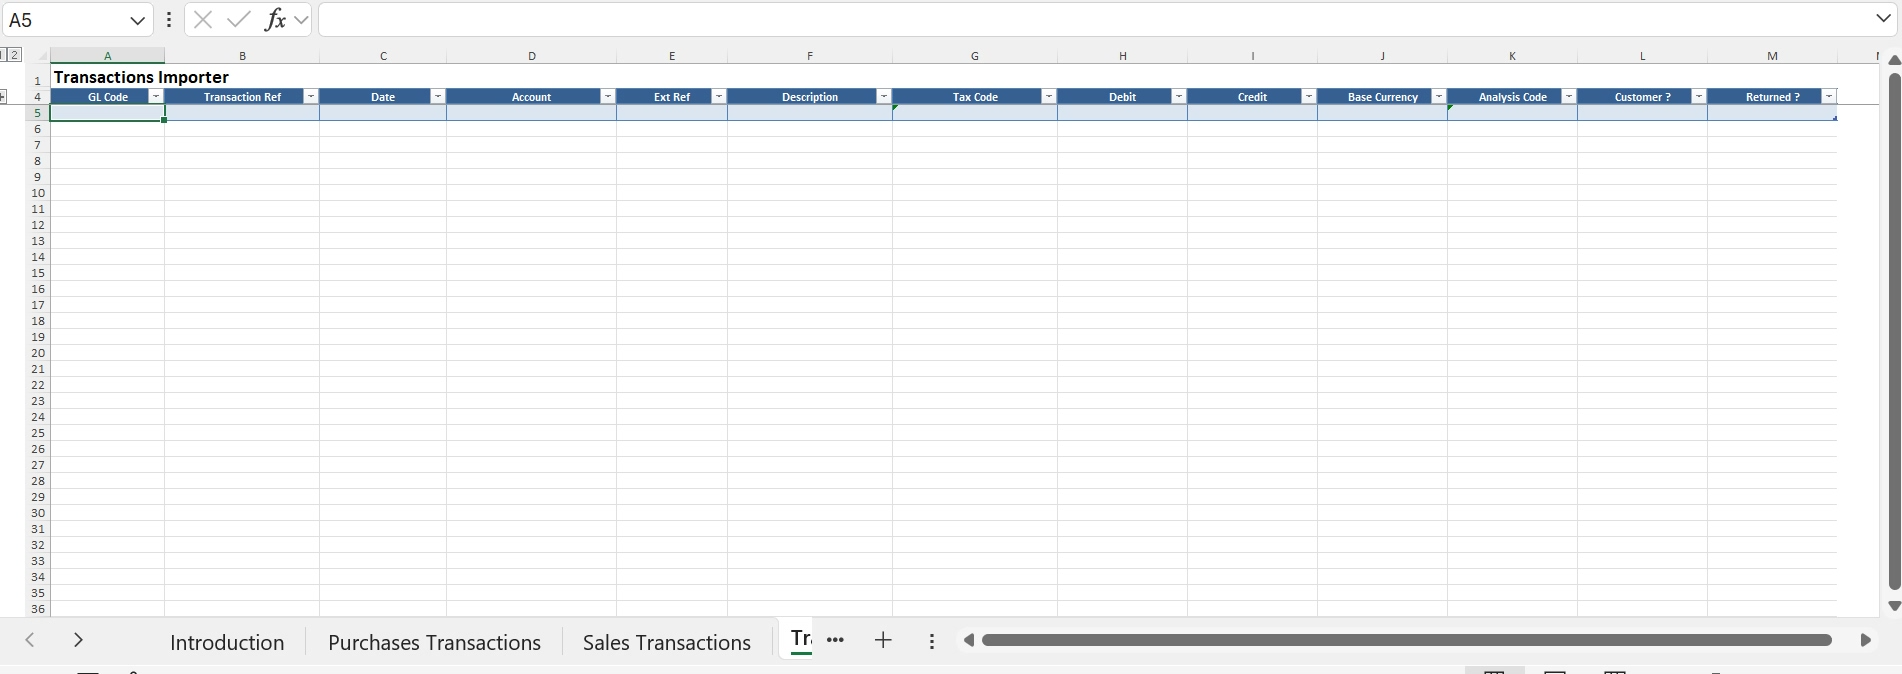
Trial Balance Importer and FX Bank Balances
After importing your trial balance using the Trial Balance and Banks Data Importer, the foreign currency bank accounts will be ready for the bank reconciliations. You can use the Transactions worksheet to create cancelling journals. One journal will remove the balance imported with the Trial Balance and the other will import the journal with both foreign and base currency values. Effectively this import will replace the journals imported at the Trial Balance stage at the FX rate 1.0 with the journal using appropriate FX rate.
 Importing the Trial Balance and Monthly Movements - AIQ Academy
To import the foreign currency bank balances, only use the Transactions worksheet.
Note the following:
- GL Code Field: Start with the GL code field. Populate all data for the debit side and then for the credit side.
- Transaction Ref: The Transaction Reference is used to group multiple lines into one transaction.
- Date: If multiple lines have the same Transaction Reference, they must have the same date.
- Account: Leave Account blank for bank balances foreign currency. It is only required if sales or purchases ledger transactions are being imported.
- Ext Ref: This is mandatory. In the case of FX bank balances journals, each credit/debit pair must have matching external references.
- Description: This is mandatory. Each debit/credit pair can have different descriptions.
- Tax Code: Do not leave Tax code field blank. Any tax code from your tax listing can be used, for example V99 or NT.
- Debit/Credit: Use a separate line for each debit and each credit. For each line, if you enter a debit value, leave the credit value blank and vice versa. All values must be positive. The total of debits must be equal to the total of credits.
- Base Currency: The Base currency field should be populated with positive values for Debits and negative values for Credits. The total in the base currency field must total to zero.
Analysis Code, Customer, and Returned are not relevant in the case of FX bank balances journals (and optional in other situations).
Import the Template
Step One: Generate the Data File
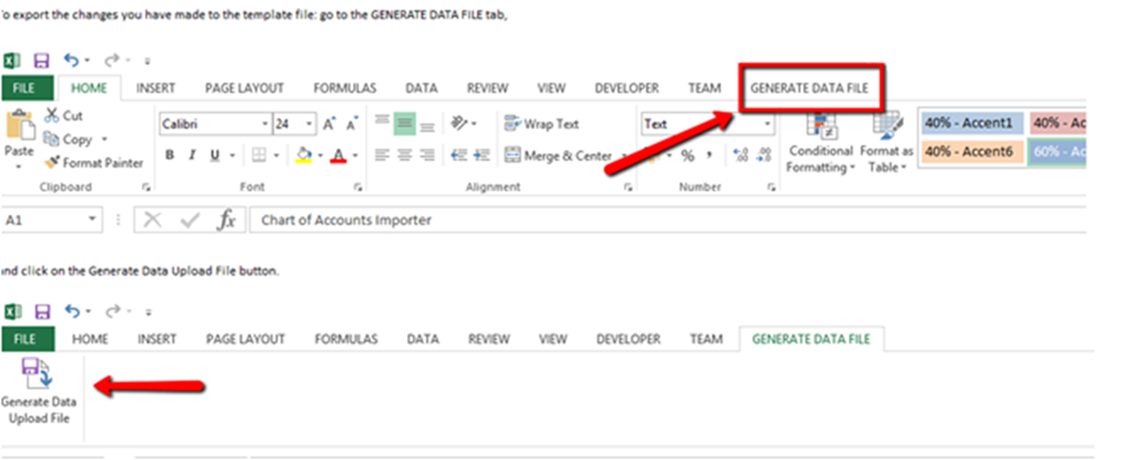
When you have completed all worksheets correctly, go to the Generate Data File tab and click Generate Data Upload File to generate the CSV file.
This is the first stage of error validation. If there are errors, correct them and click Generate Data Upload File again.
You will find the CSV file in the same location as the macro-enabled Excel file. This file will be used to import all the data you added. During upload the system will check for format and that the CSV file is in the same location as the XLS file. You will receive confirmation if this is the case.
Step Two: Import the Data File
- Go to Setup > Data Importer > Transaction Importer.

- Browse and select the CSV file you just generated.
- Click Upload Data. Do not double-click as it can bring in the information twice.
- Click Close NOT Next Step. The import file will be validated. If there are any errors, an error message will appear on screen. Make any corrections needed in the Excel file and generate another csv import file.
Transactions Import
Now that the data has been imported, it can be applied to the AIQ system.
- Go to Data Importer > Transaction Import > Transactions.
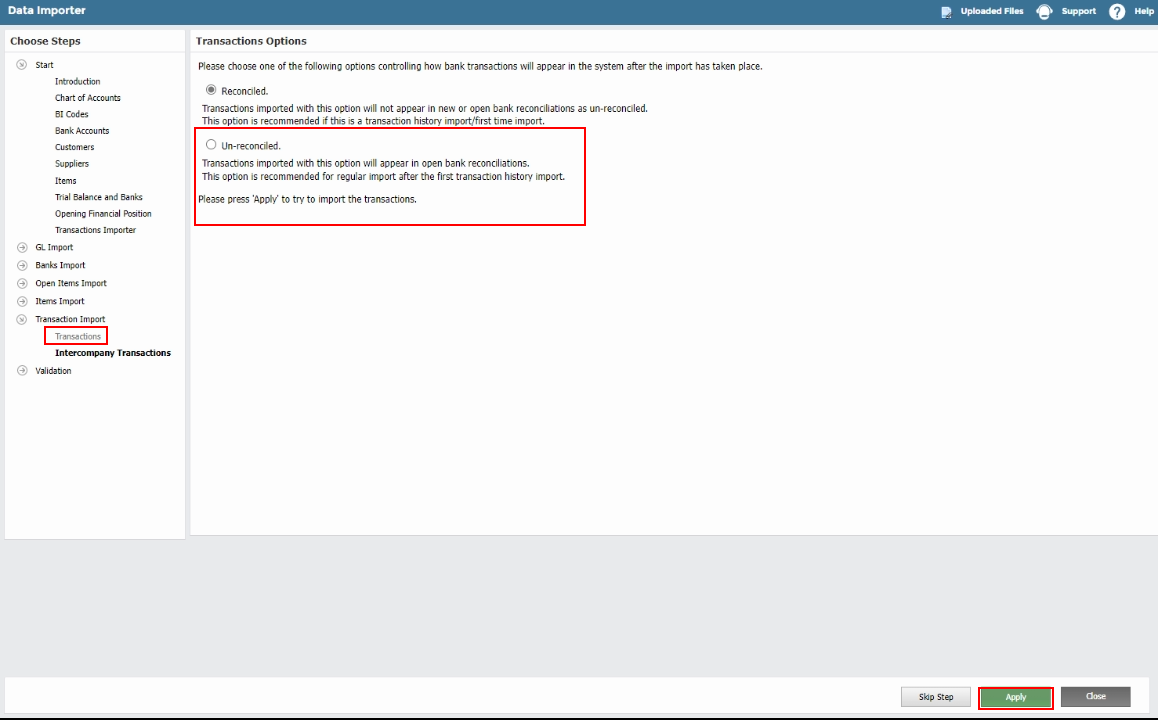
- Check “Interpret the dates in the uploaded CSV file as US Date Format” when importing these balances into the entity with the United States locale. Otherwise leave it unchecked.
- If errors are found, they will appear on screen. Correct them in the original Excel file, generate another csv file and import again.
- If no errors were found in the imported file in the previous step, either select:
- Reconciled if you want to import your transactions as reconciled, so they will not appear in the bank reconciliation screen. You can use this if you are importing historical data that has already been previously reconciled. This must be selected for Bank Balances Foreign Currency Imports as it will ensure that the imported journals do not appear in the bank reconciliation screen.
- Otherwise, click Un-reconciled. This is particularly relevant if the GL code includes a bank GL (For PP Purchase Payments or SR Sales Receipts).
- Click Apply. Please note use only one click not double click on this step. The process can take several minutes to complete.
Warning
If you have a connection timeout after you click Apply, once your connection is back do not click again. This will import your transactions twice.
Check for Errors
Check for errors before processing further transactions.
- In GL > Transaction Browser, you will see the double entry with all headings correct.
- Go to Bank > Bank Reconciliation. If you clicked import as un-reconciled, check that your SR or PP appears correctly in bank reconciliation. If you click reconciled, check that they do not appear.
- Go to GL > VAT Return Listing. Under the Sales and Purchases tabs, check that your SI/SN and PI/PN appear in the VAT Management screens.
Correct error as follows:
- If there are minor errors, refer to the transaction browser and Amending Transactions. Edit one or more transactions by going to GL > Transaction Browser and selecting the transaction ref.
- If there are multiple errors, we suggest importing reversal invoices or journals to net off the initial import and re-import with correct data.


