Warning! Entities with existing Transaction Data
Only proceed with importing data if you have selected the correct template and all the data included is accurate. Otherwise, you risk deleting existing data, including transactions. Retrieving deleted transaction data requires the paid service of our data team.
We strongly recommend contacting your account manager to review the implications of the data import and discuss any queries you may have.
Introduction
The Data Importer lets you populate predefined Excel templates and import them into AccountsIQ. It can clear data or import or add to existing system data. The Import Templates are available in Office 97-2003 and Office 2007 formats.
The Data Importer can import:
- Static information such as Chart of Accounts, VAT (Tax) Codes, and Dimension Tags.
- Existing Supplier (Vendor) or Customer records for company setup, including codes, names, addresses, contacts, and bank details.
- Transactional information such as invoices or payroll journals.
Info
If you wish to use this tool, please contact your local support team. If you have not used this before you will have to undergo training and assistance to ensure you have the knowledge and skills to use the tool effectively.
Any user can have access to the data importer if their user profile is set with that permission. For more on user permissions, see Managing Group and Entity Users. User role then determines the range of available imports. Admin users have access to the full suite, while Users only have access to a subset.
The Data importer lets you import suppliers. You can choose from two different options:
- Import Supplier Accounts: The import supplier accounts option is only used during onboarding because it overwrites all existing supplier data, including transactions.
- Add to Supplier Accounts: This adds additional suppliers to the existing records, keeping all data.
Guidelines for successful importing
Check database setup
Before importing data, ensure that the client database has been created correctly using the company setup wizard and that the correct currencies, financial year, and client locale were selected. Verify this in the main system in advance of importing data.
Use separate templates for each company.
You must download the Import Templates from each company individually. We do not recommend importing data using a template from a different company as this company may have a different setup.
Use newly downloaded templates each time
Use a newly downloaded template each time as it will contain any changes made in the system, for example, updates to the General Ledger codes, Supplier defaults, or Customer information. Make sure you download the Import Templates from the correct database.
See:
 26.1 - Getting Started with Data Importers


 Chart of Accounts Data Importer

 Trial Balance and Banks Importer


Downloading the Templates
When completing a worksheet, always read the instructions provided.
- Go to Setup > Data Importer > Start > Suppliers.

- Click Next for either:
- Import Supplier Accounts: This completely replaces the existing suppliers, deleting all existing data. Either choose a blank template for first imports or a prepopulated templates to view and check existing supplier data.
-
Add to Supplier Accounts: This adds additional suppliers to the existing records, keeping all data.

- Click Download File and save the file as a Microsoft Excel Macro-enabled file (.xlsm format).

- Open the file. If Macros are not enabled, click Enable Content.

- Fill in the required template, following the Guidelines for Data Entry (see below). For details on each worksheet, see the relevant Suppliers template section in this article:
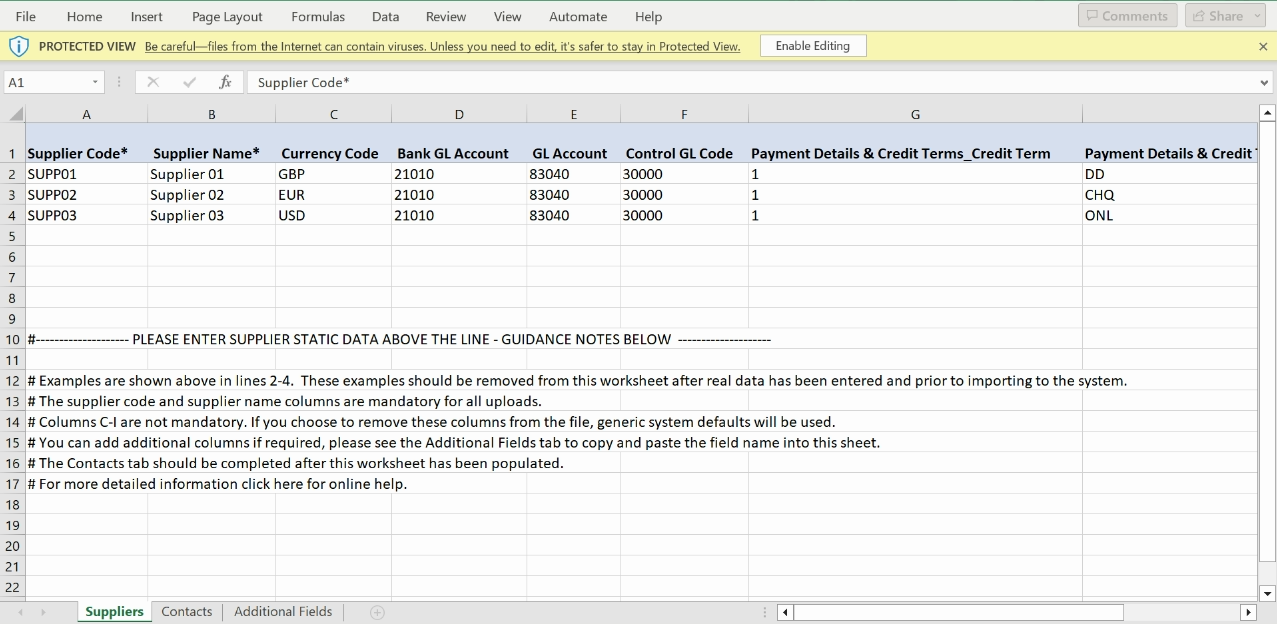
- Suppliers: Only the Suppliers worksheet is mandatory. Mandatory fields are marked with an asterisk (*) on the column header. Leave other fields blank to use the supplier default or populate with required data.
- Contacts: Use this to import contacts to new or existing suppliers.
- Additional Fields: All other field headings are listed in the Additional Fields worksheet. Copy and paste any fields that you want to import to the Suppliers worksheet.
- Save the file.
Guidelines for Data Entry
Follow these guidelines before you import the data. The data must be prepared appropriately before attempting to import.
General:
- The import tool cannot accept data prepared from any other workbook format. It must be downloaded from the Setup > Data Importer.
- Download the template from the entity that you want to import data into.
- Complete each field according to any requirements provided in the worksheet.
- Do not change column headings or worksheet names.
- Do not delete any columns in the existing worksheets.
- Do not leave any mandatory columns or rows blank.
- Where there are dropdowns, always select an option.
Formatting non-numerical data:
- Do not use special characters (e.g., apostrophes, ampersands, accents, etc.).
- Save non-numerical data according to the requirements example, for example, save dates using the date format.
- Ensure that dates are valid.
Formatting numerical data:
- Use the ‘Paste Values’ option when pasting data into the template. This will eliminate any formulas used to calculate those values.
- For negative financial figures, use a minus sign.
- Values must be two decimals. Round the values to two decimals before pasting them into the template (use the =ROUND () Excel formula).
- Ensure that there are no totals added to the bottom of any worksheet.
- Ensure that the financial information is accurate.
Suppliers Template
Info
If you would like to use the intercompany module, you must add intercompany suppliers in this worksheet.
Fields marked with an asterisk (*) on the column header are mandatory.
All other fields can be completed or left blank.
- To complete them, check the codes and the codes maintenance screen or the chart of accounts listing.
- If you leave them blank, the supplier system defaults will be used. However, we do not recommend this approach in all fields unless all your suppliers have the same settings and terms. If you do opt for this approach, first ensure that all defaults have been set up correctly in the entity.
|
Field Names |
Data Type (Length) |
Mandatory |
Example Text |
Notes |
|---|---|---|---|---|
| Supplier Code | Text (50) |
Y | Do not use spaces or special characters apart from a dash. | |
| Supplier Name | Text (50) | Y | The supplier name must not exceed 50 characters. | |
| Currency Code | Enter Code | N |
Leave blank to use supplier default | |
| Bank GL Account | Enter GL Code | N |
Leave blank to use supplier default | |
| GL Account | Enter GL Code | |||
| Control GL Code | Enter GL Code | supplier default | Leave blank to use supplier default, or enter GL code | |
| Payment Details & Credit Terms_Credit Term | Enter Code | supplier default | Leave blank to use supplier default or check code from Setup>Codes Maintenance | |
| Payment Details & Credit Terms_Payment Method | Enter Code | If you would like to use bulk payments, you must complete the supplier payment method. These can be found in Codes Maintenance. | ||
| Tax Settings_Use Tax Code | Yes/No | Yes |
Contacts Template
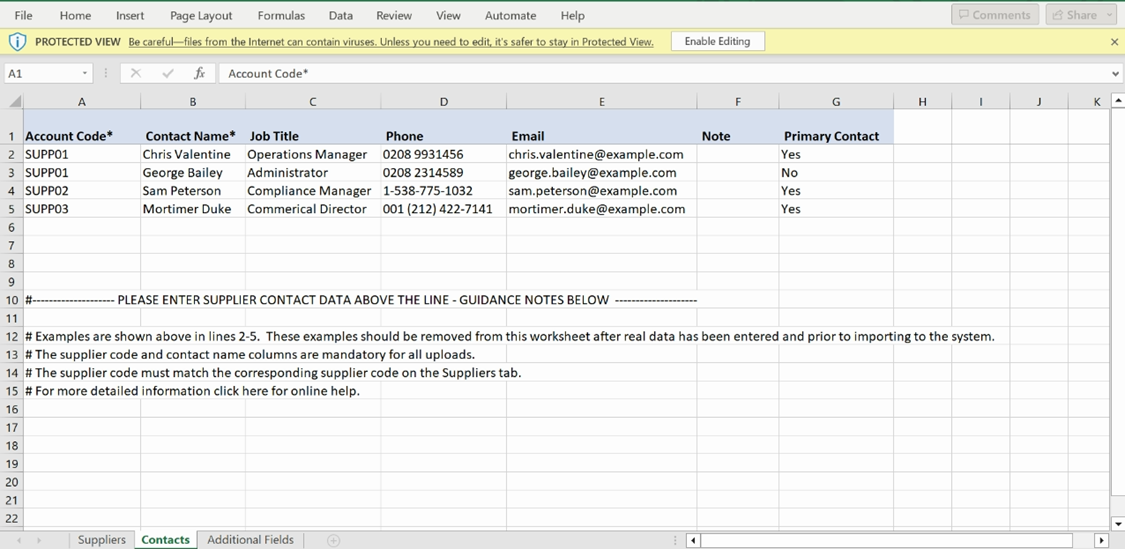
This worksheet is optional. The contacts added here will appear on supplier invoices only. Use this worksheet to store the names of individuals or specific departments, not companies. Like the Suppliers worksheet, the sample data should be deleted after completion.
- Account Code, Contact Name: If you do add contacts, the supplier codes and contact name are mandatory. The supplier code must match the corresponding supplier code in the Suppliers worksheet.
- Other Details: Complete the job title, phone, e-mail, notes, and primary contact as fits your needs, referring to the examples given. Note that only one contact per supplier can be primary.
Additional Fields Template
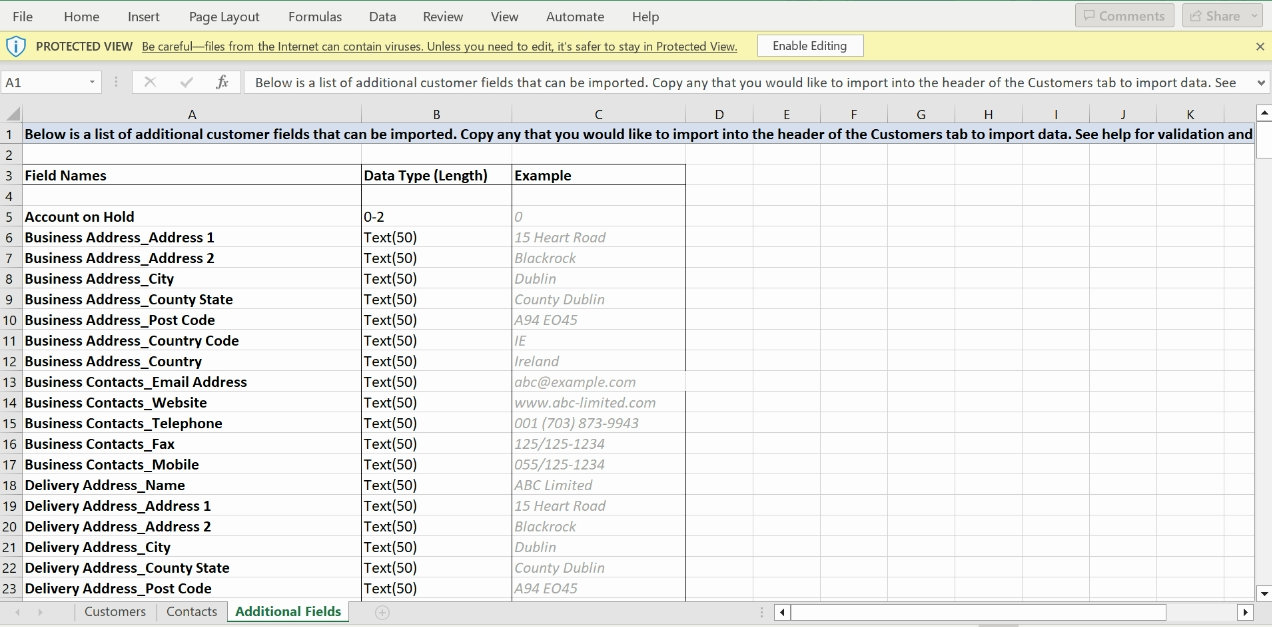
The additional fields worksheet lets you add further fields to the supplier worksheets. It contains a list of heading options that you can copy and paste into the Suppliers worksheet. All of these are optional, but we recommend adding the supplier bank details as they will be required in bulk payments.
For your reference, the worksheet contains sample data of each of the headings in the required format.
|
Field Names |
Data Type (Length) |
Mandatory |
Example Text |
Notes |
|---|---|---|---|---|
| Account on Hold | 0-2 | 0 | 0 for not on hold; 1 for deliveries on hold; 2 for orders and deliveries on hold | |
| Business Address_Address 1 | Text (50) | 15 Heart Road | ||
| Business Address_Address 2 | Text (50) | Blackrock | ||
| Business Address_City | Text (50) | Dublin | ||
| Business Address_County State | Text (50) | County Dublin | ||
| Business Address_Post Code | Text (50) | A94 EO45 | ||
| Business Address_Country Code | Text (50) | IE | short (2 letter country code) | |
| Business Address_Country | Text (50) | Ireland | ||
| Business Contacts_Email Address | Text (50) | abc@limited.ie | separate different email addresses with semi colon or comma | |
| Business Contacts_Website | Text (50) | www.abc-limited.com | ||
| Business Contacts_Telephone | Text (50) | 125/125-1234 | enter ' to include the leading 0 | |
| Business Contacts_Fax | Text (50) | 125/125-1234 | enter ' to include the leading 0 | |
| Business Contacts_Mobile | Text (50) | 055/125-1234 | enter ' to include the leading 0 | |
| Delivery Address_Name | Text (50) | ABC Limited | ||
| Delivery Address_Address 1 | Text (50) | 15 Heart Road | ||
| Delivery Address_Address 2 | Text (50) | Blackrock | ||
| Delivery Address_City | Text (50) | Dublin | ||
| Delivery Address_County State | Text (50) | County Dublin | ||
| Delivery Address_Post Code | Text (50) | A94 EO45 | ||
| Delivery Address_Country | Text (50) | Ireland | ||
| Delivery Settings_Ship Via | Enter Code | check code from Setup>Codes Maintenance | ||
| Delivery Settings_Priority | Enter Code | check code from Setup>Codes Maintenance | ||
| Account Dimensions_Area | Enter Code | check code from Setup>Codes Maintenance | ||
| Account Dimensions_Account Group | Enter Code | check code from Setup>Codes Maintenance>GL Groups | ||
| Account Dimensions_Dimension Tag | Enter Code | check code from Setup > Dimension Tags | ||
| Purchase Ordering_Order Required | Yes/No | Yes | ||
| Bank Details_Bank Account No | Text (50) | 12345678 | enter the bank account number, do not include spaces or delimiters such as "-" | |
| Bank Details_IBAN | Text (50) | IE91BOFI900017999999 | ||
| Bank Details_Bank Sort | Text (50) | 123456 | enter the bank account sort code, do not include spaces or delimiters such as "-" | |
| Bank Details_Bank Swift Code | Text (50) | IRCEIE2DEPA | ||
| Default Approver | Approver email | abc@limited.ie | If you use the new WFA, leave this blank and add them manually. | |
| Exclude from Approval | Yes/No | Yes | ||
| Payment Details & Credit Terms_Credit Limit | Enter Code | check code from Setup>Codes Maintenance | ||
| Pricing & Discount Settings_Discount | 0-1 | 0.5 | enter the percentage discount as a decimal e.g., for 10%, enter 0.10 | |
| Pricing & Discount Settings_Is Franchisee | Yes/No | Yes | ||
| Tax Settings_Use Tax Code | Yes/No | Yes | ||
| Tax Settings_VAT No | Text (50) | 123456 | ||
| Tax Settings_VAT Exempt Ref | Text (50) | VATEX | ||
| Tax Settings_Contractor Tax Code | Enter Code |
Import Template
Info: Group Companies
Create individual templates for each subsidiary that you want to import into. Do not import Suppliers into the Group Consolidation Entity.
Step One: Import the Data File
- Go to Setup > Data Importer > Start > Suppliers.
- Click Next for the relevant option.
- Click Browse to find your saved template.

- Click Import.
Step Two: Validation
The import file will be validated.
- If there are any errors, an error message will appear, along with an error file. Download this file. It includes a new sheet, Import Errors, and a copy of the import file. This shows a summary of all errors found during validation, together with a link to the fields causing the error and the actual error message.
- Click on each link to see details of the error, cells causing the error will be highlighted in red with a note showing further details (hover over the highlighted cell to see the detailed message).
- Correct all errors and re-import the file as described in step two above. You can make corrections directly in the error file.
When all errors are corrected, confirm the following:
Import Supplier Accounts Template:
The system will give you a final warning that all data is about to be deleted. This means all data will be permanently deleted, you should only proceed with this option if you are happy to delete all the following:
- Orders
- Deliveries
- Invoices and Attachments
- Payments and Allocations
- Purchase Journals
- Payments
Next you will be asked to enter your login details or, if you use SSO, follow the process outlined here:
- Click Verify Identity.

- Enter the OTP that was sent to your email.

- Click Continue to confirm the import.

Add Supplier Accounts Template:
No data is deleted when using the Add Supplier Accounts option. If you include any existing data in the template, the template will not be imported, and duplicated accounts will be highlighted in the error file.
Step Three: Check the Imported Data in the system.
You will receive a confirmation message if the import is successful.
Check that the suppliers are correct by downloading a prepopulated template. If you only need to make a few changes, this can be done manually in the system. If you have more changes to make, perform another import using the import supplier account option again. Remember, if any supplier has no associated transactions, it can still be deleted at this stage.
FAQs
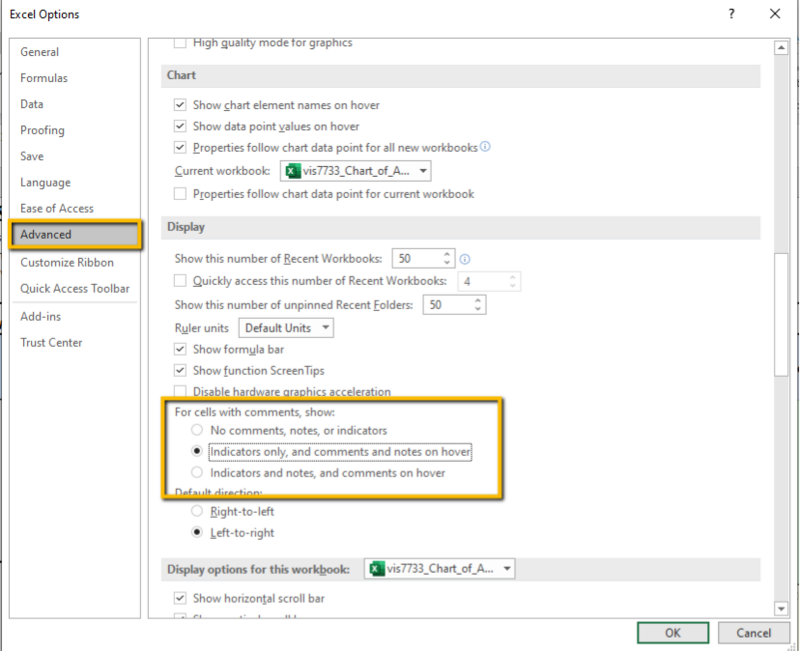
I can't see the notes in the error file.
You can control the appearance of notes in Excel:
- Go to File > Options > Advanced.
- Scroll down to the display settings. We recommend you select the "Indicators only, and comments and notes on hover" option. This lets you see detailed notes on errors when you hover over highlighted cells.