
Warning! Entities with existing Transaction Data
Only proceed with importing data if you have selected the correct template and all the data included is accurate. Otherwise, you risk deleting existing data, including transactions. Retrieving deleted transaction data requires the paid service of our data team.
We strongly recommend contacting your account manager to review the implications of the data import and discuss any queries you may have.
Introduction
The Data Importer lets you populate predefined Excel templates and import them into AccountsIQ. It can clear data or import or add to existing system data. The Import Templates are available in Office 97-2003 and Office 2007 formats.
The Data Importer can import:
- Static information such as Chart of Accounts, VAT (Tax) Codes, and Dimension Tags.
- Existing Supplier (Vendor) or Customer records when setting up a company in the system, including codes, names, addresses, contacts, and bank details.
- Transactional information such as invoices or payroll journals.
Info
If you wish to use this tool, please contact your local support team. If you have not used this before you will have to undergo training and assistance to ensure you have the knowledge and skills to use the tool effectively.
Any user can have access to the data importer if their user profile is set with that permission. For more on user permissions, see Managing Group and Entity Users. User role then determines the range of available imports. Admin users have access to the full suite, while Users only have access to a subset.
- Unreconciled Bank Transactions: This allows you to import all unreconciled bank transactions.
- Customer Open Items: This allows you to import open transactions.
- Supplier Open Items: This allows you to import open transactions.
- Opening Stock Position
Info
Note, we highly recommend that the Trial Balance is imported prior to the opening financial position template to avoid differences between the control account in the General ledger, and the purchases and sales ledgers. See Trial Balance and Banks Data Importer for more details.
Note that the bank, customer, and supplier accounts must exist in the system before you can use the Opening Financial Position Data Import. See Bank Accounts Data Importer , Customers Data Importer , and Suppliers Data Importer for more details.
Guidelines for successful importing
Check database setup
Use separate templates for each company
You must download the Import Templates from each company individually. It is not recommended to import data using a template from a different company as this company may have a different setup.
Use newly downloaded templates each time
Use a newly downloaded template each time as it will contain any changes made in the system, for example, updates to the General Ledger codes, Supplier defaults, or Customer information. Make sure you download the Import Templates from the correct database.
See:
 Getting Started with Data Importers - AIQ Academy
 Importing Opening Financial Position Data - AIQ Academy


 Trial Balance and Banks Importer


Downloading the Template
Step One: Download the template
Make sure to read the information provided at the top of each worksheet/column. It provides supplementary information on how to complete the data.
- Go to Setup > Data Importer > Start > Opening Financial Position.

- Click the download link and save the file as a Microsoft Excel Macro-enabled file (.xlsm format).

- If Macros are not enabled, click Enable Content.

- Fill in the required fields, following the Guidelines for Data Entry, below. It is not mandatory to complete all worksheets. See the sections below relating to each of these for guidance:
- Unreconciled Bank Transactions lets you import all unreconciled bank transactions.
- Supplier (AP) Open items and Customer (AR) Open items let you import outstanding balances or detailed open transactions.
- Save the file in a trusted location.
How to set up a trusted location for the AIQ template
- Open an Excel document
- Click File > Options > Trust Center.
- Click Trust Center Settings…
- Select Trusted Locations.
- Click on Add new location…
- Browse to a location on your C Drive, for example the Downloads folder, and open the template from there. (Do not use a shared drive or OneDrive or SharePoint as it will not work)
- Click OK.
- Proceed with the process to generate the csv file. (Open future templates from this location and generate the csv file from the same location).
Step Two: Generate the CSV Data File
When you have completed all worksheets correctly, go to the Generate Data File tab and click Generate Data Upload File to generate the CSV file.
This is the first stage of error validation. If there are errors, correct them and click Generate Data Upload File again.
You will find the CSV file in the same location as the macro-enabled Excel file. This file will be used to import all the data you added.

Guidelines for Data Entry
Follow these guidelines before you import the data. The data must be prepared appropriately before attempting to import.
General:
- The import tool cannot accept data prepared from any other workbook format. It must be downloaded from the Setup > Data Importer.
- Download the template from the entity that you want to import data into.
- Complete each field according to any requirements provided in the worksheet.
- Do not change column headings or worksheet names.
- Do not add or delete any columns in the existing worksheets.
- Do not leave any mandatory columns or rows blank.
- Where there are dropdowns, select data from the list.
Formatting non-numerical data:
- Do not use special characters (e.g., apostrophes, ampersands, accents, etc.).
- Save non-numerical data according to the requirements example, for example, save dates using the date format.
- Ensure that dates are valid.
Formatting numerical data:
- Use the ‘Paste Values’ option when pasting data into the template. This will eliminate any formulas used to calculate those values.
- For negative financial figures, use a minus sign.
- Values must be two decimals. Round the values to two decimals before pasting them into the template (use the =ROUND () Excel formula).
- Ensure that there are no totals added to the bottom of any worksheet.
- Ensure that the financial information is accurate.
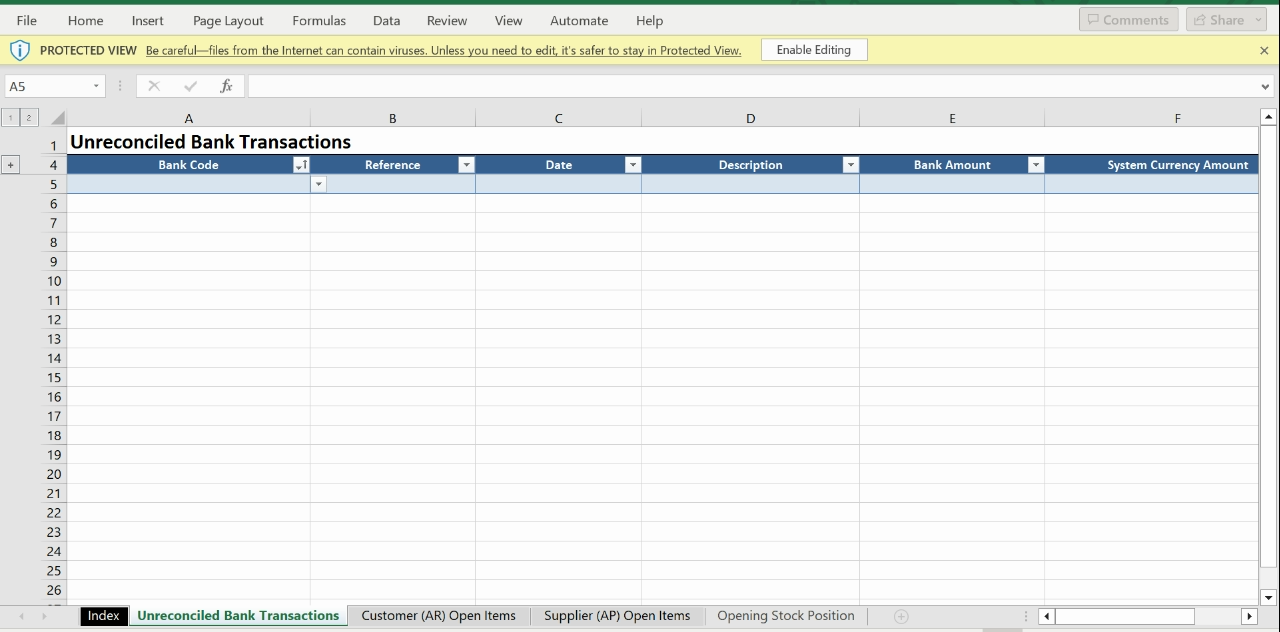
Unreconciled Bank Transactions Template
The Bank Unreconciled Transactions allows you to import all unreconciled Bank transactions. These can be imported into a suspense account that will not affect the balance on the bank account itself (as this will already be included in the Trial Balance figure).
You can also select another GL account (for example an opening balance account) which will affect the balance on the GL account.
Complete the following:
- Bank Code (Mandatory): From the dropdown, select the GL bank account.
- Reference (Mandatory): Enter the transaction reference. This will appear in the bank reconciliation screen and cannot be blank. The reference will usually be a receipt or payment reference number.
- Date (Mandatory): Populate with the transaction date. This must be before the go-live date.
- Description (Mandatory): Populate with a transaction description. This assists with bank reconciliation.
- Bank Amount (Mandatory): Enter the transaction amount in the bank account currency. Enter payments as negative values and receipts as positive values.
- System Currency Amount (Mandatory): Enter the value of the transaction in base currency.
- GL Code: The GL code field is not mandatory. We recommend leaving it blank to avoid affecting the bank GL balance in the general ledger. The system will use the import suspense account for the contra that performs the triangulation.
Customer (AR) Open Items Template
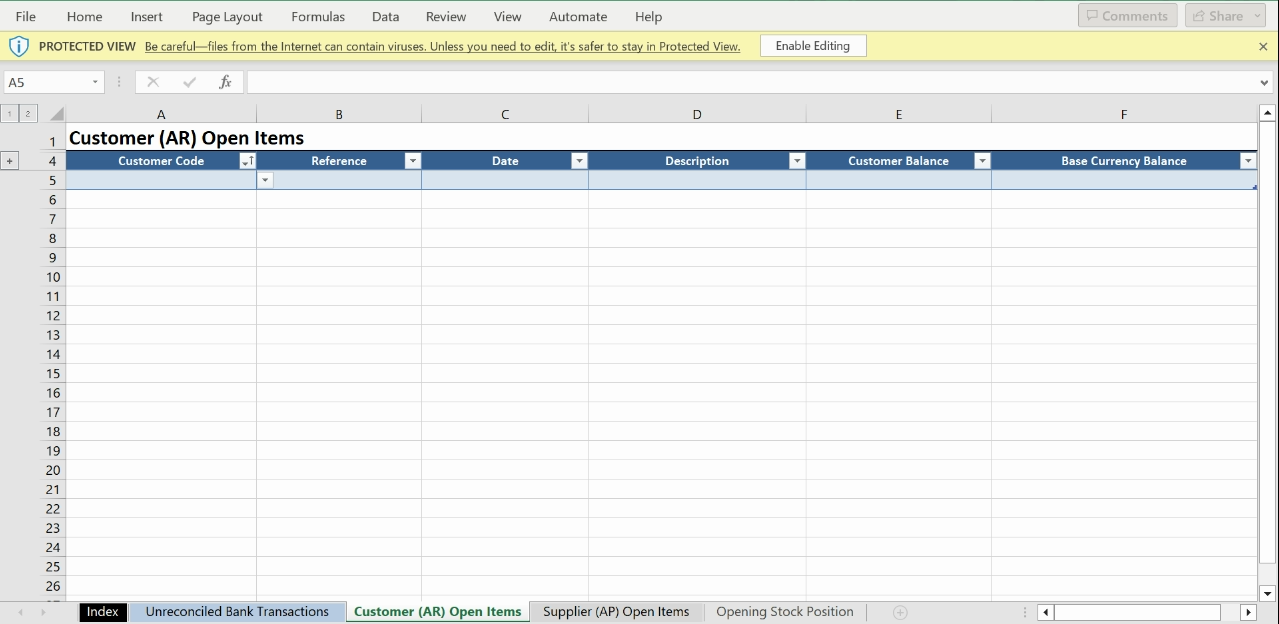
All fields are mandatory and there must be no blank values. Complete the following:
- Customer Code (Mandatory): Nominate the Customer Account from the dropdown.
- Reference (Mandatory): Populate with the transaction reference. The reference will appear in the customer ledger. This will be an invoice number, credit note, or payment reference. If you are only bringing in open balances, use a reference to recognise this.
- Date (Mandatory): Populate with the transaction date. This could be the original date or the date of the opening trial balance. This must be before the go-live date.
- Description (Mandatory): Populate with the transaction description.
Next, enter the financial figures. All values must be rounded to two decimal places (run the ROUND formula to check) and there must be no rows with zero values.
- Customer Balance (Mandatory): Enter the invoice/payment amount in the customer account currency. Outstanding invoices should be positive. Credit notes or outstanding payments should have negative values.
- Base Currency Balance (Mandatory): Enter the invoice or payment amount in entity base currency.
For base currency customers, both amounts will be the same. For foreign currency customers, the amount will differ. Corresponding Customer and Base Currency Balances must have the same signs.
Info: Relationship with Trial Balance
The total for Base Currency balance column should equal the Customer Control Account as of the date of the trial balance.
Supplier (AP) Open Items Template

All fields are mandatory and there must be no blank values. Complete the following:
- Supplier Code (Mandatory): Nominate the Supplier Account from the dropdown.
- Reference (Mandatory): Populate with the transaction reference. The reference will appear in the supplier ledger. This will be an invoice number, credit note, or payment reference. If you are only bringing in open balances, use a reference to recognise this.
- Date (Mandatory): Populate with the transaction date. This could be the original date or the date of the opening trial balance. This must be before the go-live date.
- Description (Mandatory): Populate with the transaction description.
Next, enter the financial figures. All values must be rounded to two decimal places (run the ROUND formula to check) and there must be no rows with zero values.
- Supplier Balance (Mandatory): Enter the invoice or payment amount in the customer account currency. Outstanding invoices should be negative. Credit notes or outstanding payments should have positive values.
- Base Currency Balance (Mandatory): Enter the invoice or payment amount in entity base currency.
For base currency suppliers, both amounts will be the same. For foreign currency suppliers, the amount will differ. Corresponding Supplier and Base Currency Balances must have the same signs.
Info: Relationship with Trial Balance
The total for Base Currency balance column should equal the Supplier Control Account as of the date of the trial balance.
Opening Stock Position Template
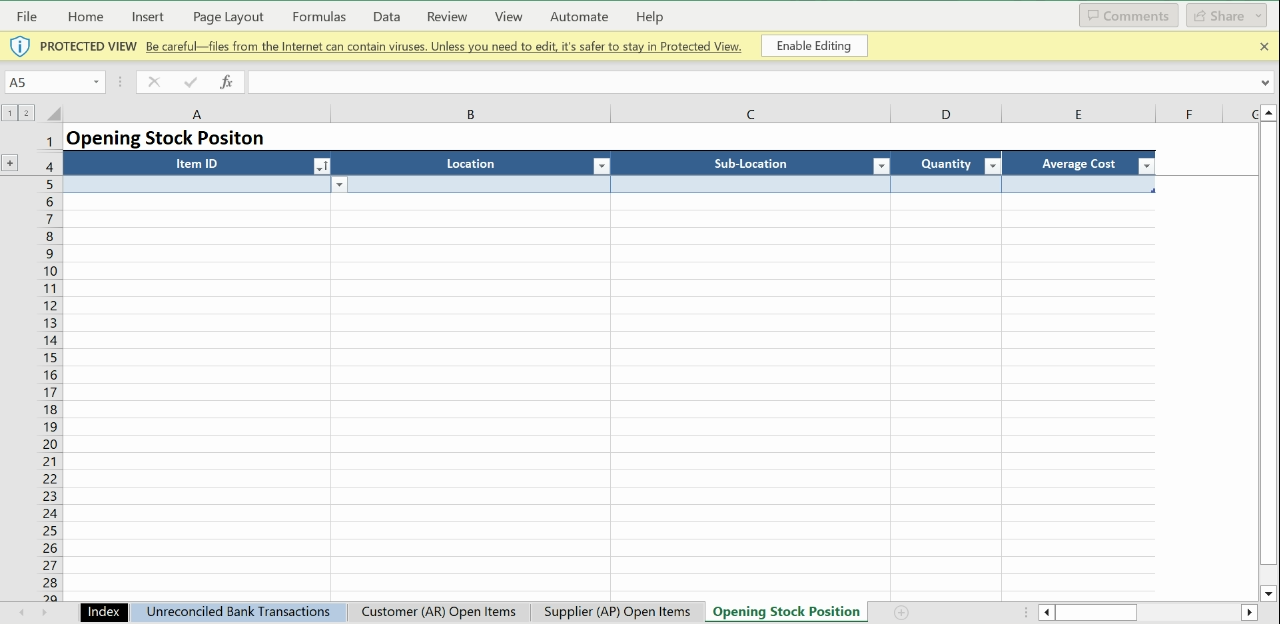
Complete the following:
- Item ID (Mandatory): Nominate the Stock Item from the dropdown.
- Location: Nominate the location of the item from the dropdown. You can nominate a stock item on two rows if the location ID is different.
- Sub-Location: Nominate the sub-location of the item from the dropdown.
- Quantity: Enter the quantity of the stock item that is available at that location. This will represent the quantity on-hand in the system.
- Average Cost
Import the Template
Info: Group Companies
Create individual templates for each subsidiary you want to import into. Do not import Opening Financial Position into the Group Consolidation Entity.
Import the Data File
Warning: During Import, log out all other users
Before you begin the upload and import process, ensure that all other users are logged out. If another user enters transactions during import, this could cause an accidental merge of transactions.
In addition, go to Manage Financial Year and check that the purchase and sales ledgers are open in the month prior to going live.
- Go to Setup > Data Importer > Start > Opening Financial Position.
- Click Browse to find your saved CSV template.

- Click Upload Data. If the file could not be uploaded, you will receive an error message. Make corrections in the original Excel file, generate a csv file again and upload it as before.
Import Unreconciled Bank Items, Customer Open Items, and Supplier Open Items
Once you have imported the completed data file, you are ready to apply the data to the system via the Banks Import and Open Items Import. If you log out and log back in again to continue the import, you do not have to upload the import file again as it is retained in the importer.
When a step is successful you will be prompted to move to the next step. You can skip any step by clicking Skip Step. Steps are colour-coded according to their status:
- Green: Step completed.
- Red: Step not completed.
- Greyed out: Step unavailable for selection because the data is not included in the Import Template.
Unreconciled Bank Items
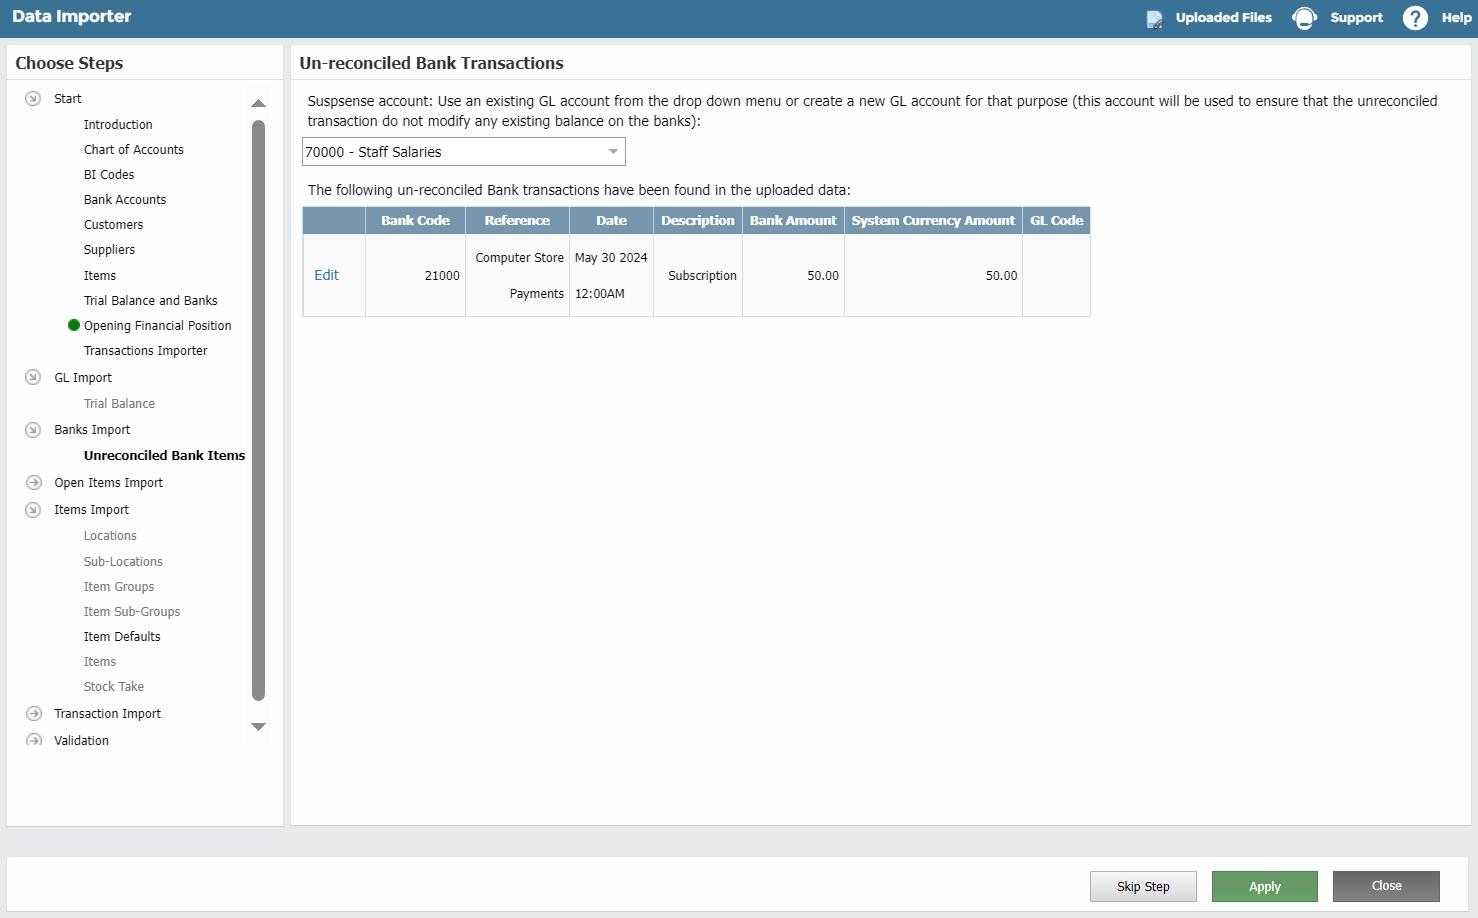
- Go to Setup > Data Importer > Banks Import > Unreconciled Bank Items.
- Unreconciled items you want to import appear on the screen. If an error occurs with the data, an error message will appear on the screen.
- You can click Edit to make changes.
- If any errors cannot be corrected on screen, you must first go to Validation > Clean Up and click on Clean Up. This will remove any unneeded temporary data, avoiding the risk of duplicating data from a previous import into a subsequent one. Then correct in the original Excel template, generate the CSV file again and follow the upload and import steps again. Repeat until the import passes validation.
- To ensure that no bank balances are affected in the system, keep 9999IMP as the importing suspense account.
- To import, click Apply. If successful, you will receive confirmation.
Customer Open Items
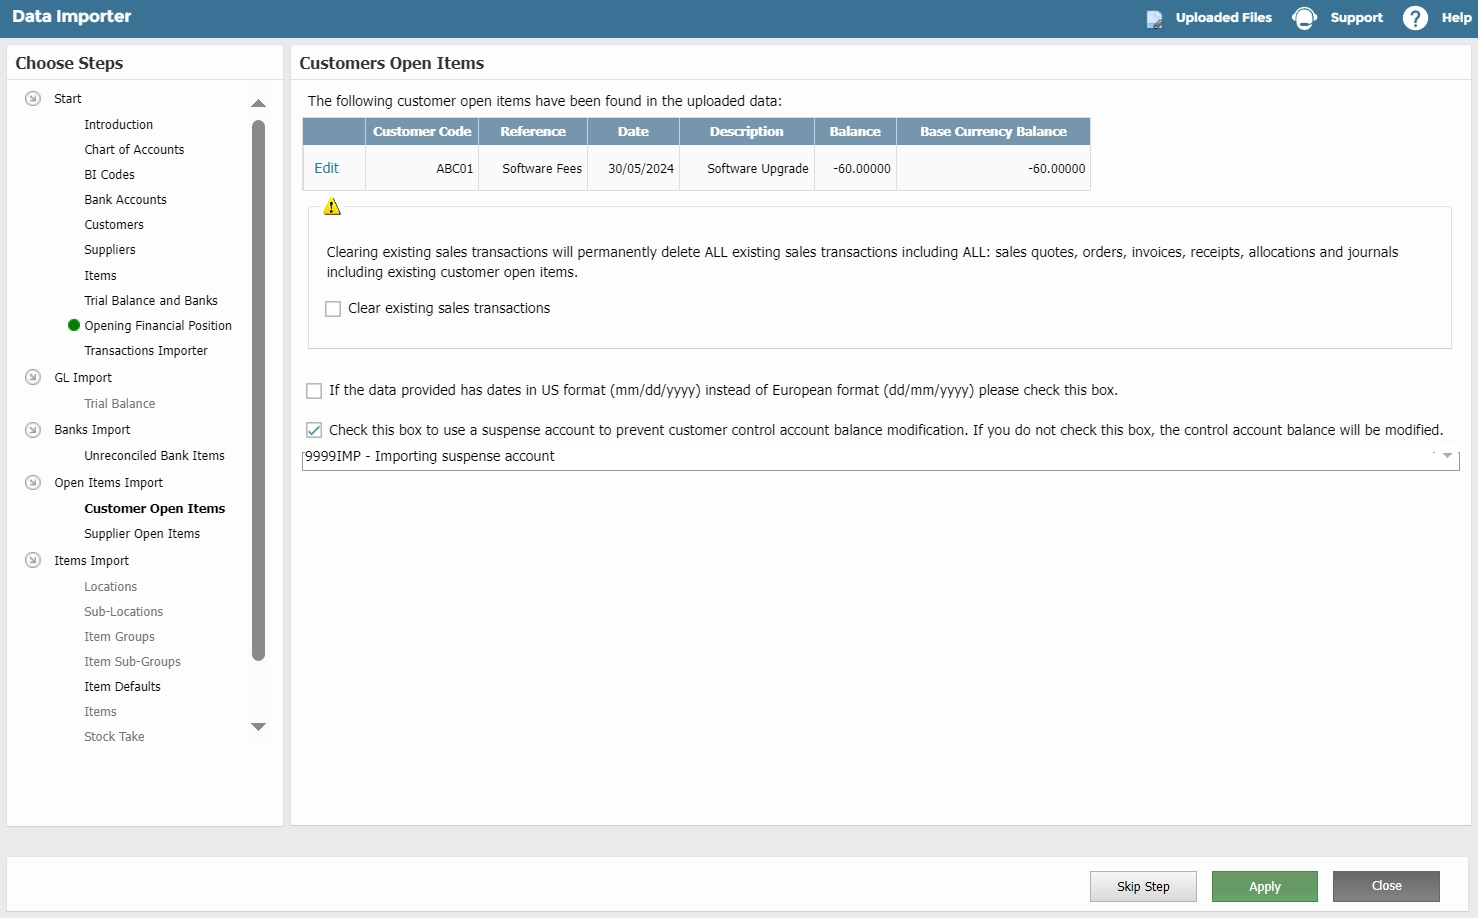
- Go to Setup > Data Importer > Open Items Import > Customer Open Items.
- Customer Open Items you want to import appear on the screen. If an error occurs with the data, an error message will appear on the screen.
- You can click Edit to make changes.
- If any errors cannot be corrected on screen, you must first go to Validation > Clean Up and click on Clean Up. This will remove any unneeded temporary data, avoiding the risk of duplicating data from a previous import into a subsequent one. Then correct in the original Excel template, generate the CSV file again and follow the upload and import steps again. Repeat until the import passes validation.
- If you want to clear existing customer open items, check Clear existing customer open items. If you do not check this, the importer will add to the existing open items.
- If the data provided has dates in US format instead of European format, check Data Format to change to European format.
- Suspense account is checked by default. To prevent control account modification, all opening items are posted to a Suspense Account whose code will appear on the screen. To change the balance to post to a Control Account, uncheck.
- To import, click Apply. If successful, you will receive confirmation.
Supplier Open Items

- Go to Setup > Data Importer > Open Items Import > Supplier Open Items.
- Supplier Open Items you want to import appear on the screen. If an error occurs with the data, an error message will appear on the screen.
- You can click Edit to make changes.
- If any errors cannot be corrected on screen, you must first go to Validation > Clean Up and click on Clean Up. This will remove any unneeded temporary data, avoiding the risk of duplicating data from a previous import into a subsequent one. Then correct in the original Excel template, generate the CSV file again and follow the upload and import steps again. Repeat until the import passes validation.
- If you want to clear existing supplier open items, check Clear existing supplier open items. If you do not check this, the importer will add to the existing open items.
- If the data provided has dates in US format instead of European format, check Data Format to change to European format.
- Suspense account is checked by default. To prevent control account modification, all opening items are posted to a Suspense Account whose code will appear on the screen. To change the balance to post to a Control Account, uncheck.
- To import, click Apply. If successful, you will receive confirmation.
Final Clean Up
Warning
Always perform cleanup after a new import. This avoids the risk of duplicating data from the previous import in the new import. Clean-up should only be completed when a data import is complete and the files are no longer required.
- Go to Data Importer > Validation > Clean Up.
- Click Clean Up.
