
Introduction
The Purchase Ordering System has three modules:
- Sales Orders: This lets you record receipts of goods or services against a specific Purchase Order.
- Deliveries: The listing grid allows you to view all Purchase Orders received which have not been matched to an invoice. You can then record an invoice for matching against that PO. Unmatched POs where they have been marked as "Received" can then be the basis for your accruals.
- Item Invoices
It is or can be, integrated with:
- Product and Service Type Items - either fully in the context of quantities management or partially in the context of non-stocked goods and services.
- New Workflow Approval - New Look UI - Beta
Invoicing without a prior Purchase Order
Not all Orders need to be entered into the system. Small low-value Items such as stationery or refreshments can be processed using Batch Invoicing, without the necessity of a preceding Purchase Order. This, however, can be a security risk as it bypasses the Ordering process. If this is a concern, remove the Batch Invoicing option as a menu option, or severely restrict its usage. This will mean that all Invoices are processed using Item Invoices.
Enforcing a prior Purchase Order
Item Invoices for things like electricity, water, or rent can still be entered without a preceding Purchase Order.
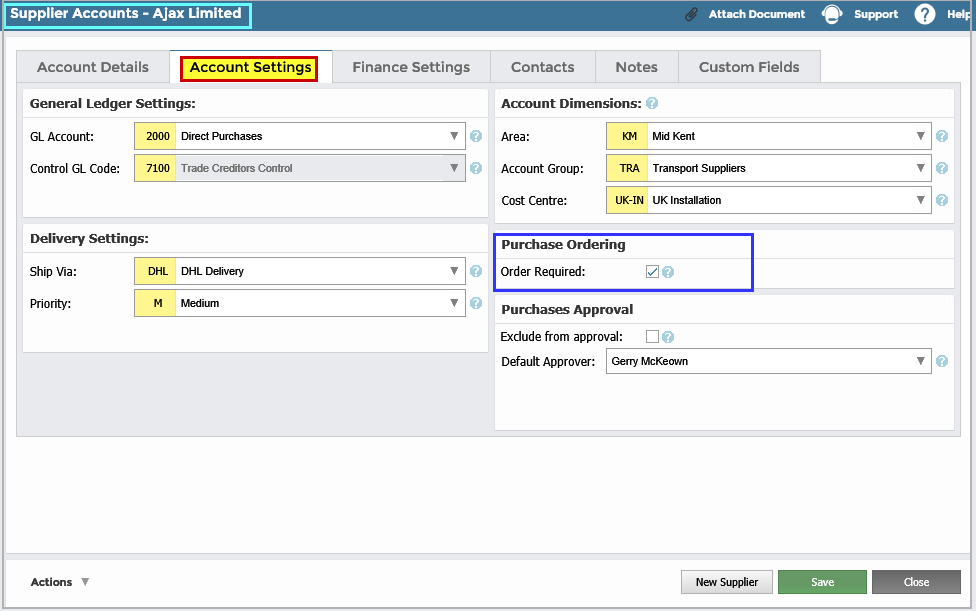
However, you have the option to enforce the entry of prior Purchase Orders against selected Suppliers by checking Order Required in their master record. The Invoice will subsequently undergo an Invoice/Order Matching process. If the Invoice exactly matches the Order in respect of all Lines, Quantities, and Prices, then the Invoice is automatically processed without the need to enter it into the system.
Best Control Practices
To introduce the strictest possible control over your Purchasing System:
- Limit access to the Batch Entry facility.
- Enforce Order Entry against most Suppliers.
- Ensure that only authorised personnel have access to the Supplier Master record maintenance function.
Setup Prerequisites
The Purchase Ordering facility has several prerequisites. These include setting up the:
- Supplier Master Record
- Product and Service Type Items
- Code tables including General Ledger Codes, Taxes, and Currencies
See:
 Purchase Orders Overview (17.0) - AIQ Academy
 Purchase Order Entry - Pre-requisites (17.1) - AIQ Academy
 Purchase Order Entry (17.2) - AIQ Academy
 Purchase Deliveries (17.3) - AIQ Academy
 Purchase Orders /Delivery Queries (17.4) - AIQ Academy
 New Workflow Approval - New Look UI - Beta
 Creating Batch Purchase Invoices

Create a Purchase Order
Step One: Enter a new Purchase Order
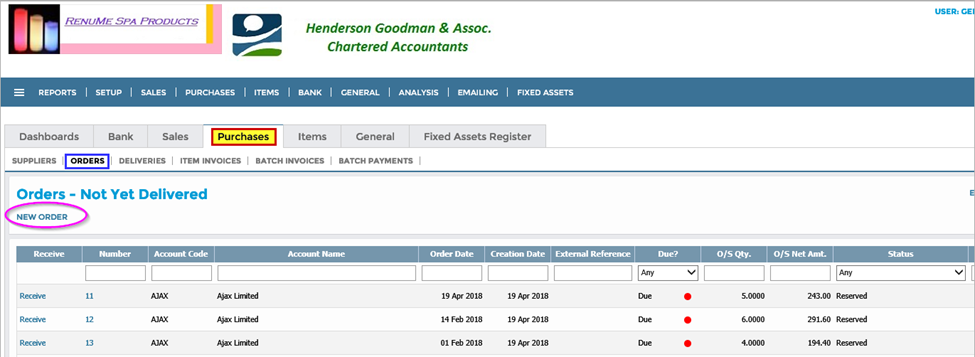
Go to Purchases > Orders > New Order. This opens the Purchase Order screen.

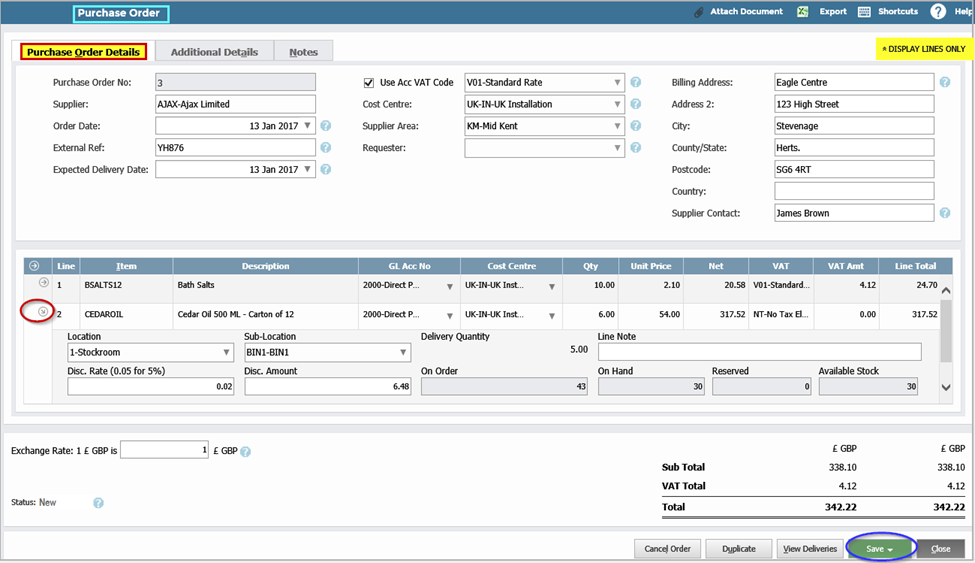
Step two: Complete the Purchase Order Details tab
 In the upper section of the screen:
- Purchase Order No: This is controlled in Company Details and Settings. If auto-numbering is on, then the P.O. Number will auto-generate. Otherwise, supply a unique Order No.
- Supplier (Vendor): Select from the dropdown provided. This populates the Supplier’s (Vendor’s) details on the Order Header.
- Order Date: This defaults to today’s date, but you can change it using the dropdown. Note that this date will place this order into the correct financial period. This is done automatically to ensure that the transactions go to the correct period.
- External Ref: This is your own reference number to help you keep track of your Orders. It could, for example, be the Supplier’s (Vendors) Inventory Code.
- Expected Delivery Date: This defaults to today’s date, but you can change it using the dropdown. This is the date you expected this order to be delivered (i.e. received). This can be used to track orders that are due or overdue using the filter options in the Orders Listing grid.
- Use ACC VAT (Tax) Code: Checking this box means that any items entered will use the supplier account's default tax code instead of the product's tax code. For example, if a particular product has a default tax code of 21%, but a particular Supplier is an overseas Supplier and is exempt from tax. This field can be modified to allow you to account for the difference.
- BI Code: Some Suppliers (Vendors) always deliver to the same part of the Company which they represent with an optional BI Code from the Supplier (Vendor) Master Record. It is not a mandatory entry as you may not want to use Extended Business Analysis, or your Order might use several BI Codes. If a BI Code exists, it will appear on each line of the Order where you can override each individually. However, if you are using Purchase Order approval, then you can only use one BI Code per Order.
- Supplier (Vendor) Area: This defaults from the Supplier’s (Vendors) Master Record but you can override it here.
- Requester: This is an optional field. It is the individual that raised this Purchase Order. This person, along with the approver, will be notified by email after this Purchase Order is processed and will receive an attached copy of this order for their information.
- Billing Address: This is the address of the Supplier (vendor) that this order relates to. This address is read from the Supplier(vendor) record and can be changed at order level.
- Supplier (Vendor) Contact: This is the Primary Contact from the Supplier’s (Vendors) Master Record. This can be modified for a specific order.
In the lower section of the screen:
Click Display Lines Only to hide the Supplier (Vendor) Detail in the upper half of the screen. Click again to restore.
Similarly, click the arrow icon at the start of each Order Line to display/hide details from the Inventory file for the Product nominated on that Line.
- Item: This comes from the Inventory Product file. Use the dropdown together with its Description and default GL Posting Code which you can change if required.
- GL Account Code: This comes from the Supplier’s (Vendors) Master record (if any) and then the GL Account Code from the Product file overrides it. You can override it using the dropdown or by keying in a GL Code.
- BI Code: If you are using Extended Business Analysis then supply a BI Code. It might come from the Order Header; in which case you can still override it here.
- Qty: Enter the Quantity of Items required from the Supplier (Vendor).
- Unit Price: This comes from the Last Cost field on the Inventory Master Record, but you can override it here.
- VAT (Tax): This either comes from the Order Header (which in turn comes from the Supplier’s (Vendors) Master record) or from the VAT (Tax) Rate associated with this Item on the Inventory file. In both cases, it is a default rate, but you can override it here.
- Disc. Rate, Disc. Amount: If there is a Discount Percentage on the Supplier’ (Vendor) Record, then this will apply. You can either accept this Rate and Calculation or you can put in a fixed amount in the Disc. Amount field and the system will work out the percentage.
- Line Note: You can add a Note to each Order Line.
- Exchange Rate: If the Supplier is a Foreign Currency Supplier, this field displays the default exchange rate currently associated with the chosen Supplier (vendor). This can be overwritten if necessary and will be used when posting the order to calculate the base currency value of the order.
- Status: The status of the order is displayed here. An order can be 'Reserved' when initially recorded and the items have a reserved quantity against them, 'Partial Delivery' when part of it has been delivered, 'Full Delivery' when all of it is delivered, 'Complete' when it has been delivered and invoiced and finally 'Closed' if the user has decided to close it and not deliver.
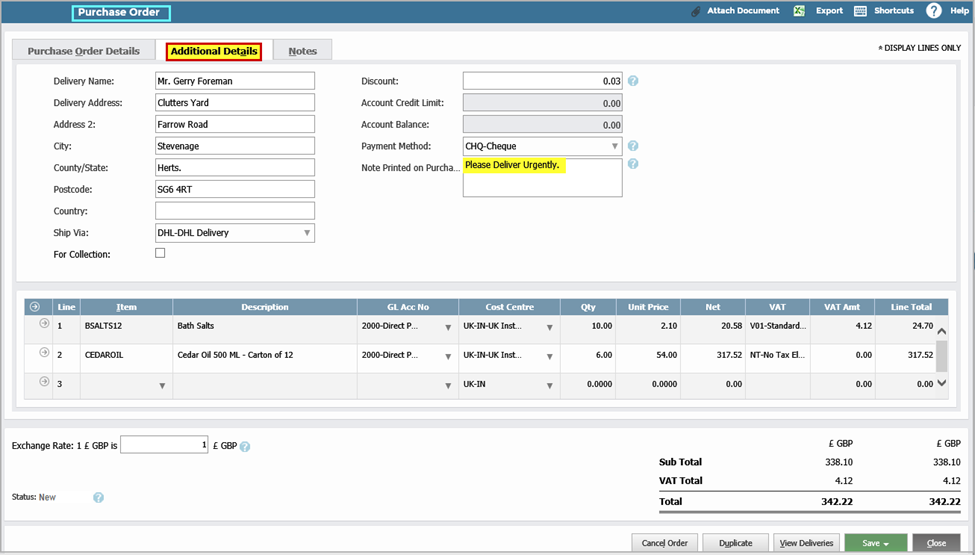
Step three: Complete the Additional Details tab
In this tab, you can modify the Delivery Details inherited from the Supplier’s Master Record such as:
- Discount: This displays the default discount associated with the Supplier (vendor). This can be overwritten for the specific order and will update any lines entered. If you update the default in the supplier record, any prices and quantities recorded prior to modification would need to be re-entered to include the modification.
- Payment Method: This specifies how this order will be settled by your company. If you select a payment method that has been set up as an 'online' payment method in codes maintenance, then related orders will be available to pay through the Online Batch Payments function.
- Note Printed on Purchase Order: Here you can also add a Note to appear on the Supplier’s (Vendor's) Order for them to see.
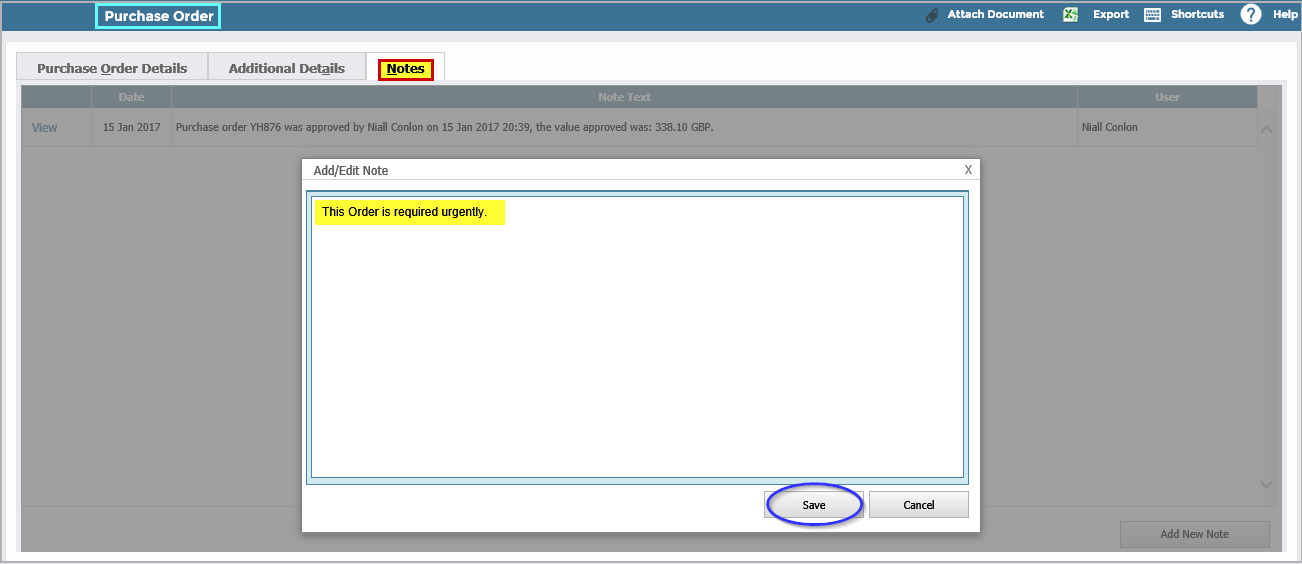
Step four: Complete the Notes tab
The Notes tab allows you to add internal Notes to the Order.
- Click Add New Note.
- Enter your note.
- Click Save.
See:
 Using Extended Business Analysis
Enable and Disable Workflow Approval
For full details on our new workflow approval, see New Workflow Approval - New Look UI - Beta and Workflow Scenarios - Beta.
Disabling Workflow Approval
After saving, the Order will bypass approval if:
- You leave Purchase Approval Enabled unticked in Company Details & Settings.
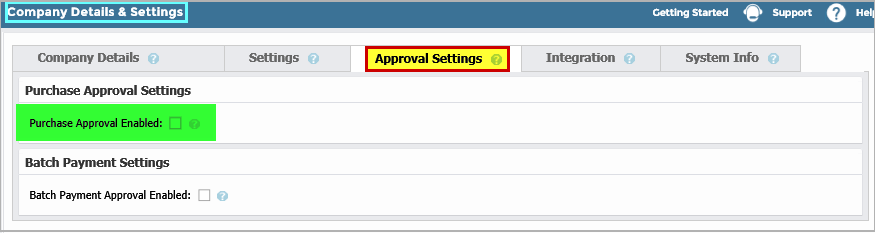
- If you tick Exclude from Approval in Supplier Accounts.

Workflow Approval Statuses

If you enable approval:
In both the legacy and new workflow approval:
- The Status will be "Reserved."
- The relevant Approval Status will appear. See New Workflow Approval - New Look UI - Beta for full details of legacy vs new workflow statuses.
- In the Actions dropdown, Receive All & Invoice will be available will NOT be available until the order has been approved.

If you disable approval:
In both the legacy and new workflow approval:
- The Status will be "Reserved".
- The Approval Status will be "Approval Not Required".
- In the Actions dropdown, Receive All & Invoice will be available.

Edit Orders
Once you reserve an Order, it is saved. You can recall the Order at any time before full delivery to amend and/or re-issue it.
- Go to Purchases > Orders and find it in the grid.
-
- If the Order delivery is complete, Receive All & Invoice will be unavailable in the Orders listing grid.

- Click the Order No. to open the Purchase Order.
If the Order delivery is complete, all fields will be greyed out meaning you cannot edit them.
If they are not greyed out, make any required changes. You can delete Lines, add new lines, change Quantities and Prices, Vat Rates, add Line Notes, and amend GL Codes and BI Codes. Click the arrow or the Item Code dropdown to make any edits.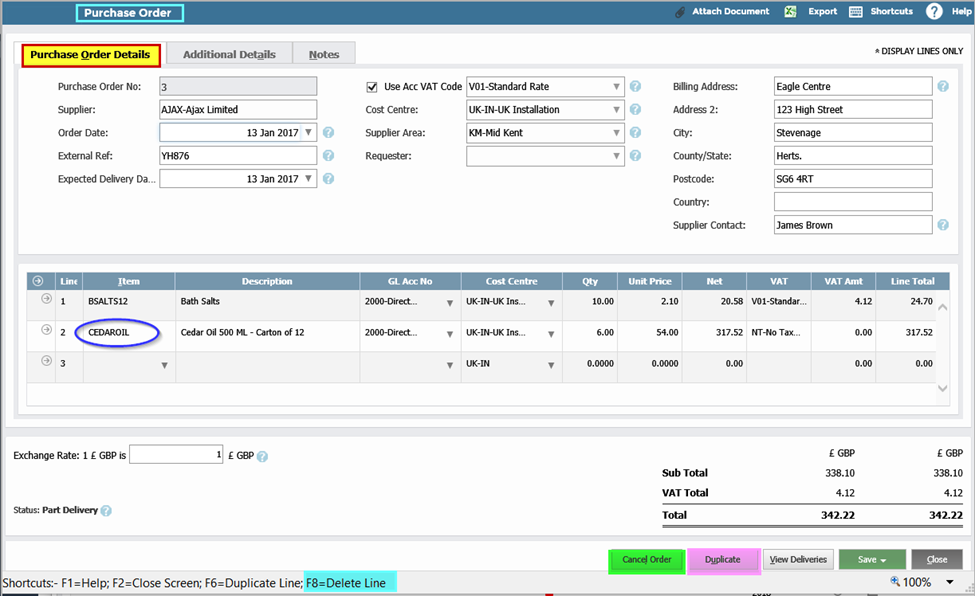
- Click Save.
Cancel, Duplicate, and Print Orders

Cancelling Orders
You can close an order at any time by opening the order and clicking Cancel Order. This will update the status of the order to Cancelled.
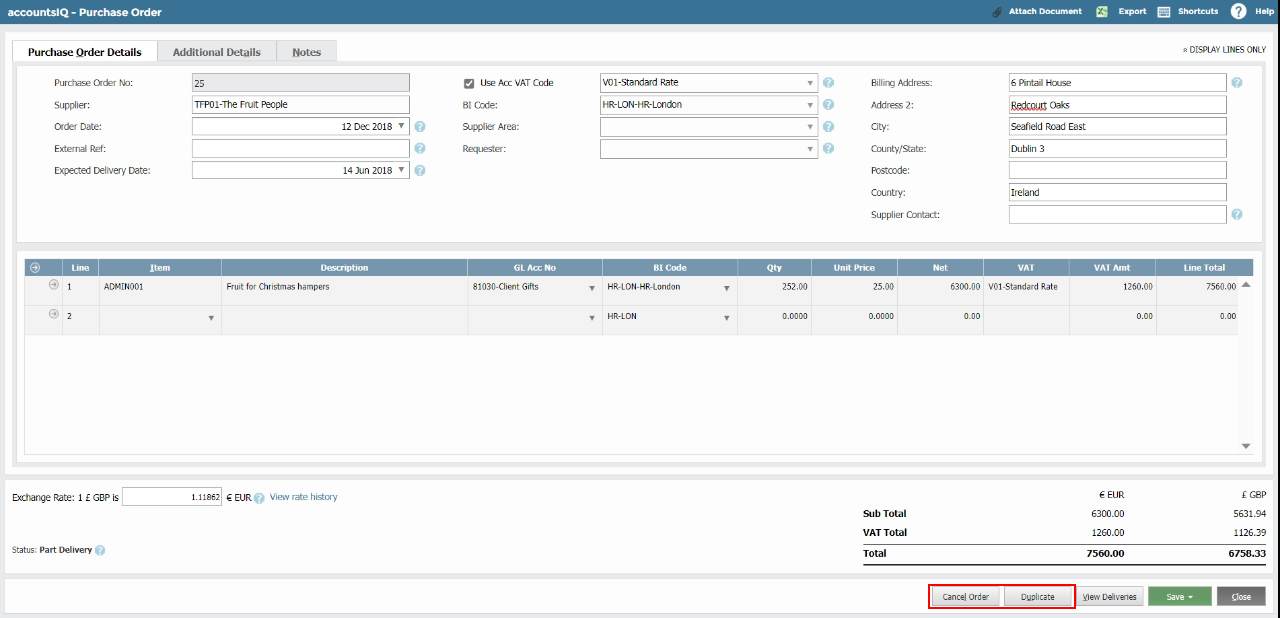
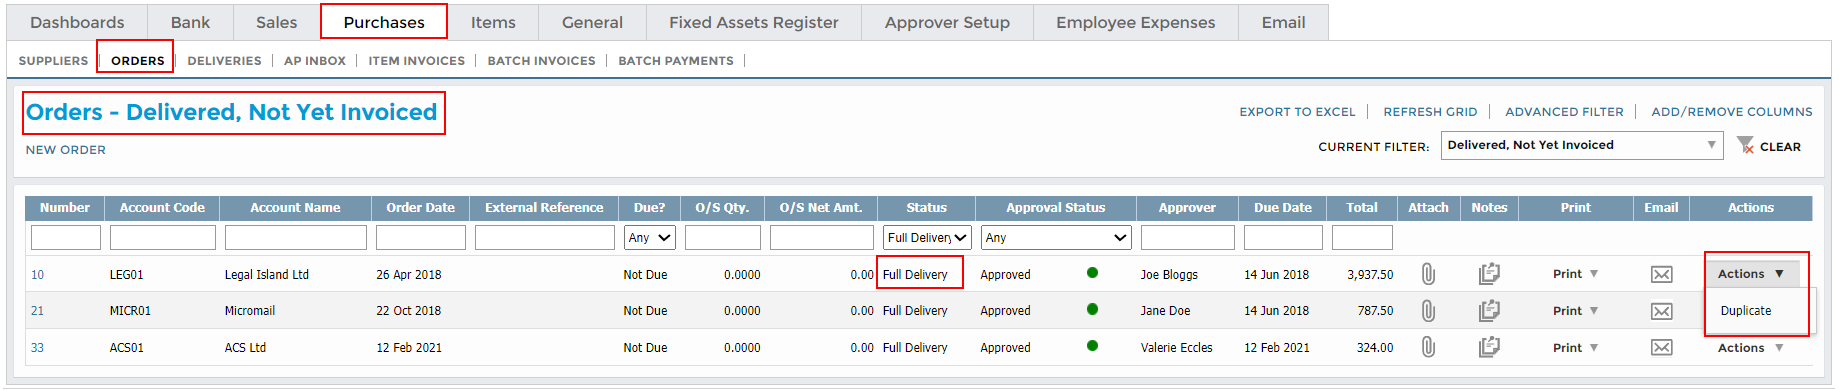
Duplicating an Order
You can duplicate or copy an order at any time. The duplicate order can have completely different line details than the original, but you may want just the original header information to remain.
You can also duplicate closed orders even though all the details for the closed order are greyed out (read-only).
- Click Duplicate to create a replica order.
- Add a new External Ref.
- Modify it, including adding new Order Lines, as you require.
- Click Save. The old Order will remain in the system as it was.
Alternatively:
- Go to Purchases > Orders > Actions to Duplicate an Order. You can also cancel an order here.

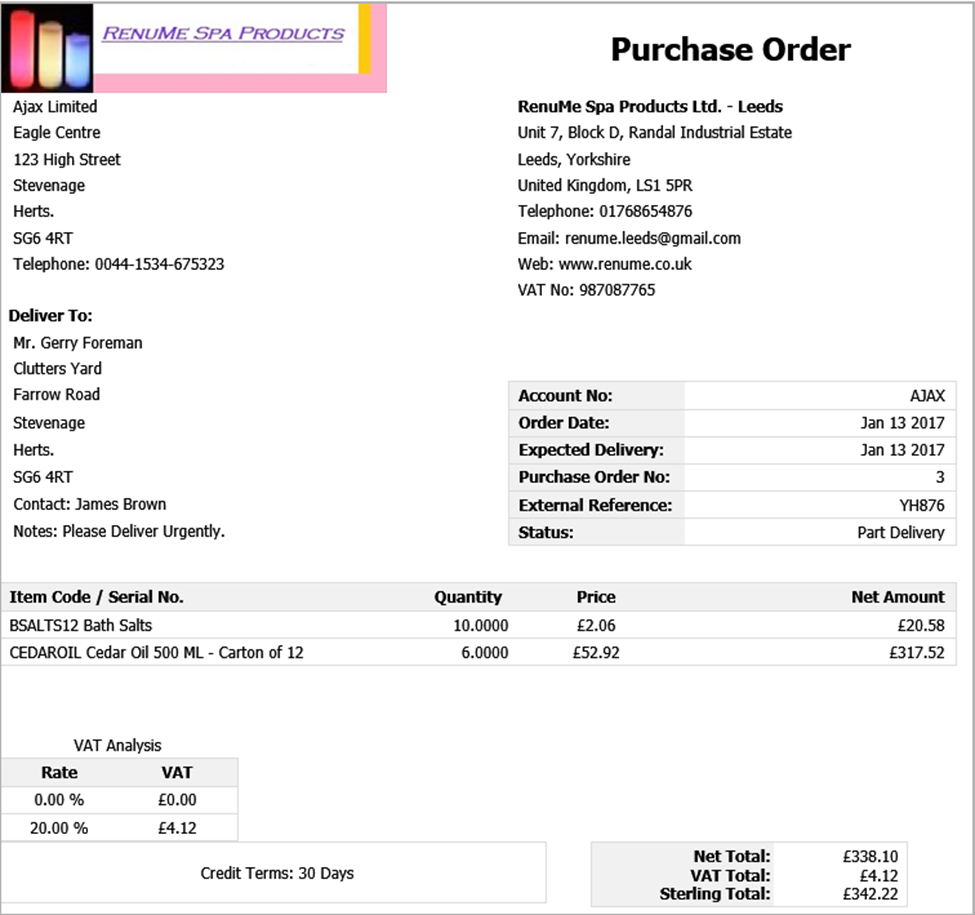
Printing an Order
- Go to Purchases > Orders.
- In the Print column, print a PDF Order that you can email to the Supplier (Vendor).
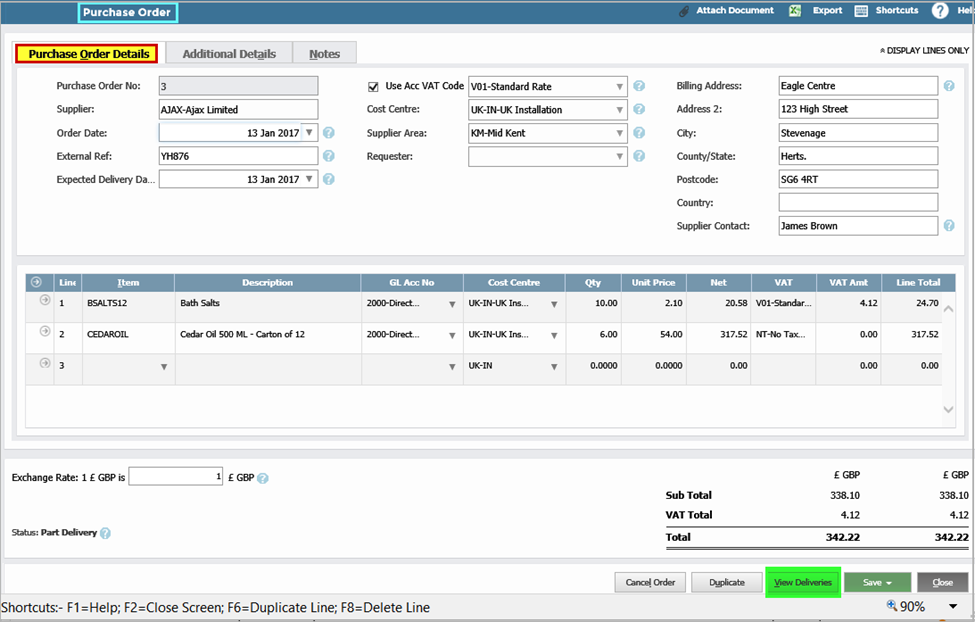
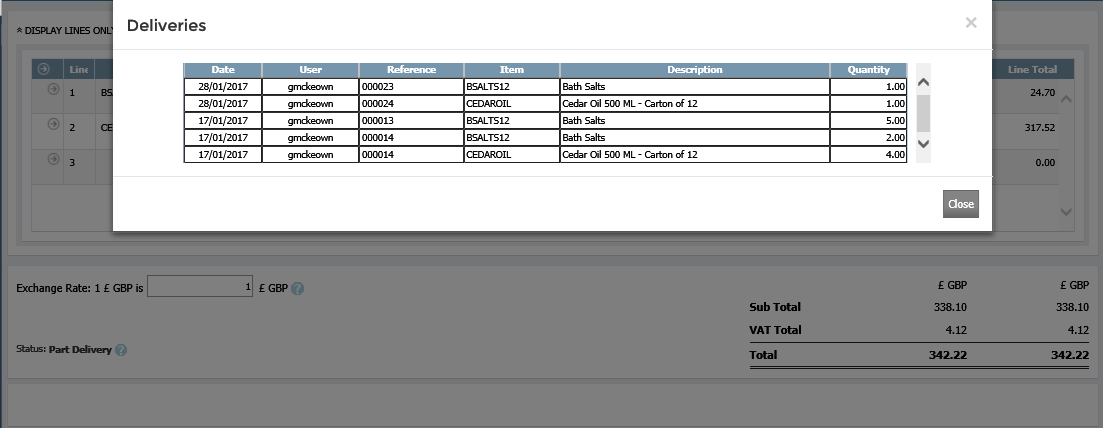
View Deliveries
Viewing Deliveries
To view which deliveries you have received, either:
- Go to Deliveries and select View Deliveries from the relevant Actions dropdown.
- Open the relevant Purchase Order and click View Deliveries.

Receive All Orders and Invoice (Non-Stock Items)
When you obtain services from a Supplier (Vendor) that have been approved where relevant, you need to receive and invoice them (in full or partial).
- To receive deliveries, click Receive All & Invoice against the relevant Order No. in the Orders listing grid. This creates a Purchase Invoice with the current date and the status of Full Delivery.

-
- Complete the Purchase Invoice. For a partial delivery, change the quantities.
- Click Save. The status will update to Complete.

Receive Orders and Match Invoices (Stock Items)
When your Supplier (Vendor) delivers goods, you need to receive and invoice them (in full or partial).
Step One: Receive Orders
- To receive deliveries, click Receive against the relevant Order No. in the Orders grid. This opens the relevant Purchase Deliveries screen.
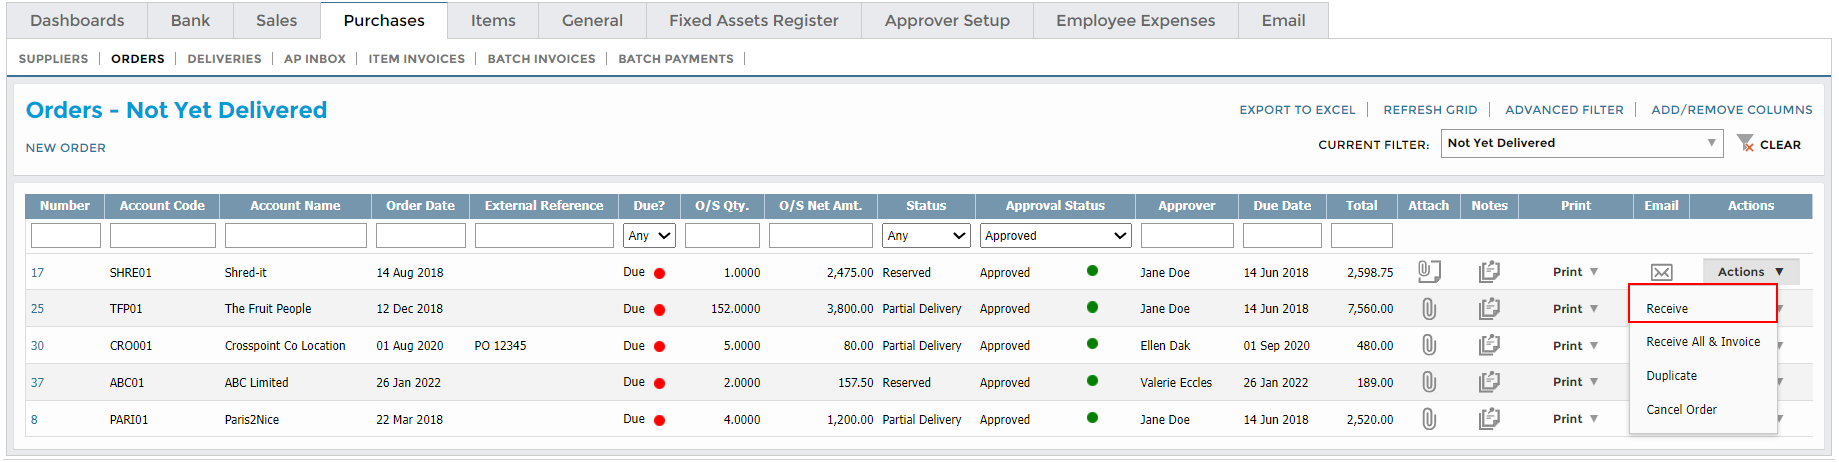
-
- In This Delivery, enter the appropriate quantity or click Receive All. To undo the Delivery Quantities, click Reset.
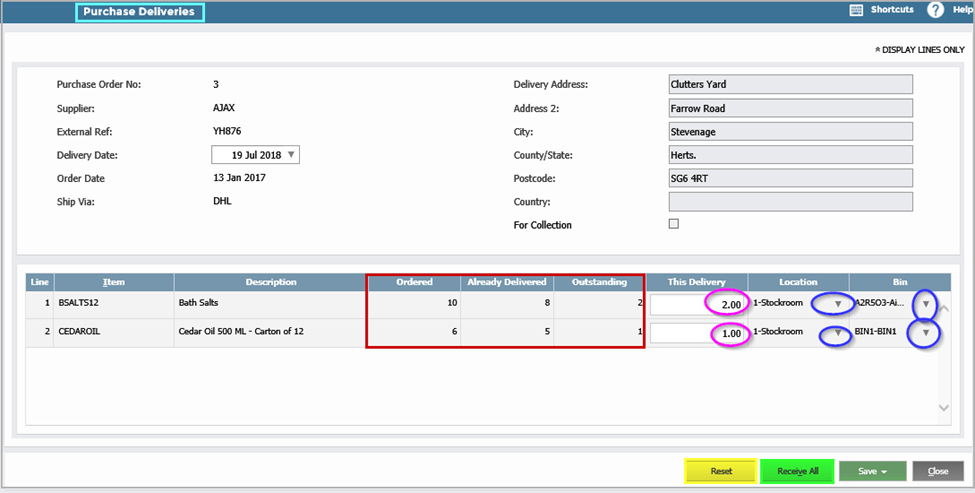
- Click Save or from the Save dropdown, select Save and Print Order to produce a Goods Receipt Note for your records.

Step Two: Create Matching Invoices
- Go to Purchases > Deliveries and find your delivery.
- In the relevant Actions dropdown, click Invoice. The invoice is now available in the Item Invoice listing grid.

-
- Click the Item Invoice No. to open the Purchase Invoice.
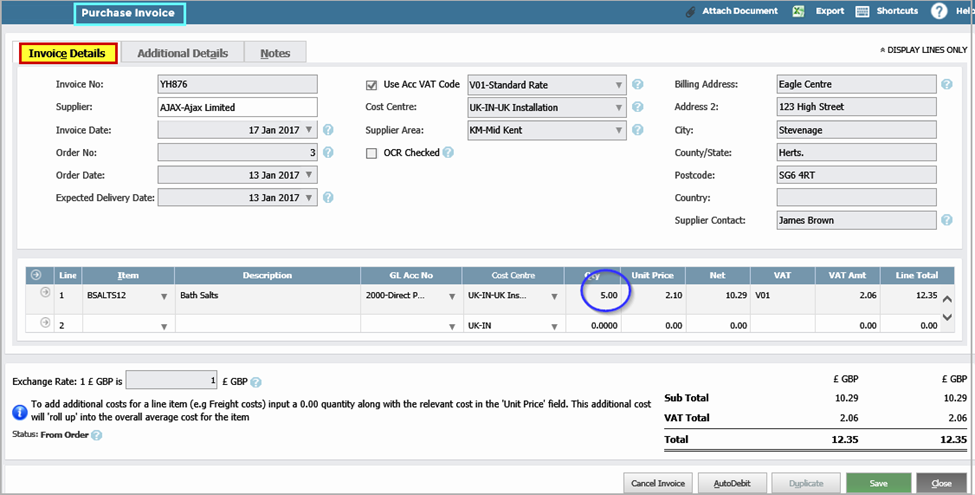
- If the Invoice details do not agree with your Delivery Records, then:

- If quantities differ, change the Quantity on this Invoice to match your quantities.
- If there are price differences and you’re willing to accept them, adjust the Unit Price.
- If there are additional charges against a Line, add a new line with the same Item Code, a quantity of 0.00, and put the extra charge in the Net column. This additional cost will be used in the calculation of the overall Average Cost for the Item.
- If you receive more than you ordered, then you cannot increase the quantity. You must go back to the Order first and increase the quantity there and then deliver it.
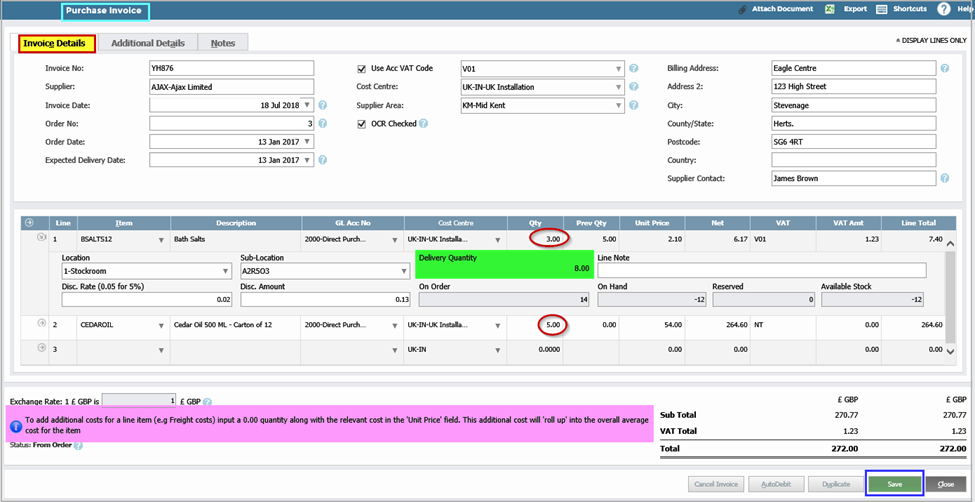
- Click Save. If the saved Invoice now matches the Delivered Order, then the Order will be fulfilled and disappear from the system. You can Cancel an Order at any time. If there are partial Deliveries in the system, you can still cancel the remainder of the Order.
Delete