Introduction
Purchasing Approval is an optional feature in the system that can be set up per entity. Both Purchase Orders and Purchase Invoices can undergo the approval process.
Purchase approvers are authorised to approve Purchase Orders and Invoices on behalf of the company. They can be Budget or Non–Budget Holders, depending on whether you want to use Budget Holders and Commitment Reporting. Batch Payment Approvers are authorised to approve Supplier Payments. For more details, see Using Bulk Payment Approval.
Non-Budget vs. Budget Approval
Decide initially whether to base your Approvers on Budget Holders or non-Budget Holders. You can change this later if necessary. Approvers can be overridden at Order or Invoice processing stage by nominating a different Approver. Both approval types can use the Expense module.
Non-Budget Holders:
These are linked to Suppliers in the Supplier Master Record and are the initial approver for a new Order or Invoice. This approver type can use multiple BI Codes.
See: Using Purchase Approval for Non-Budget Holders
Budget Holders:
Budget Holders are linked to Budget Heads via the use of BI Codes. They can ordinarily only use one BI Code except in the case of expense claims. The initial Approver depends on the BI Code used on the Order or Invoice. Although Approvers do not have to be users of the system, we recommend that Budget Holders are.
One of the principal benefits of selecting Budget Holders as Approvers is that you can examine current commitments against each Budget Head, giving you greater control of your expenditure on a rolling basis. This could be in terms of expenditure to date, existing orders in the pipeline, or the amount of unspent budget remaining.
Requesters (Requisitioners)
Anybody in the organisation can be a requester, including Budget Holders. These are usually non-system users, such as field operatives, who raise Purchase Orders and are the eventual recipients of the goods. They can communicate with the system via email, to receive order status updates throughout the approval process.
See:
 Purchase Workflow Approval Overview (18.0) - AIQ Academy
 Workflow Approval Setup (18.1) - AIQ Academy
 Pre-requisites for Approver Setup (18.2) - AIQ Academy
 Create Budget Holder type Approvers (19.3) - AIQ Academy
 Budget Holder approval process for orders and Invoices (19.5) - AIQ Academy
 How do I use the Client Administration facilities to add Users and Control their Access Permissions?
 How do I Implement Supplier (Vendor) Batch Payment Approval?
Enabling the Approval Processes
Step One: Set admin permissions
- In the Group Portal, find the relevant entity.
- Under Actions, select Maintain Menu Profiles.
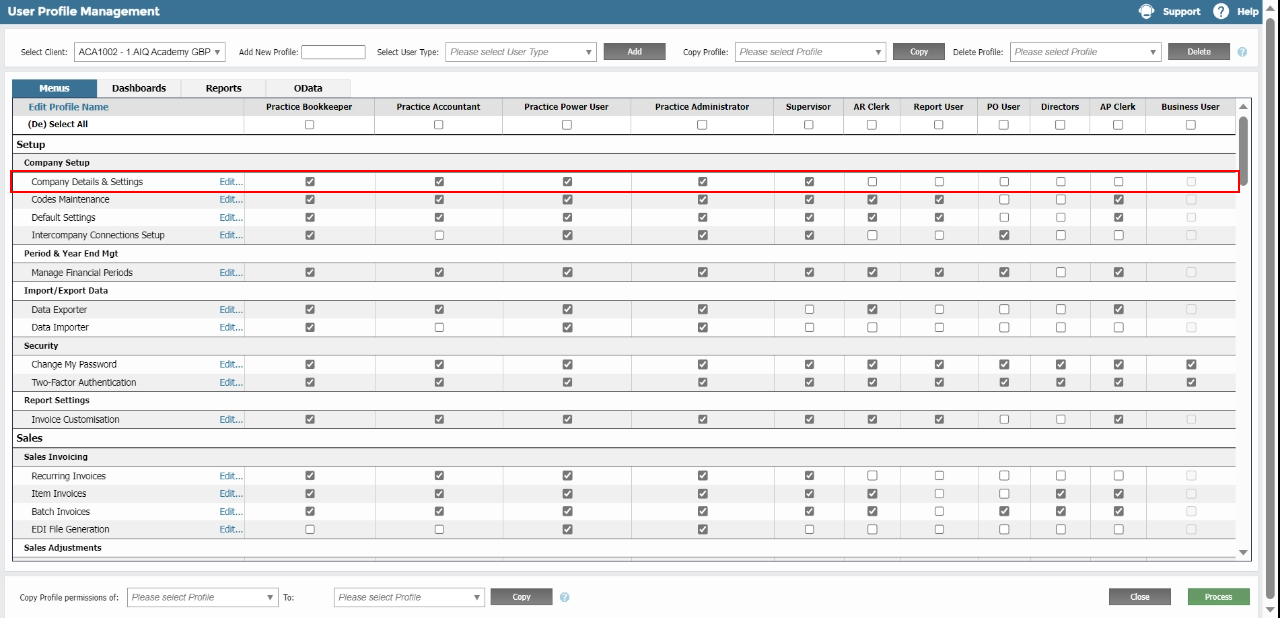
- In the User Profile Management screen, under Approval, check Company Details & Settings and Purchase Approval Setup against the relevant users.
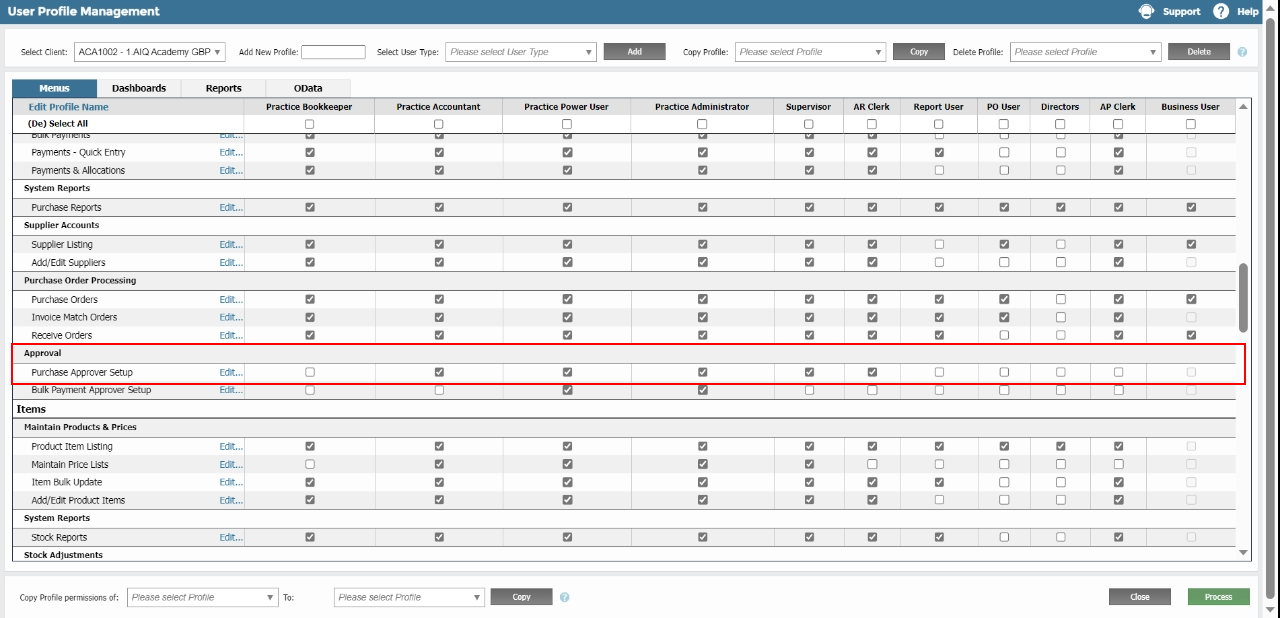
- Click Process.
- Repeat for all relevant entities.
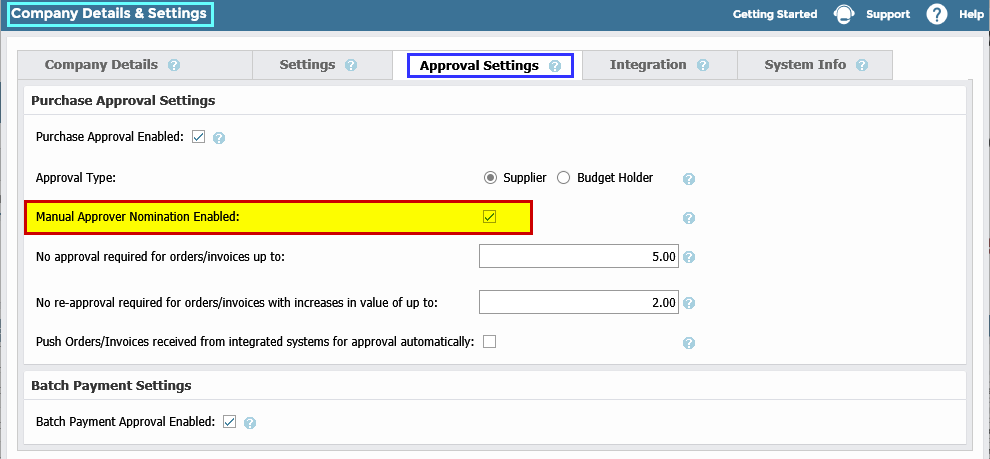
Step two: Customise the approval settings.
- Go to Setup > Company Details & Settings.
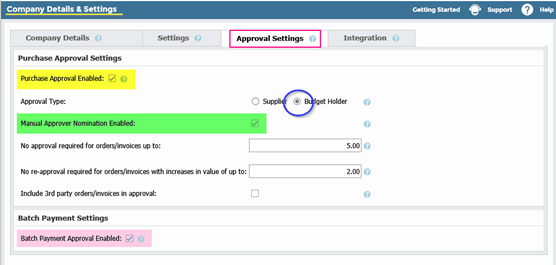
- In the Approval Settings tab, set the following:
- Purchase Approval Enabled/Payment Approval: Check to implement Purchasing Approval by Budget Holders.
- Approval Type: Select Budget.
- Manual Approver Nomination Enabled: We recommend enabling this at first and disabling it later if required. It gives you the option of overriding the default approver at Order or Invoice entry stage as long as the selected approver has the same or greater financial authority.
- No approval required for orders/invoices up to: Enter an amount up to which Order and Invoice approval will automatically be bypassed.
- No re-approval required for orders/invoices up to: Enter an amount to prevent the Orders and Invoices from going for reapproval over small increases.
- Include 3rd party orders/invoices in approval: Third-party Invoices may originate from external sources such as OCR Scanning or other integrations such as EPOS. Check to have these Invoices go through the Approval process.
- Batch Approval Enabled: Check Purchase Approval Enabled if you want to enable batch approval.
Batch Invoicing and the Approval Process
Purchase Invoices entered via Batch Invoicing do not undergo Invoice Approval and post directly to the Supplier Account as normal. Batch processing can be used for small Invoices amounts, or Invoices which do not require approval. However, this is a security risk that might defeat the purpose of implementing Invoice Approval. If you want all your Purchase Invoices to undergo approval, then remove (or restrict) the Batch Invoicing option. Doing so requires all Invoices processed to use Item Invoices.
Step three: Enforce/Exclude Orders as a prerequisite to invoicing
You can enforce Orders as a pre-requisite to Invoicing and/or exclude certain Suppliers from the Approval process. These companywide rules will only take effect for new Suppliers and will not have a retrospective effect on existing Suppliers. You can reset these rules at individual Supplier level if necessary.
- Go to Setup > Default Settings.
- In Supplier Defaults you can set companywide rules for Orders:
- Order Required: Check to enforce the entry of Purchase Orders against the selected Supplier. This ensures that Invoices from that Supplier cannot be processed without a prior Order. The Invoice will then undergo an Invoice/Order Matching process. If the Invoice exactly matches the Order in respect of all Lines, Quantities, and Prices, then the Invoice bypasses Invoice Approval.
-
Exclude from Approval: Check to automatically approve purchases from this Supplier. Even if you implement Purchase Approval, not all Orders/Invoices require Approval. You can exempt certain Suppliers associated with ongoing expenses like electricity, water, or rent and others associated with small Items, such as stationery, or refreshments.
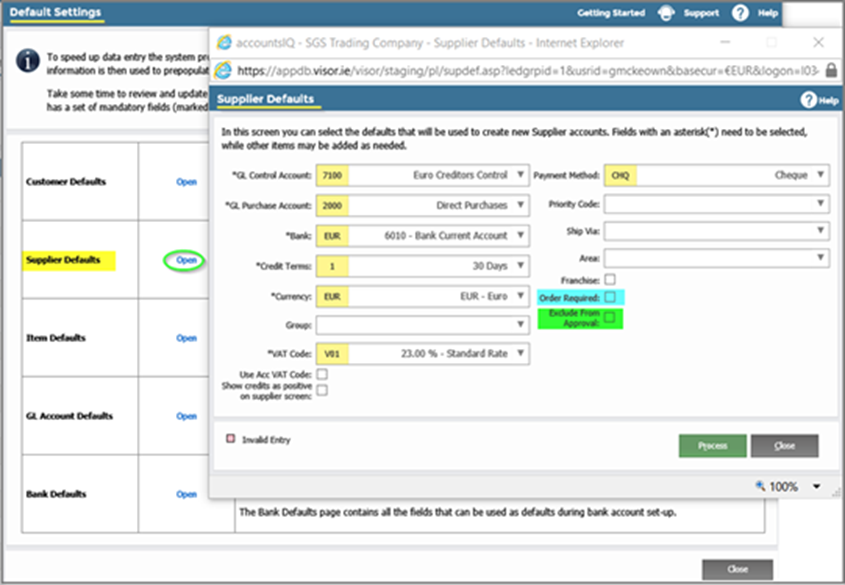
- Click Process.
Creating Approvers and Requesters
Setting up Approvers
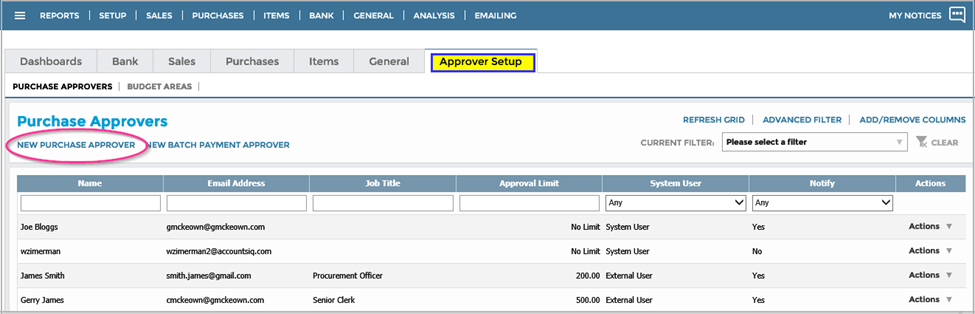
- Go to Approver Setup > Purchase Approvers > New Purchase Approver to open the Purchase Approver screen.
- Use the Use Existing System Userflag to specify whether the new approver is based on an existing system user.
- If 'Yes' is selected, the 'Name' drop down provides a list of active system users along with their email addresses. System users will have the capability to approve orders/invoices that have been routed to them for approval subject to their spending limits. They can approve directly in the system by using the options listed in the 'Actions' drop down beside an order or invoice if that document is available for approval.
- If 'No' is selected this designates the new approver as someone external to the system without login rights. These users will receive all approval requests by email and will have the ability to approve via email.
- If you have chosen to base this new approver on an existing system user, the Name dropdown lists all active system users which you can select an entry from. Otherwise, type the full name of the new approver.
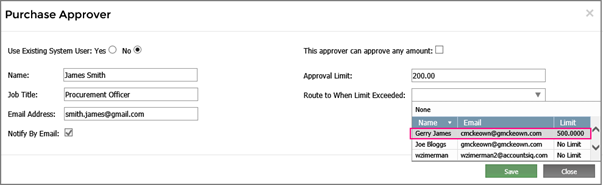
- Enter the Job Title of the approver. This helps identify the specific approver when setting up approval chains with differing levels of approval authority.
- If the user has direct access to the Purchasing System, the email address with the associated user account will be used. Specify whether the system approver wants to receive approval request notifications by email or not. In some cases, system approves might wish to not receive these and approve via the system only. If they are a non-system user, enter their name and email address and check Notify by Email.
- The This approver can approve any amount flag indicates that the approver has no approval limit and can thus approve an order/invoice of any value. This is the default setting when creating a new approver.
- Approval Limit is the base currency approval value for this approver. It is the total net amount that this approver can approve for any given order or invoice. This is used to restrict the amount that this user can approve given their authority level in the organisation. Approval is based on the Nett Value of the Order or Invoice before any Tax calculations.
- If you have given a limit to how much an individual can approve, then you must specify the person the approval request must be routed to if the order or invoice is above that approval limit. The Route to When Limit Exceeded list will show only approvers that have a limit above the limit of the current approver. In this way multiple chains of approval can be set up with approvers having different spending limits.
Approver Hierarchy
Approvers operate in a hierarchy of financial approval authority. All hierarchies must contain a "No Limit" approver to complete the hierarchy.
In this example, James Smith is the default Approver. As the Order or Invoice exceeds his approval limit of 200.00, then the Approver next-in-line will replace him if they have a greater financial approval level. The Approver doesn’t necessarily have to be the immediate next-in-line (Gerry James). It could be either of the No Limit approvers.

Here the Route To When Limit Exceeded is redundant, as the system will examine all the Approvers against a Budget Head to find the one with the appropriate financial authority to become the Budget Holder Approver for the Order or Invoice.
Editing Purchasing Approver details
- Go to Approver Setup > Purchase Approvers.
- Go to Actions and select Edit.
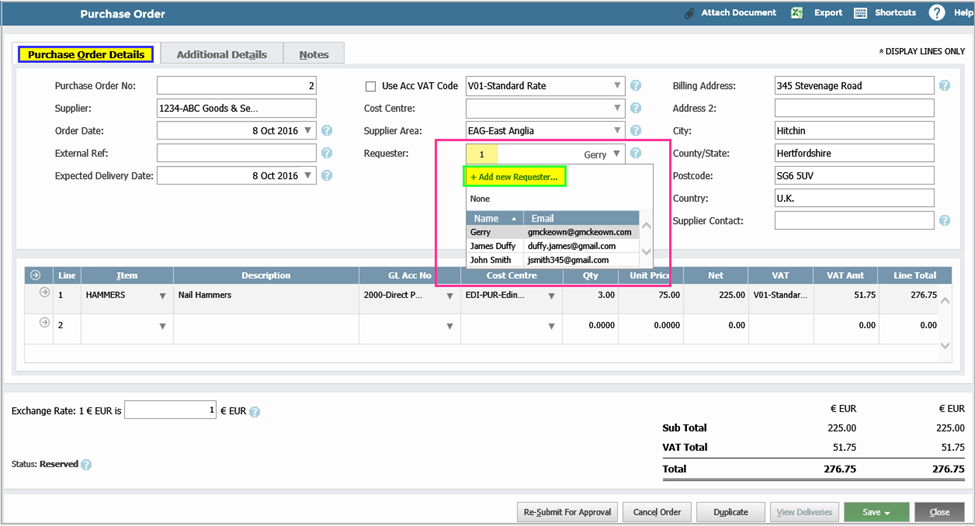
Setting up requesters (optional)
- Go to Setup > Codes Maintenance > Requesters to open the Add Requesters screen.
- To add a Requester, click Add New Requester.
To modify the details of an existing Requester, click Edit.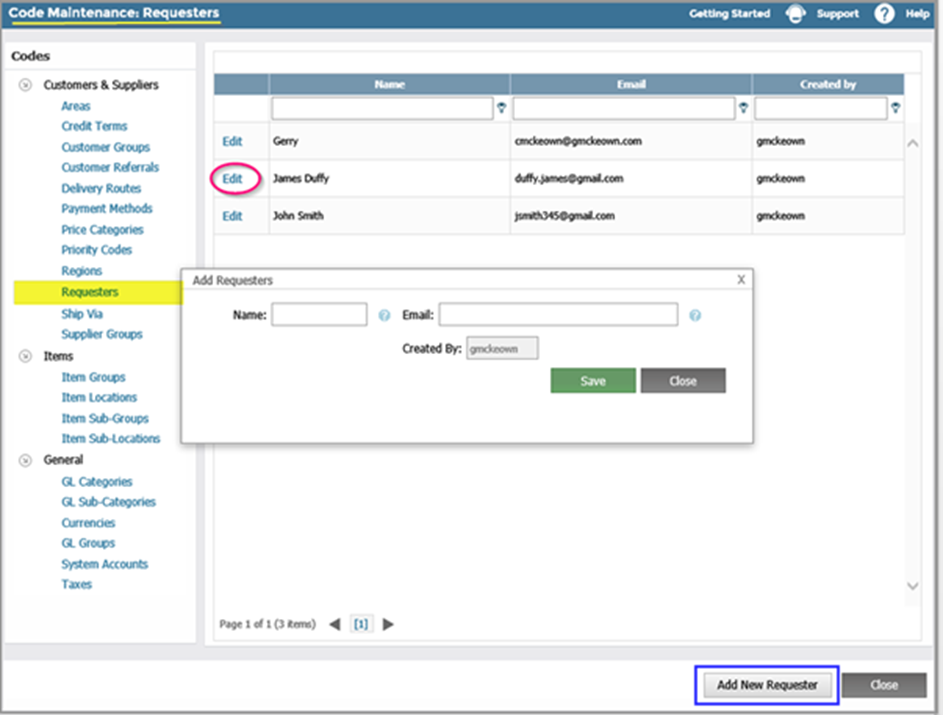
- Click Save. The Requester (Requisitioner) is now an optional field on the Order Entry screen.
See:
 How do I Implement Extended Business Analysis?
 How do I Implement Job or Project Analysis using Extended Business Analysis?
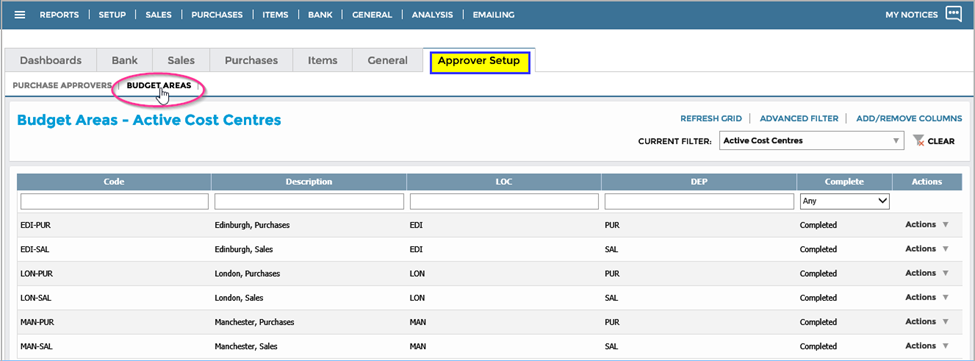
Assigning Budget Areas to Purchase Approvers
Editing Purchase Approver Budget Areas
- Go to Approver Setup > Budget Area. The grid lists all the BI Codes that have been set up in the system.
-
In this example, the BI Code represents a Cost Centre. The Complete column shows that some of the Cost Centres are Incomplete. Being marked Incomplete can result from:
- Not having any Budget Holder Approvers.
- Lacking a No Limit budget holder.
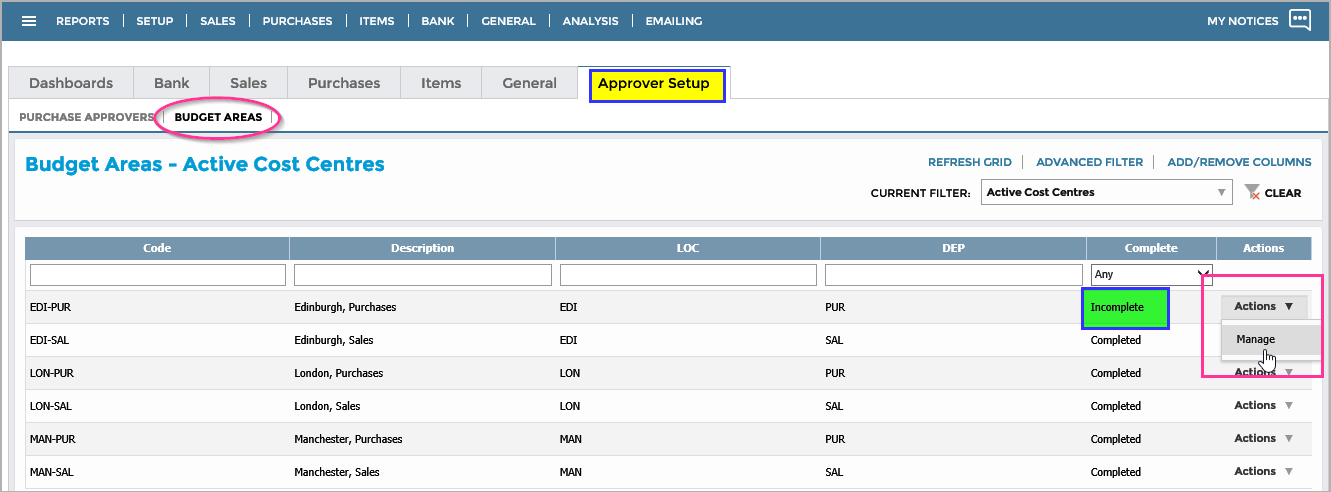
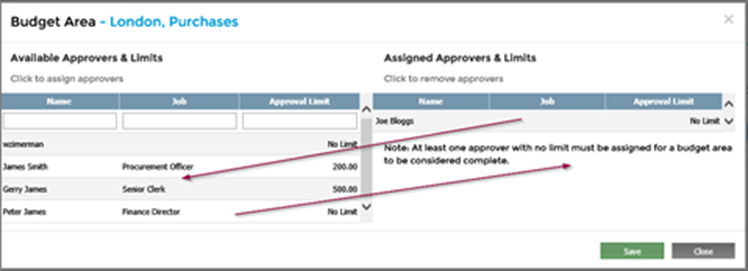
- Under Actions select Manage against a particular BI Code to open the Budget Area screen.
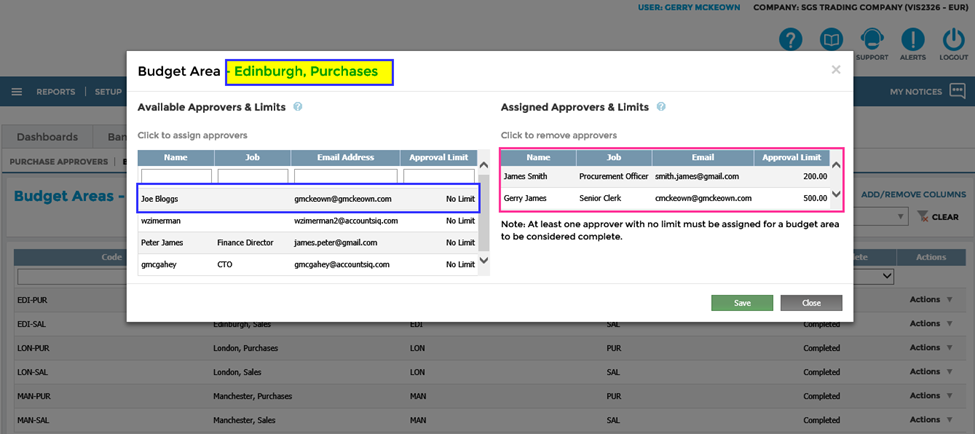
- To assign an approver to this BI Code as a Budget Holder Approver, click any of the Approvers on the left-hand side. Opt for either:
- One "No Limit Budget Holder" against a BI Code (in this example called Cost Centre). In the example, there was a missing No Limit Approver, rectified by clicking Joe Bloggs or any of the other No Limit Approvers.
- Several Budget Holders, with varying financial limits, assigned to a single BI Code.
- A single Budget Holder assigned to several BI Codes.
- To remove an approver from the BI Code, click any of the entries on the right-hand side.
- Click Save.
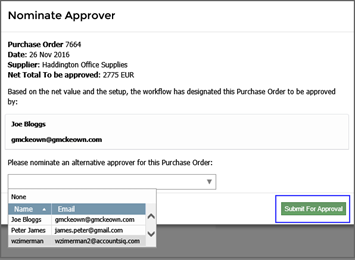
Manually Nominating an Approver
If you ticked Manual Approver Nomination Enabled in Approval Settings, you must nominate an approver. You will be asked after clicking Save on an Order or Invoice.
Choose your Approver from the dropdown (or not) and click Submit for Approval.
This new approver will now replace the system-derived approver for this Order/Invoice.
The Order Approval Process for Budget Approval
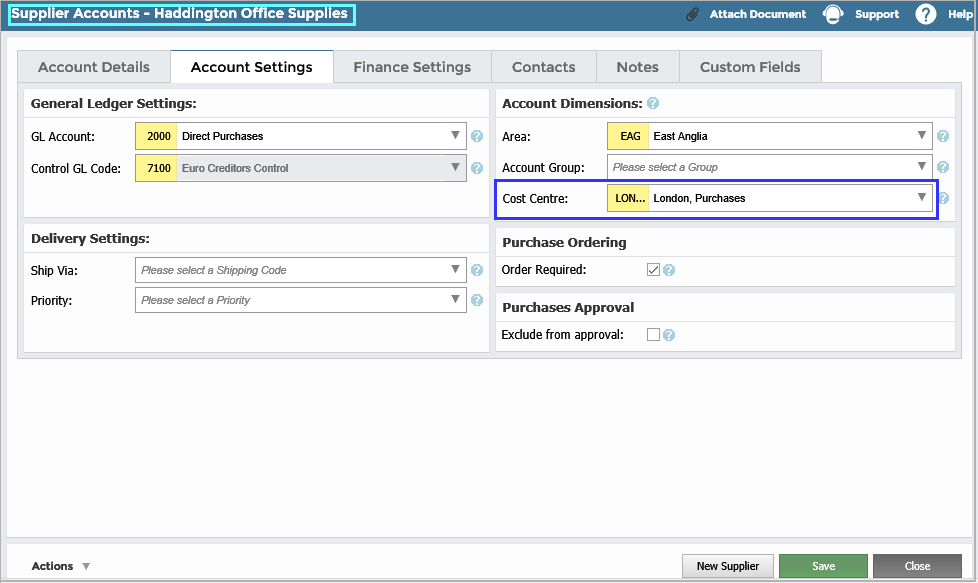
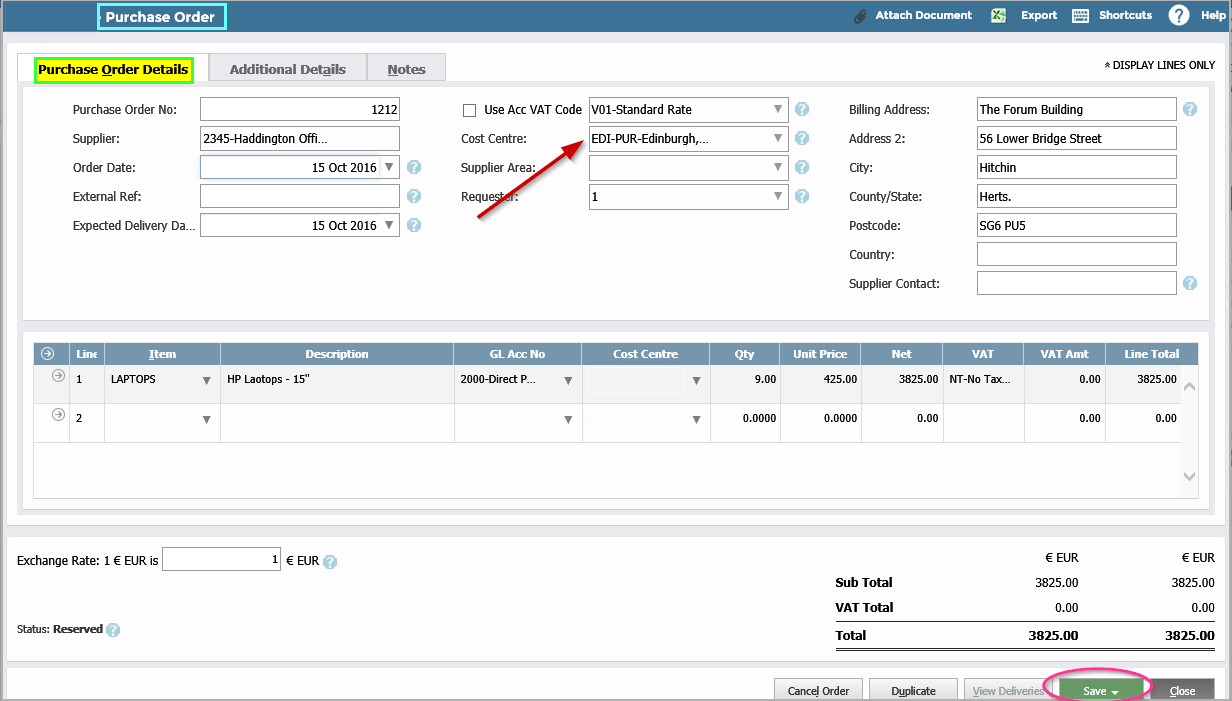
Step One: Set a default BI Code for a Supplier
- Go to Purchases > New Supplier.
- Under the Account Settings tab, set up a default BI Code at the Supplier level if this supplier is only supplying orders to that source. Otherwise, leave it blank and enter the BI Code at Order entry.
- Click Save.
Step Two: Complete a Purchase Order
- Go to Purchases > Orders and create an order.
- On the Order, enter the BI Code (if not inherited from the Supplier). Each Line automatically inherits the BI Code from the Header. If you have set up several Budget Holders with varying financial authority, the system will decide which Budget Holder should be the Approver based on the total value of the Order.
- Click Save.
Step Three: The Approval Process with Email Notification
If the Exclude from Approval is set to off, the Requester (if any) will receive an email from the system or the currently logged-in User. They can appraise the Purchase Order and send a return email describing any modifications required. Any changes which result in a new quantity or new value will restart the Approval process.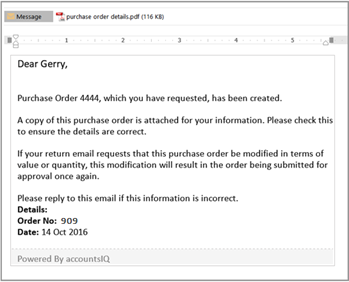
The Approver will also receive an email asking to approve or reject the order. As with the Requester, a pro forma copy of the Order and its details is included.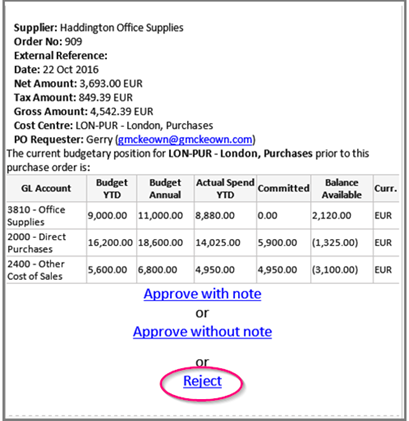
Approval Status: Committed and Actual
The meaning of Committed, for each separate Budget Head, in Base Currency, at any point in time, is as follows:
| The sum total of Uninvoiced Approved Order Lines Net Value [Net Price * Un-invoiced Quantity (Order Quantity less Invoiced Quantity)] that is either delivered or undelivered in the system |
| Plus |
| The sum-total of U-posted Approved Invoice Lines Net Value [Net Price * Invoiced Quantity] currently in the system |
| Minus |
| The sum-total of Un-Posted Supplier Credit Note Lines Value [Net Price * Credit Note Quantity] currently in the system. |
An order moves out of Committed into Actual status when the Invoice it is associated with is posted, not just when the invoice is processed and awaiting posting. Similarly, an Invoice that is not associated with an order, and Supplier Credit Notes moveout of committed status and into actual only when posted.
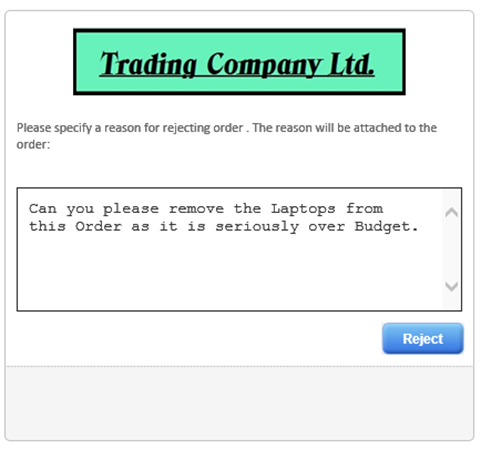
Rejected Orders
In this example, the Budget Holder responds by clicking Reject in the email, entering a note on the screen, and clicking Reject again. Requesters also receive notification so that they can prepare a new Order for submission.
To cancel the Order, go to the Actions dropdown.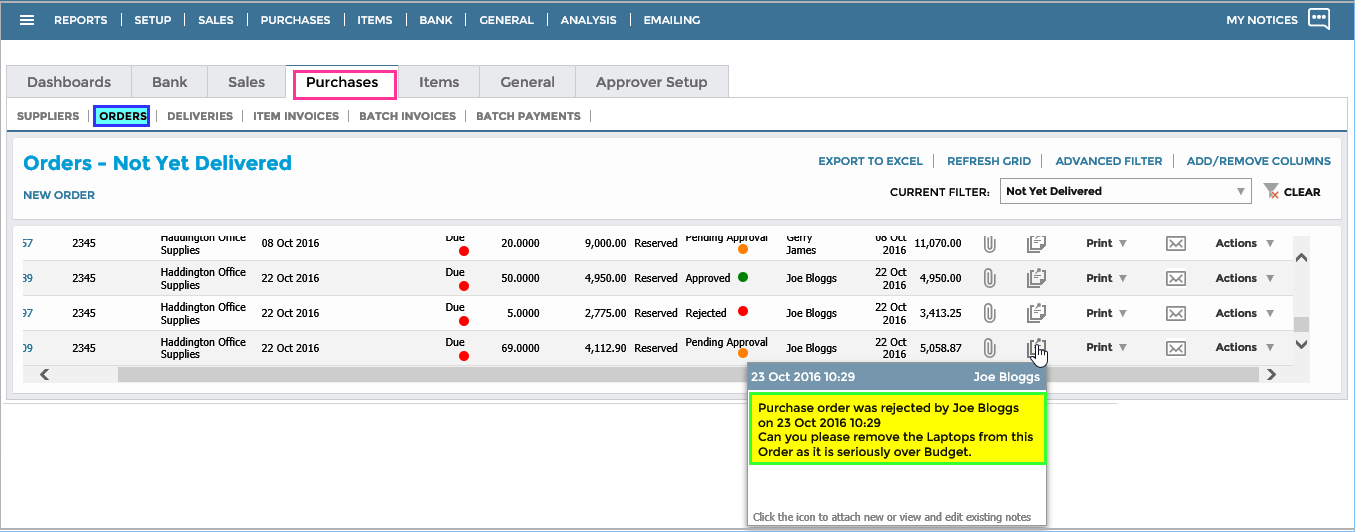
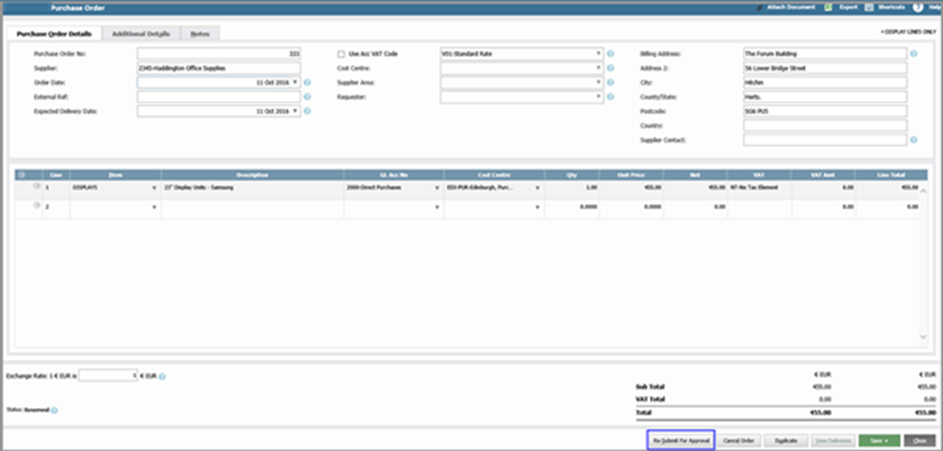
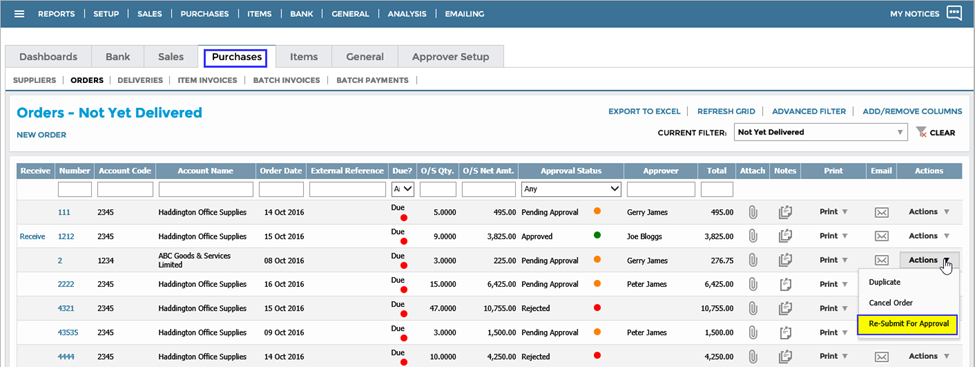
Resubmitting Orders and Invoices for Approval
You can resubmit Orders and Invoices for Approval after making the appropriate amendments by clicking Re-submit for Approval at the bottom of the Order, or in Purchases > Orders, under Actions.
Approved Orders
If the Approver clicks Approve with Note in the email, they can enter a note on the screen before clicking Approve.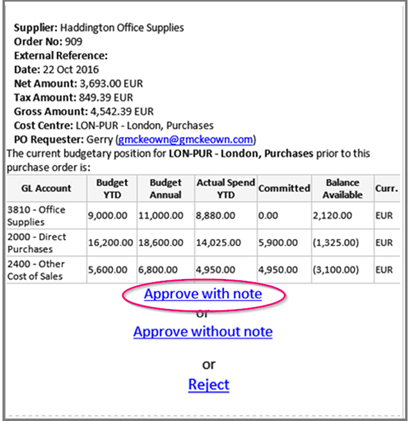
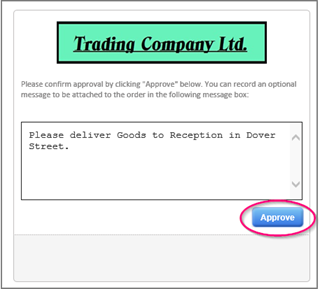
In Purchases > Orders the orders appear as approved in the Orders Grid and await subsequent receipt of the Goods from the Supplier. To view any attached Notes, click the Note icon. 
The Requester (if any) receives an email notification that the Order has been approved.
The Approval Process without Email Notification
If the Approver is a System User and Notify by Email is set to off, then the approval process is as follows:
- Go to Purchases > Orders and find the entry.
- The following statuses will be displayed in the Approval Status column:
- Pending Approval: This usually means that an email has been sent to the Approver,
- Pending your Approval: This refers to a System Approver who will use the Actions dropdown to affect the next step.
- Pending: This means the order has not been approved. Under Actions, select Re-Submit for Approval.
- Go to the Print dropdown and select PDF to copy the Order or Invoice. It will be labelled *Order Not Approved*.
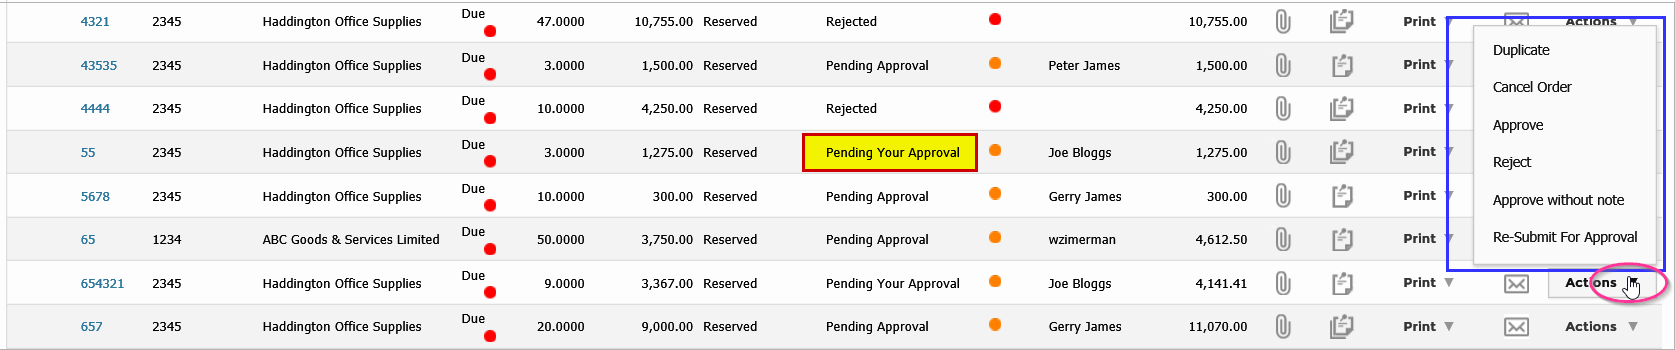
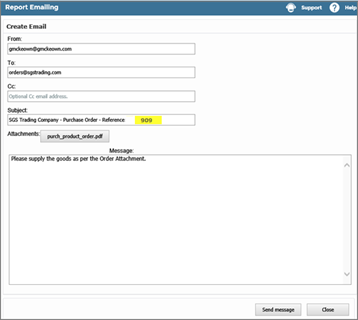
- Click the Email icon against the Order you want to send to the Supplier. This opens the Report Emailing window.

- Enter the email address if it’s not already in the Supplier Master Record. Complete the email and click Send Message.
Absent Approvers or Requesters
If the Budget Holder becomes unavailable for an extended period, then:
- Assign another Approver, in Budget Areas to all the Budget Heads.
- Re-submit each Order or Invoice for re-approval. The new Budget holder will receive any subsequent Emails.
If one of your Requisitioners is absent for a period:
- Replace them with someone else on any of the outstanding Orders or Invoices.
- Re-submit each Order or Invoice for re-approval. This approver will receive any emails.
The Invoice Approval Process for Un-Ordered Goods and Services
This example deals with Invoices that arrive for which there is no Order but require Invoice approval.
This will apply:
- If Invoices that have Exclude from Approval and Order Required are set to off in the Supplier Master Record.
- Equally to Purchase Debit Notes (Supplier Credit Notes).
This will not apply:
- If the Invoice is below the threshold set in the Approval Settings tab of the Company Details & Settings.
- If the Invoice is a third-party Invoice arising from external systems and Include 3rd party orders/invoices in approval is set to off.
- If Order Required is set to on, then you cannot enter an Invoice until you enter an Order. Instead, you will receive a message.

The Approval Process
- Enter the Invoice details. The Requester is not necessary in this instance.
- Click Save.
- The same rules apply regarding the financial hierarchy of Approvers, and an Email will be sent to the Approver. Approved Invoices are then ready for posting.

The Combined Order and Invoice Approval Process
The following applies when the Order and Invoice are both required to undergo approval. An Invoice will only undergo the combined process if both:
- An Order in the system has or awaits approval.
-
Exclude from Approval is set to off in the Suppliers Master Record.
Orders will bypass approval if:
- The Order is less than the minimum stated on the Approvals Parameter Settings.
- The Invoice value is also less than the minimum stated on the Approvals Parameter settings.
- The increase in value of the Invoice over the Order is less than the amount allowed on the Approval Parameter settings, meaning re-approval is unnecessary.
The Approval Process
- Enter the Order as described previously and process it to the status of Approved.
- Follow the "Receive Orders and Match Invoices" in How does the Purchase Ordering System Work?
- The Invoice received from the Supplier can differ from the Order, in Quantity (excluding partial deliveries discussed below) or Value. If so, during the Invoicing process:
- Amend the price to match the Supplier Invoice by double-clicking on the field. If the Value increase is greater than that specified in the Approval Settings, the amended Invoice will go for re-approval.
- Add lines for other services such as Transport.
- It is not possible to amend the Quantity. If there is a Quantity difference between the Supplier Invoice and what was received in good condition (what the GRN shows) then you must get a new modified Invoice from the Supplier before progressing with this delivery.
- If the Invoice agrees with the Order in both Value and Quantity, it will not go for Approval. Instead, it will appear in the Purchase Invoices grid awaiting posting. If it differs from the approved Order, then it will go for approval.
Budget Holder Reporting and Dashboards
There are two Reports provided with the Budget Holder Approval process.
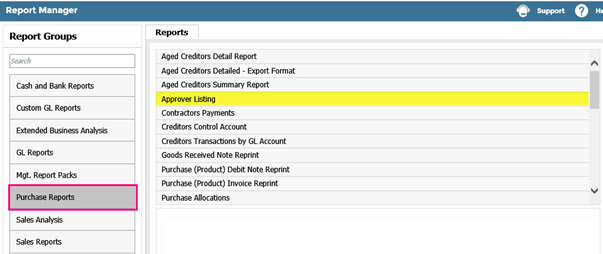
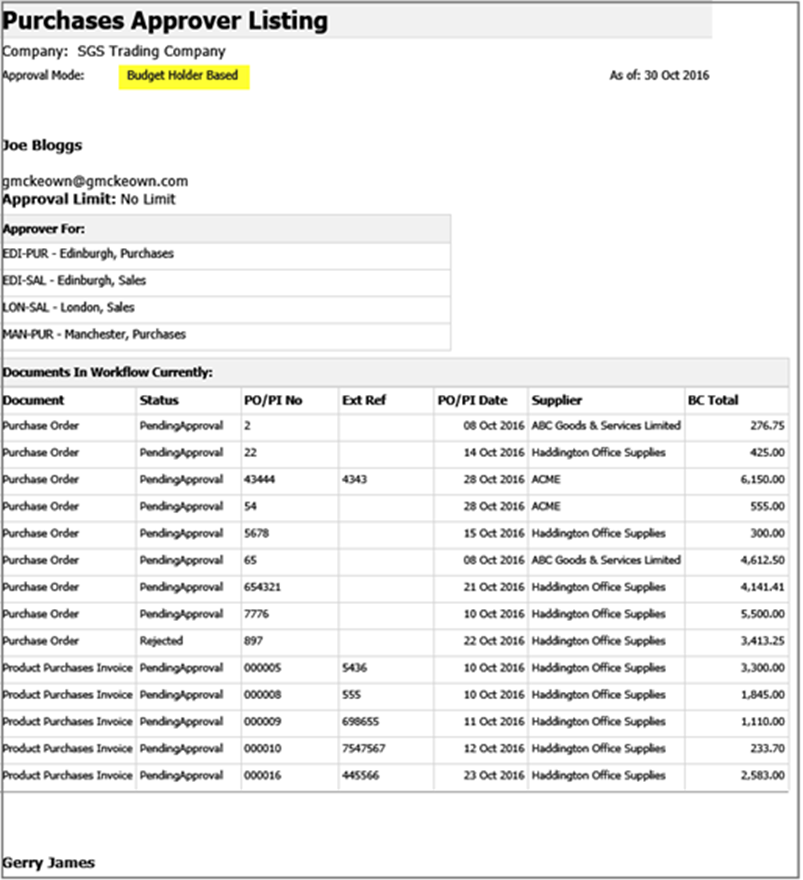
Purchase Approver Listing Report
This report shows a list of the Budget Holder Approvers, the BI Codes for which they are a nominated approver, and the Orders and Invoices awaiting progress.
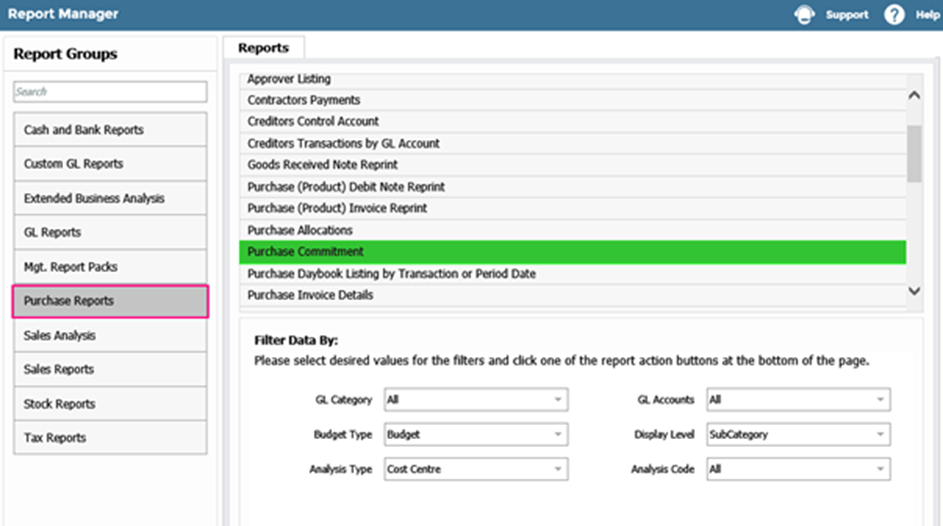
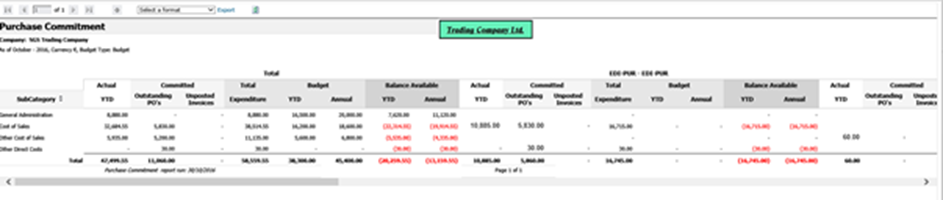
Purchase Commitment Report
This report shows the status of expenditure against a variety of General Ledger and BI Codes, detailing Actual Expenditure To Date, Commitments, Budgets, and Amounts available for further expenditure.
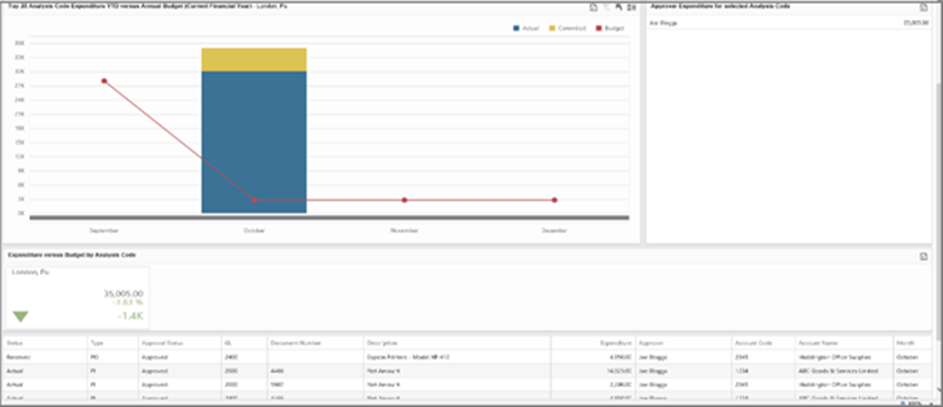
Dashboard
The Dashboard provides a high-level view of actual and committed expenditure versus budget year to date. This is a visual of the overall committed and actual spend relative to the budget, whether there is under or overspending in a particular area/period, and the overall trend.
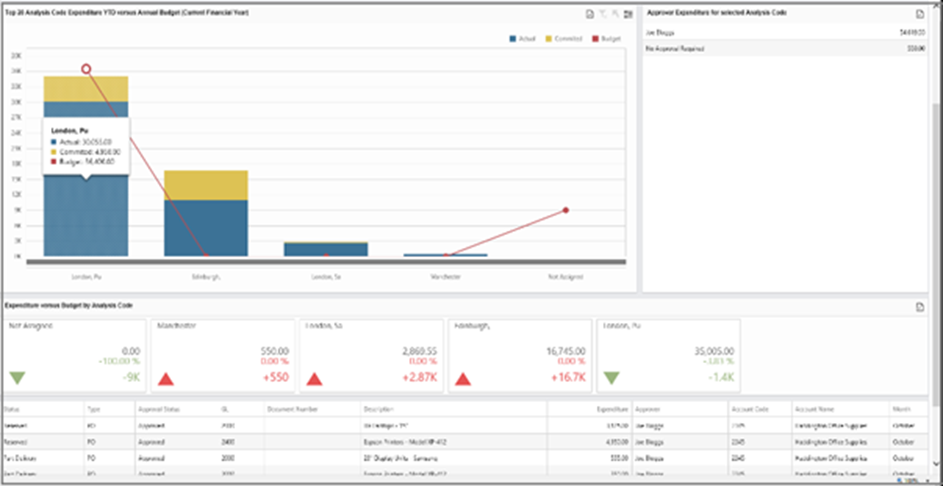
You can drill down further in the dashboard by choosing a particular cost centre and then the monthly position. The dashboard also provides a breakdown of the Purchase Orders and Invoices related to the expenditure and contains a summary of the expenditure by approver by BI Code.