
Introduction
Why use AutoEntry?
Using AutoEntry reduces the manual entry of Purchase Invoices/Credit Notes. With AutoEntry the details of OCR-scanned Purchase Invoices are entered into your Purchasing system automatically.
How does AutoEnty work?
The vast majority of your inbound Invoices will arise from a defined group of regular Suppliers (Vendors). AutoEntry can memorise the layout of Invoice and Credit documents from each of these Suppliers, whether scanned copies or emailed PDFs. AutoEntry uses its OCR (optical character recognition) software to convert the images to digital characters and post the results directly into your Purchasing System, field by field, line by line, into the corresponding fields in the Purchasing system tables.
The system will still continue to facilitate the manual entry of other occasional Invoices from Suppliers who might not be set up for automatic processing through the scanning function.
Integration with the rest of the system
AutoEntry works with all the existing features of the system, including Workflow Approval.
Decide whether to approve invoices from integrated products as follows:
- Go to Setup > Approval Settings.
- Tick Re-approve PO Documents from Integrated Products or Re-approve PI/PN Documents from Integrated Products if you want to reapprove documents from Kefron in the system. Otherwise, leave it unticked to bypass the system's Approval process. For more on our new WFA, see New Workflow Approval.
During the approval process, a copy of the actual Invoice image is automatically attached to the transaction for examination by the approver(s).

Navigating AutoEntry
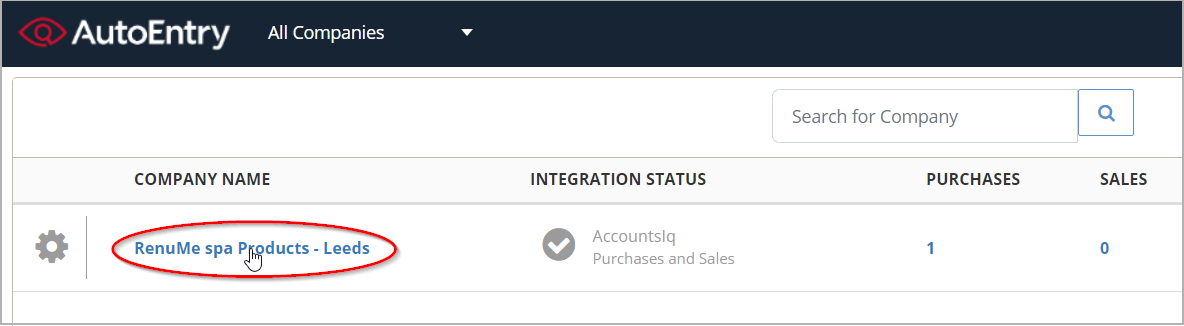
- In AutoEntry, go to Purchases > OCR Scanning Sub-System.
- Log into AutoEntry with your email address and the password which you received from your system provider.
- Click the appropriate Company Name.
See:

Company Settings
Company Settings contains parameters relating to your Company and the processing of your Purchase Invoices. Your Support and Implementation personnel will assist with the setup of these parameters. Once set up, you don't need to access this part of the system again. 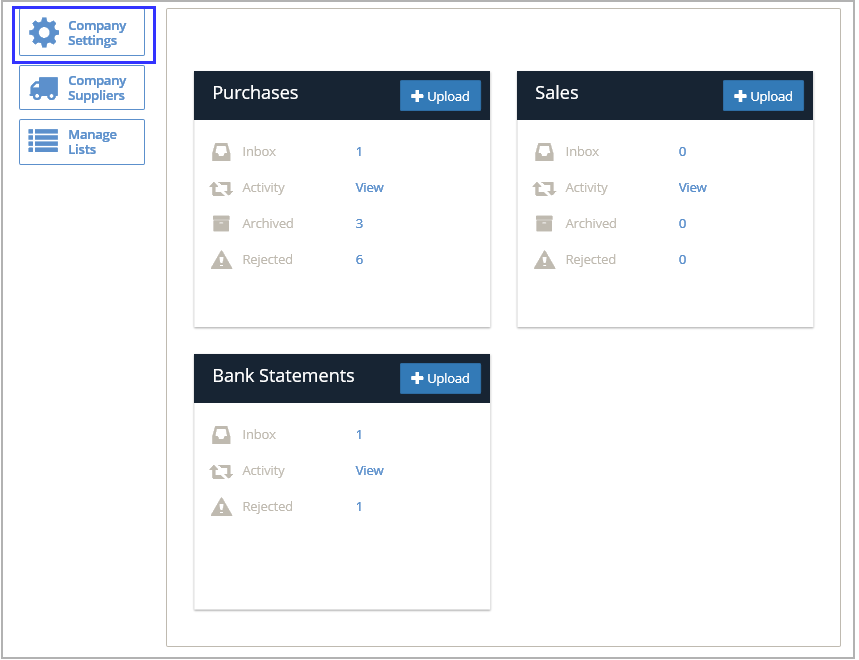
Company Details
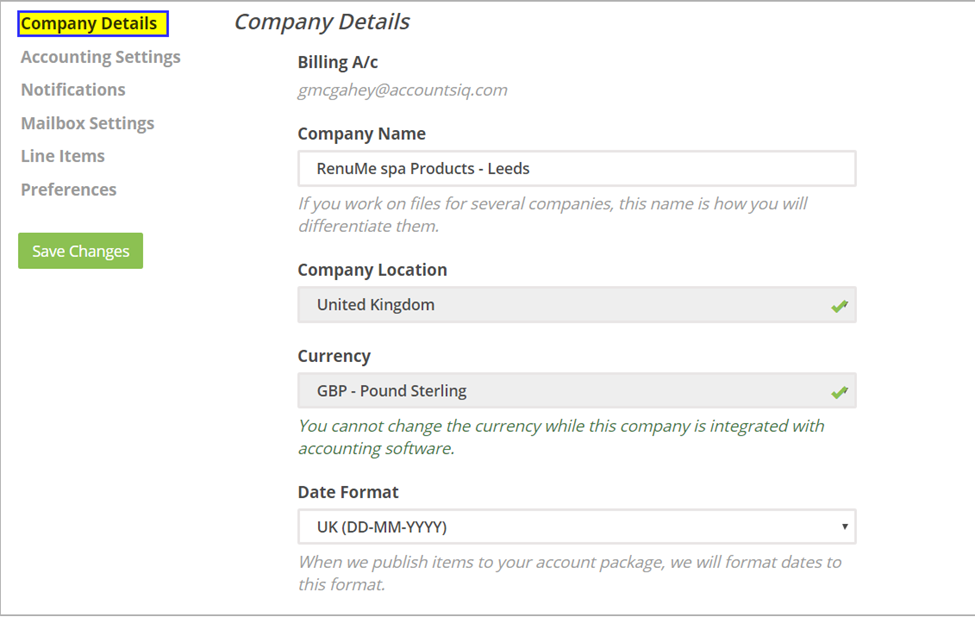
- Billing Account: The email address of the person in your company who is responsible for billing.
- Company Name: The name of your Company.
- Company Location: The location of Head Office.
- Currency: The Base Currency of your Company.
- Date Format: The date format you use.
Accounting Settings
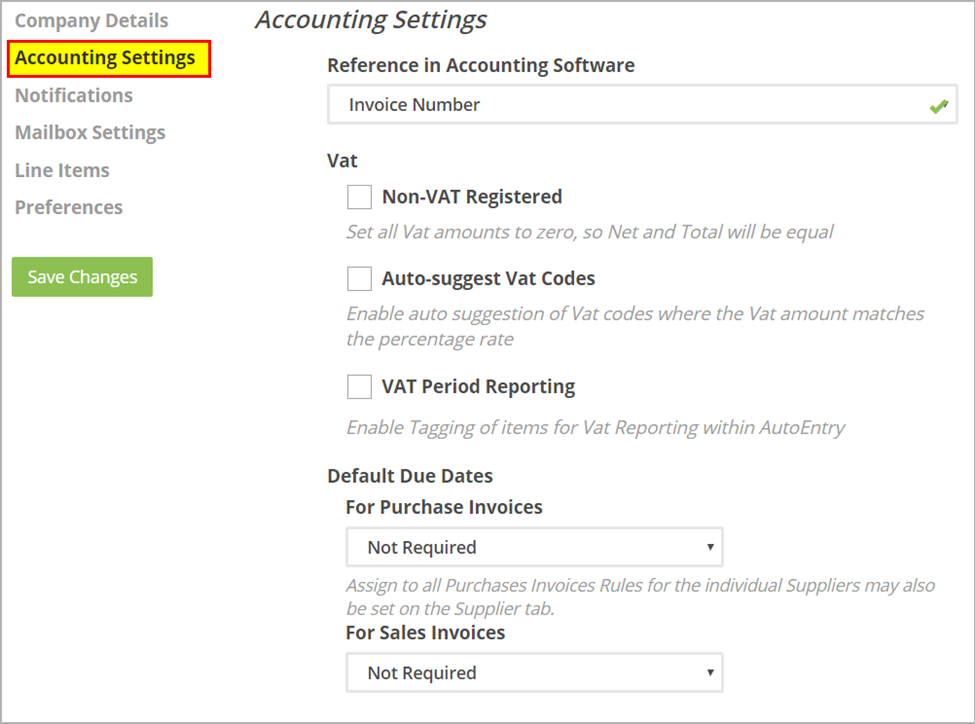
- Reference in Accounting Software: Enter an identifying reference for your Purchase Invoices.
- VAT: Indicate your VAT Status and tick any requirements.
- Default Due Dates: Select from the dropdowns if you wish the System to add a due date to the Invoice Transactions.
Notifications
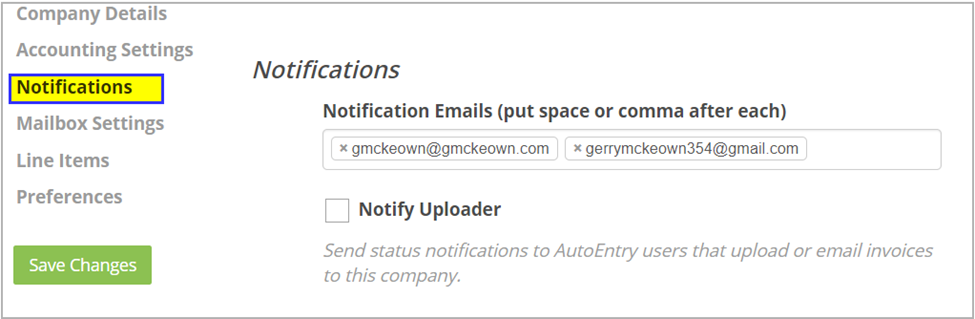
Notification Emails: Enter the email address(s) of the person(s) you want to notify when new Invoices appear in the Mailbox.
Mailbox Settings
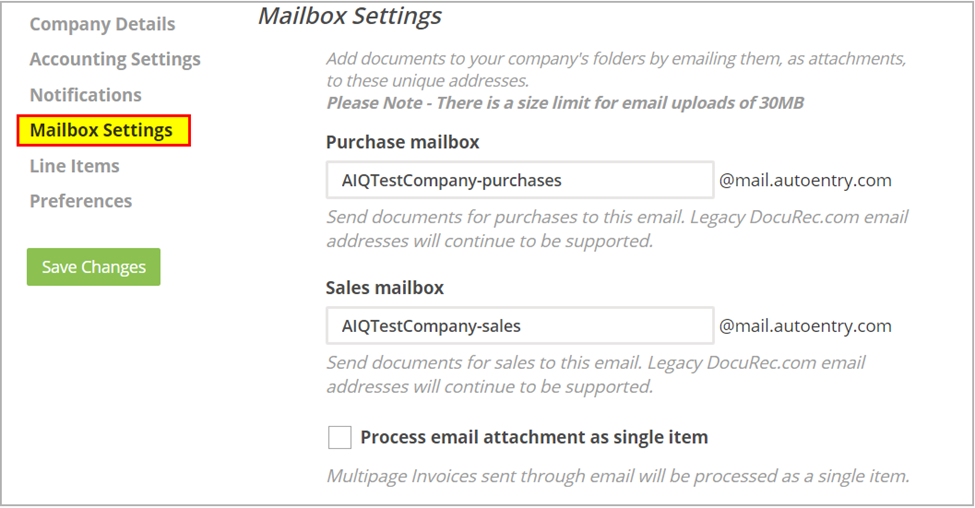
Purchase Mailbox: You need to set up a special email address to receive emailed Purchase Invoices. Enter the first part of the email address here. The second part, @mail.autoentry.com, will be automatically appended.
Line Items
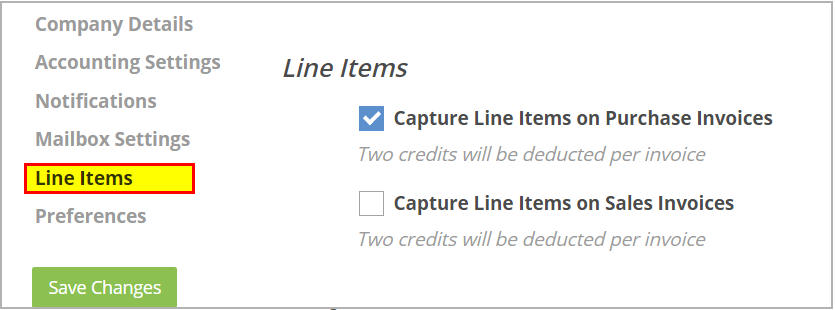
Line Items: Tick this box if you wish the system to capture Line Items as well as Invoice Totals.
Preferences
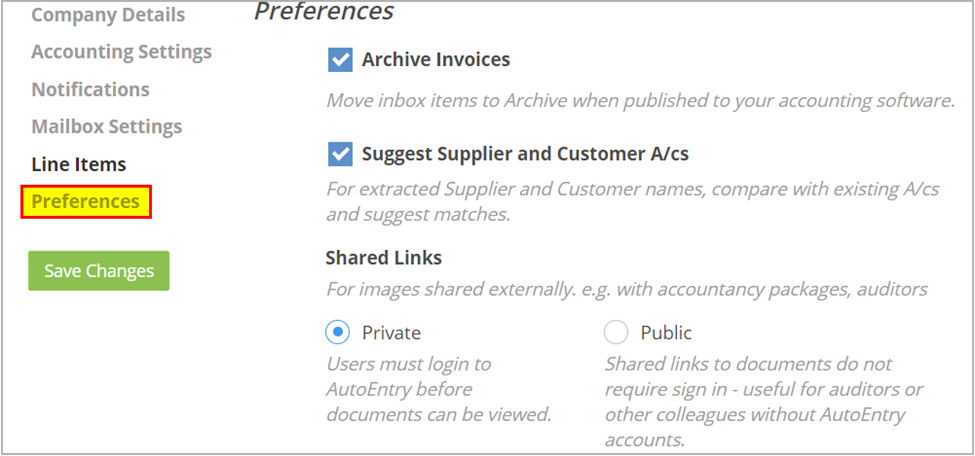
Preferences: Tick as appropriate.
If you have made any changes to these recommended settings, click Save Changes now.
Company Suppliers and Manage Lists
Click Company Suppliers.
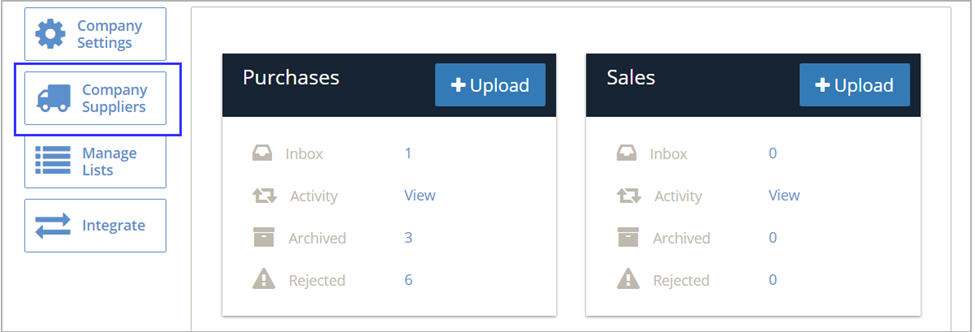
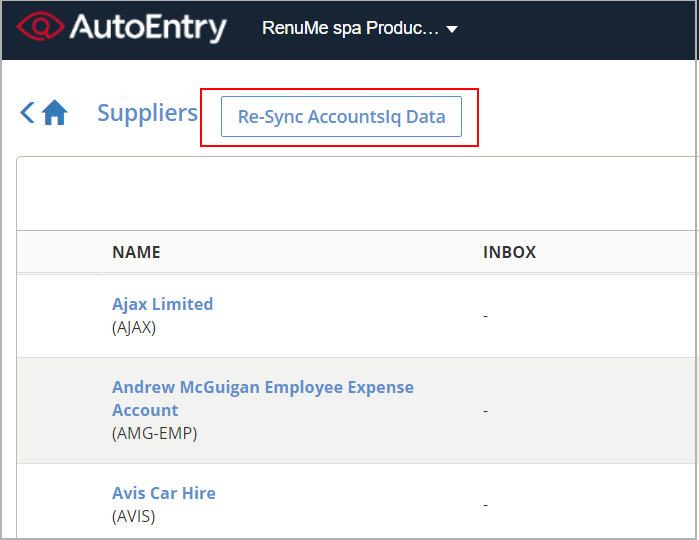
Click Re-Sync AccountsIQ Data to update your Supplier, GL Code, and VAT List. Click Manage Lists to examine any of these items. You may need to carry out this action from time to time as new Suppliers or GL Codes are added.
Entering Purchase Invoices into the AutoEntry System
You can either manually scan your Invoices or receive them via email. Ask your Suppliers to email your Invoices to the Purchase Mailbox nominated in Mailbox Settings.
Process a manually scanned Invoice
- Scan the Invoice.
- Save it to a nominated folder on your Desktop.
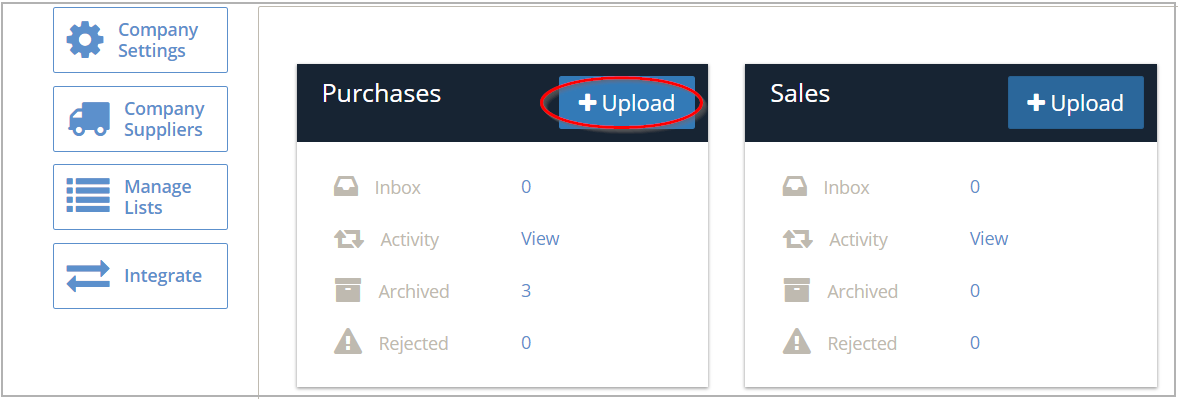
- In AutoEntry, click Upload.
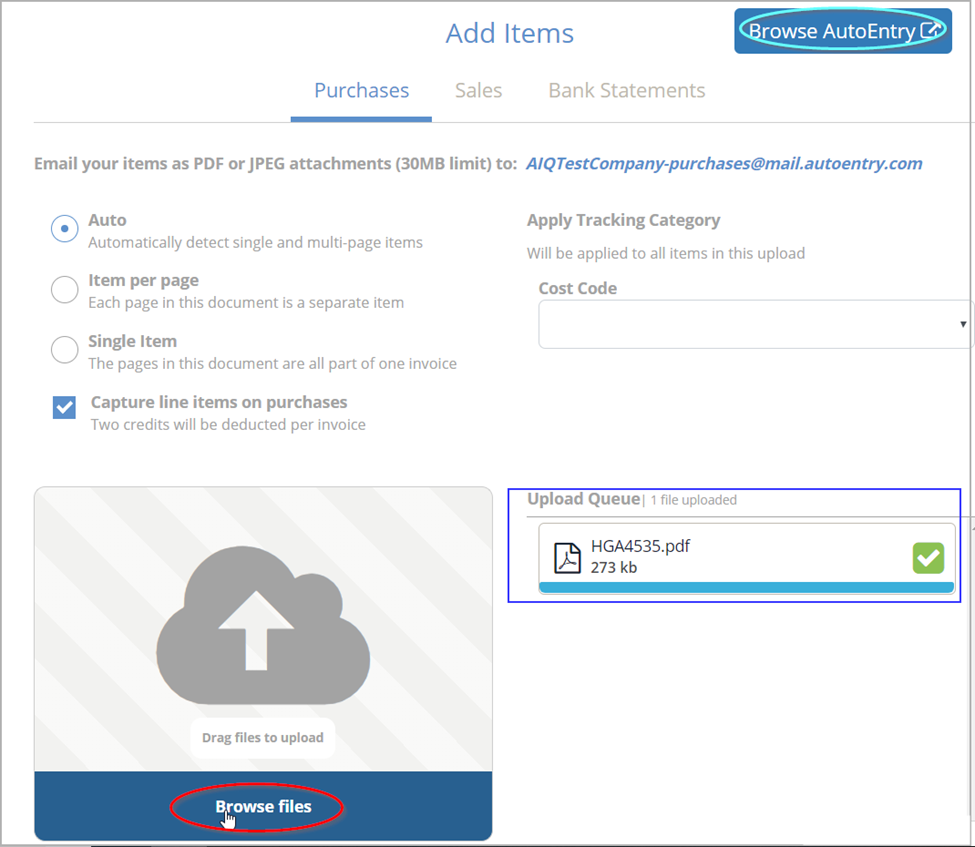
- Click Browse Files. Select your scanned file.
- Click Browse AutoEntry to see the status of your uploads.
- Processing can take several hours. You (or whoever you nominated in Notifications) will receive an email update when the process is complete.
Emailed Invoices
Emailed Invoices will be uploaded automatically. Click Activity to view them. Processing can take several hours. You (or whoever you nominated in Notifications) will receive an email update when the process is complete.

Processing Scanned Purchase Invoices
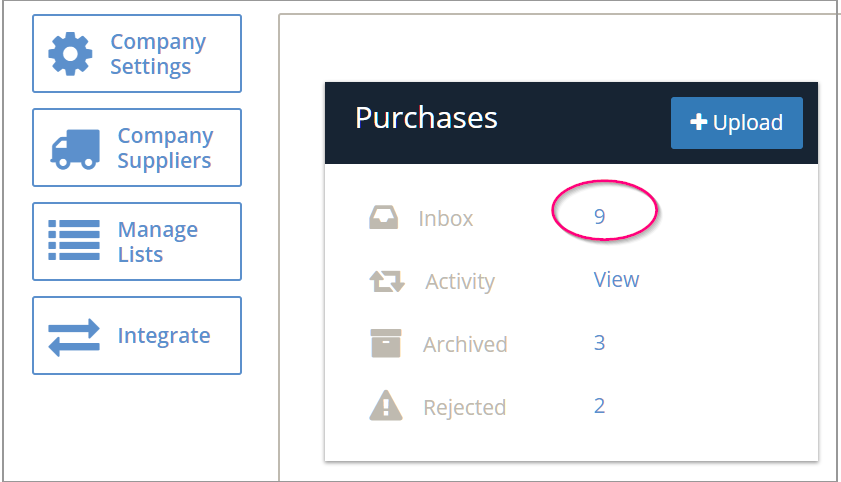
You will receive an update email when there are Invoices in your AutoEntry Mailbox.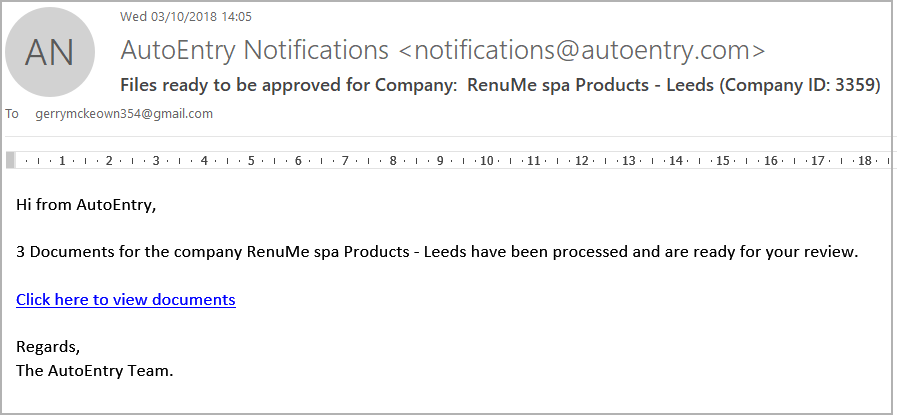
- Log back into the AutoEntry System.
- Click your Company Name.
- Click Inbox.
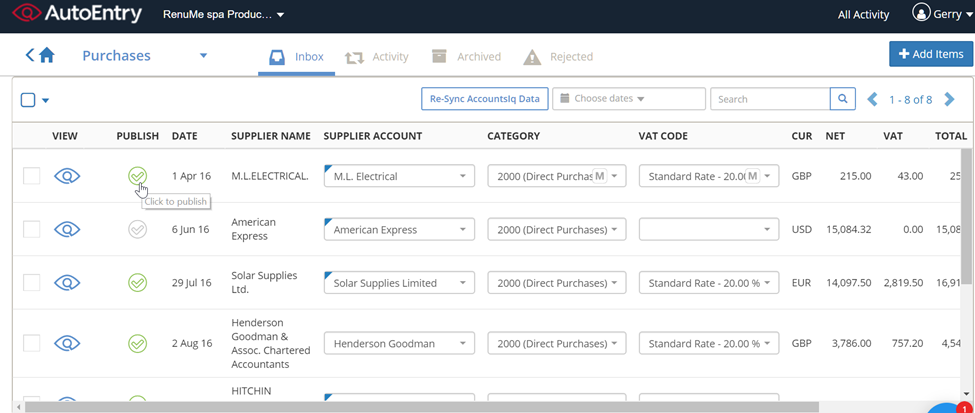
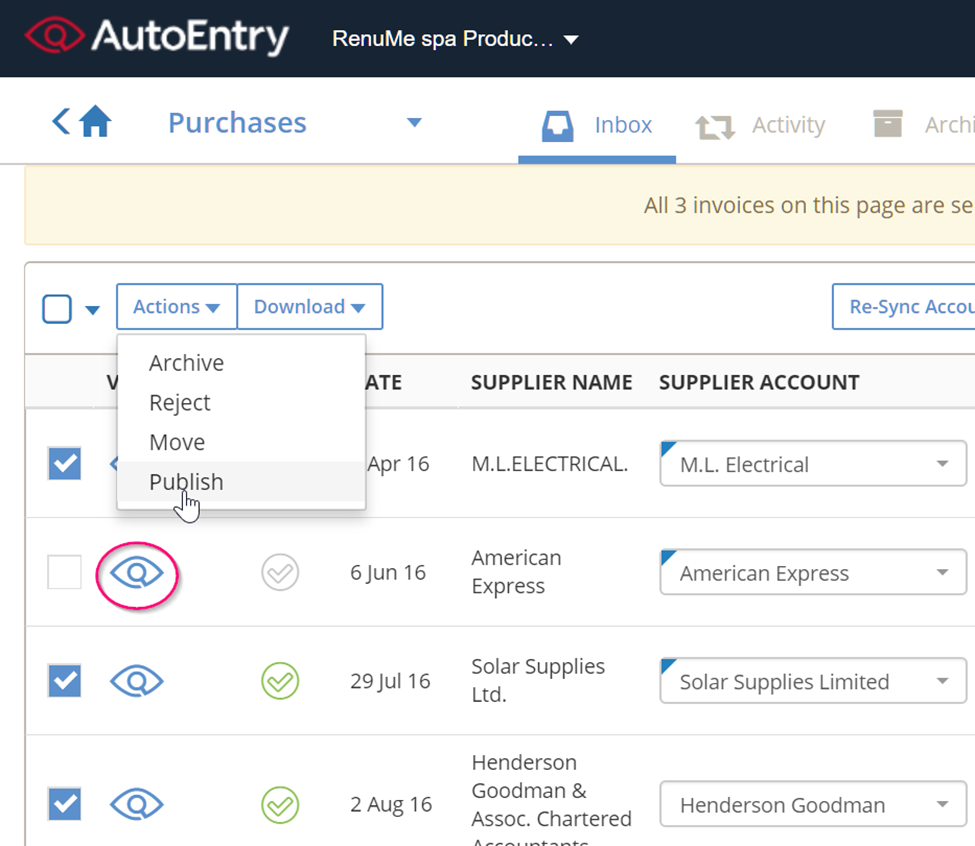
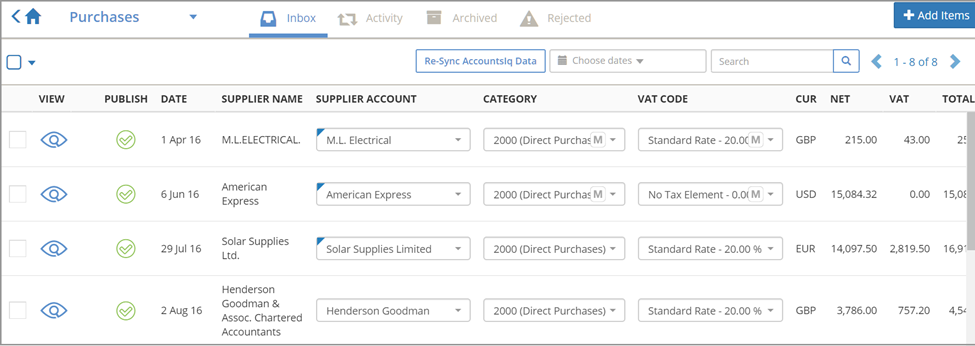
- Invoices with green ticks in the Publish column are ready to be transferred into the Accounting System. Click the eye icon to view an entry. Apply actions to entries by ticking the boxes to the left of the entries and selecting from the actions in the dropdown.
Example: Resolving issues with Invoices
The American Express Invoice does not have a Green Tick Mark. There is something wrong with the Invoice. 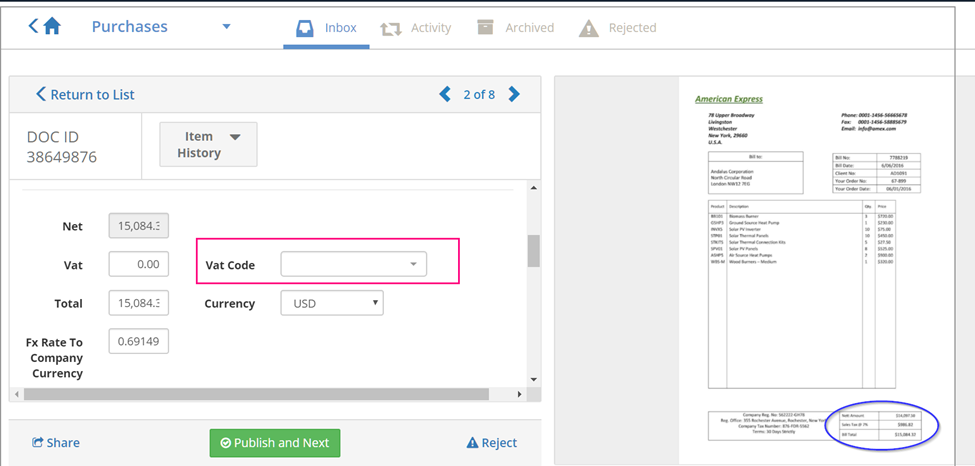
The problem is that it is a USD Invoice with Sales Tax instead of VAT. You can Reject it and process it manually. Or, since it has calculated the Invoice correctly by treating the Sales Tax as irrelevant, correct it here by choosing a 0.00% VAT Rate Code from the dropdown.
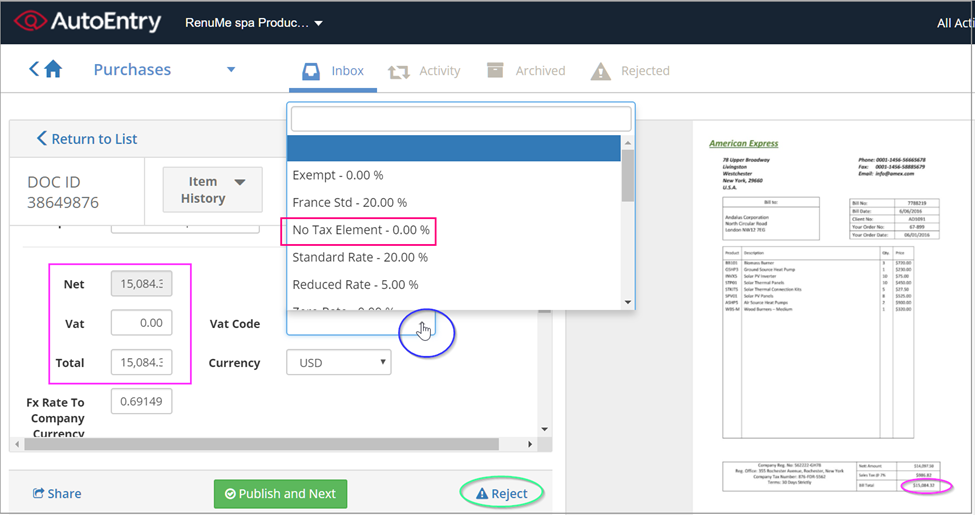
The Invoice is now ready for publishing.
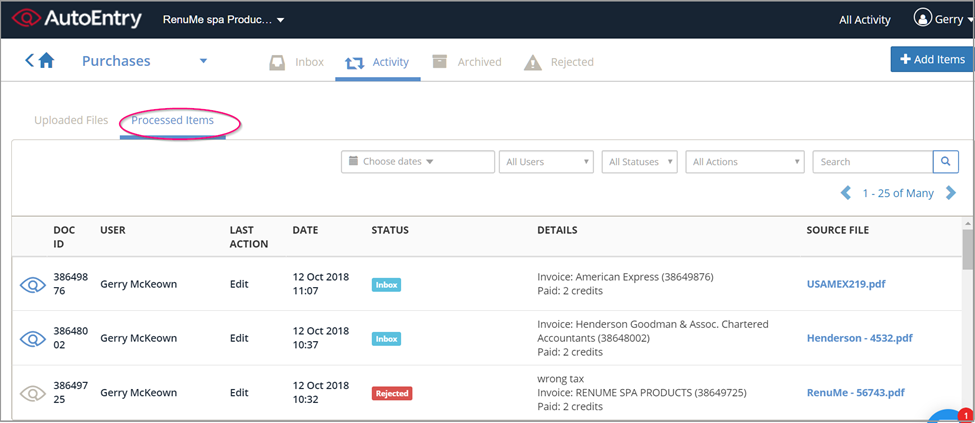
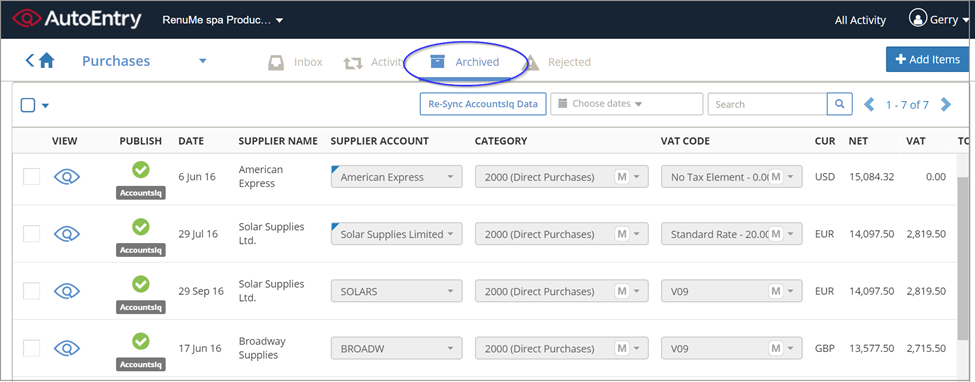
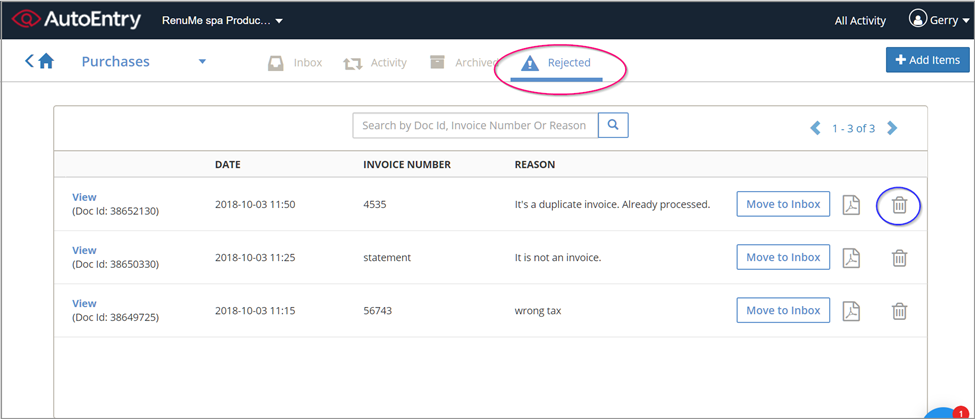
The Activity, Processed Items, Archived, and Rejected screens
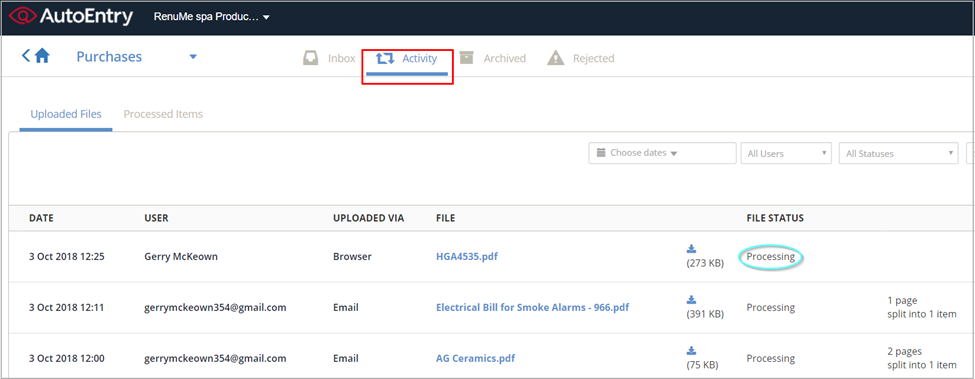
The Activity Screen
The Uploaded Files screen shows the uploaded Invoices and their status. Click the File name to view the PDF.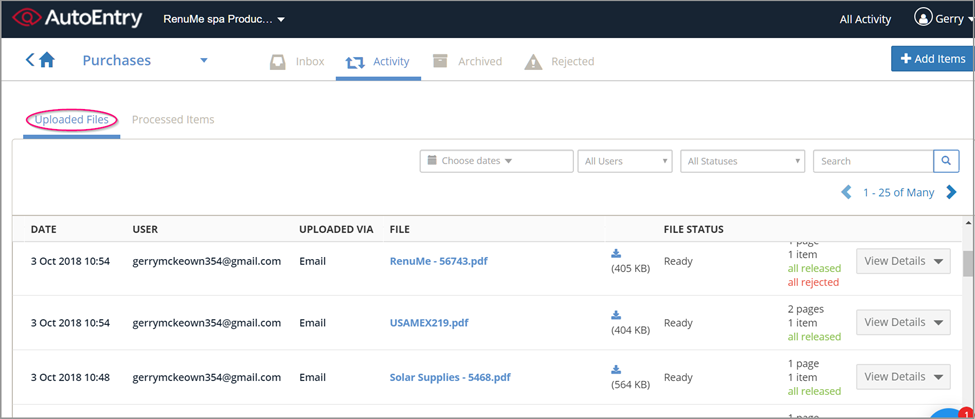
The Processed Items screen
The Archived Screen
The Archived Screen shows the Invoices which have been successfully posted in the Accounts System.
The Rejected Screen
This Rejected screen shows rejected Invoices with the reason. You can either delete them or, in the case of wrong tax, move them to the Inbox anyway.
Managing Invoices in the system
Step One: Check the Invoice
Processed documents will now appear in the system in Purchases > Item Invoices.

The AutoEntry system cannot determine or allocate Dimension Tags, so in most instances, the Invoices will be missing these codes. Add these codes if needed, then tick OCR Checked:
Optional: Add OCR-related columns to the listing grid
There are two fields that you need to display on the Item Invoices grid.
- Click on the Add/Remove Columns icon.
- Add the following
- Created By: This will distinguish those Invoices which have been received from AutoEntry as manually entered invoices will have the name of the person who entered the data (from their login).
-
OCR Checked: This indicates whether the Invoice has had its coding reviewed and updated. If this field is set to Checked, then you can send the Invoice for Approval (or not) using the Actions dropdown.

Step Two: Process the Invoice
Once the document has been OCR Checked, it can go for Workflow Approval, if using, and the Invoice status will appear in the Approval Status column. Once approved, it can be posted as normal.