Introduction
Legacy vs New Analysis Module
This article concerns the legacy analysis module.
- If you are currently using this version, we recommend migrating to the newest release.
- If you are a new customer, you will use the latest release by default.
See Using Dimensions for full details.
Info: Extended Business Analysis
For in-depth knowledge about BI Codes, including creating, deleting, and deactivating them, read Using Extended Business Analysis before proceeding here.
Set up process
Business Analysis can be used for Job or Project performance monitoring as follows:
- Rename the BI Code to Job No. or Project Code.
- Set up the relevant Dimensions and Elements.
- Create Job Nos. by combining the relevant Elements from the relevant Dimensions.
Reporting
Using Job Nos. will provide Profit and Loss Reporting against each individual Job. In addition, by attaching the Job to a Dimension Element, you can produce Profit and Loss reports against each of these Dimensions and Dimension Elements, for example, all Jobs for Commercial Customers in Essex.
See:


Example: Construction Job
Here is a typical setup for a Job in the construction sector: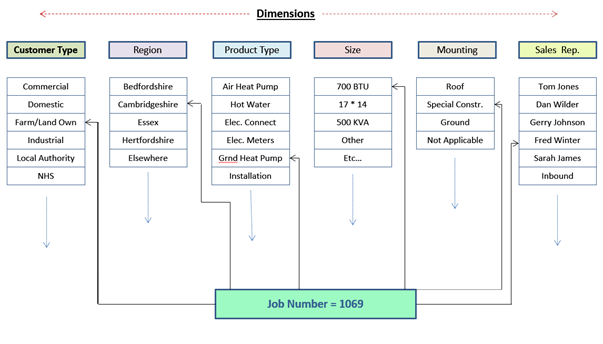
Follow the instructions in for Dimension, Element, and BI Code setup as outlined in Using Extended Business Analysis with the following changes:
- Change BI Code name to Job No., or something meaningful.
- Set up Dimensions. For our construction example, we have Customer Type, Product Type, Size, Mounting, Sales Rep.
- Set up Elements relevant for each of the Dimensions.
- Create a Job No. by assigning Dimension Elements.
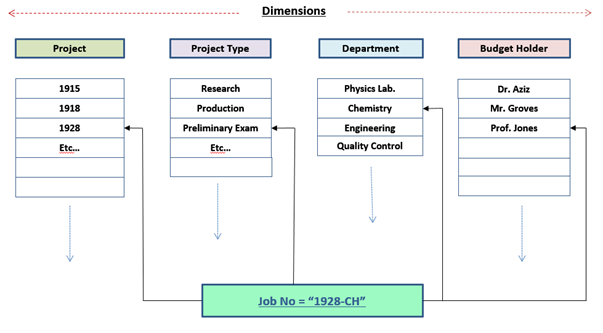
Example: Multi-Departmental Research Job
Some Jobs might need to be attached to several Departments, for example, a Research Project. In this case, consider setting up the Project No. as a Dimension as follows:
- Set up the Project as a Dimension along other Dimensions, such as, Project Type, Department, and Budget Holder.
- Create the relevant Dimension Elements. For Project, the Elements will be IDs.
- Create Project Nos. using a combination of Project ID and Department ID for all Departments under which that Project will attract cost. For example, combining Elements from the Project and Department Dimensions will create the following Project Nos:
- 1928-CH (Project 1928 in Chemistry)
- 1928-PH (Project 1928 in Physics)
- 1928-EN (Project 1928 in Engineering)
- 1928-QC (Project 1928 in Quality Control and Testing)
- Continue, attaching each Project No. to Elements in the other Dimensions, like Budget Holder, and Project Type.
This will subsequently facilitate Performance Reporting on:
- Project 1928 or all projects.
- Performance of all Projects of each Type or all Project Types.
- Performance for each Department or all Departments.
- Performance of each Budget Holder across all Projects or all Budget Holders.
- Or any combination of the above, whether individual or total, for example, Individual Budget Holder against one or more Departments.
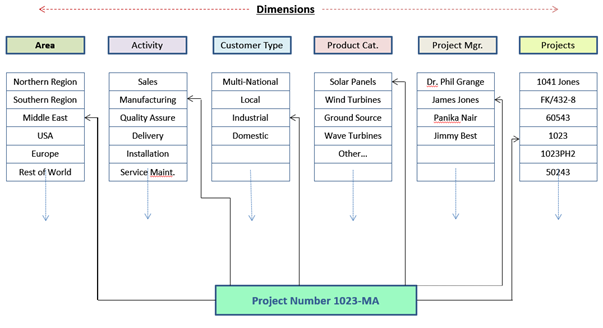
Example: Manufacturing
Here is a similar example for a Project that engages in several Activities within the same Project Code. Project Number 1023-MA is attached to Project 1023 and Activity MA (Manufacturing) as well as to the other relevant elements of each Dimension.