
1. Introduction:
You can operate the Sales System without Sales Orders if you wish. And, even if you operate Sales Ordering, there may be certain Invoices for which you may not want to create and issue a Sales Order – such as bills for Extras, Transport, on-the-spot Services, etc. This program facilitates the entry of Customer Invoices for which there is no preceding Order. Its companion program, “How does Sales Ordering Work?”, details the instructions for Customer Invoicing where a Sales Order (and possibly Sales Quotes) has been raised and accepted by the Customer beforehand.
Sales Item Invoicing is integrated with the Inventory Management system, either fully in the context of quantities management, or partially in the context of non-stocked goods and services. Alternatively, you can also create Sales Invoices through the Batch Entry facility (“How does Sales Batch Invoicing Work?”) again without the necessity of a preceding Sales Order. Such Invoices do not use the Inventory Management Tables and consist of single line entry only - whereas Sales Item Invoicing facilitates multiple lines - one for each Product being invoiced. The Sales Invoicing facility has a number of pre-requisites. These include the Customer Master Details table, the Inventory Master table (Stock and/or Non-Stock), and various Code tables including General Ledger Codes, Taxes and Currencies.
2. Sales Invoice (Item) Entry:
To enter a new Sales Invoice click on the highlighted area “New Item Invoice” as shown here;
This will bring up the following screen;
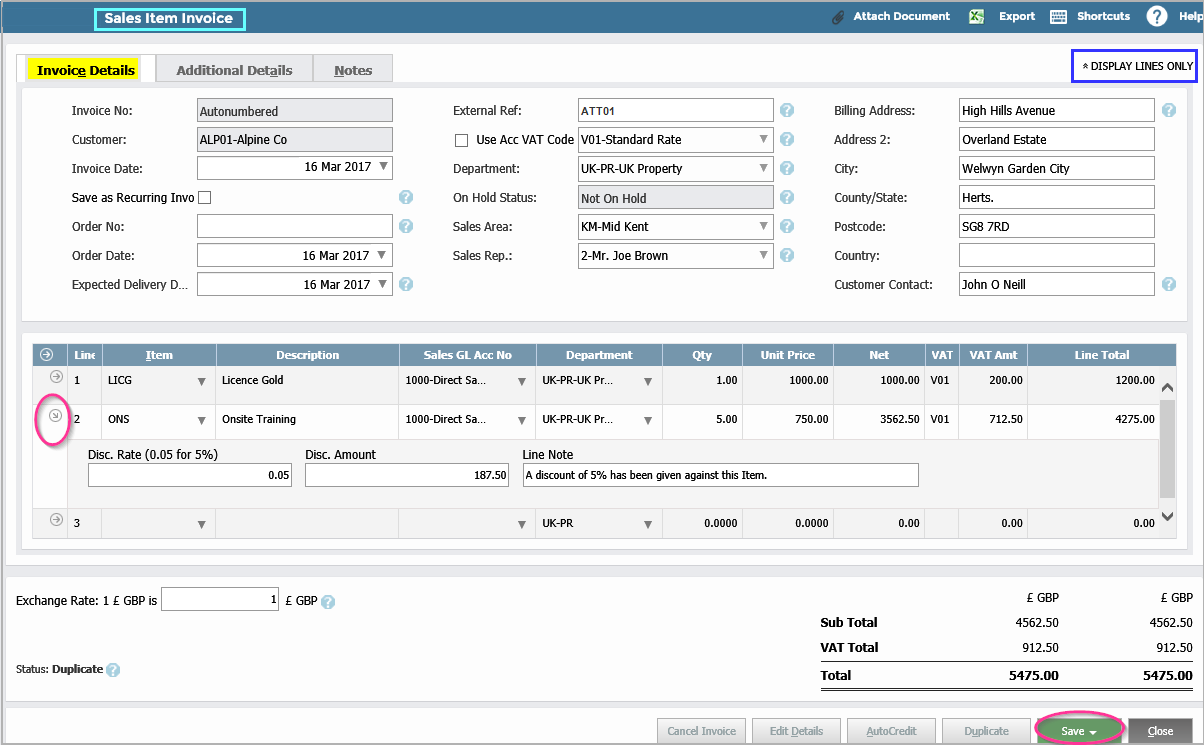
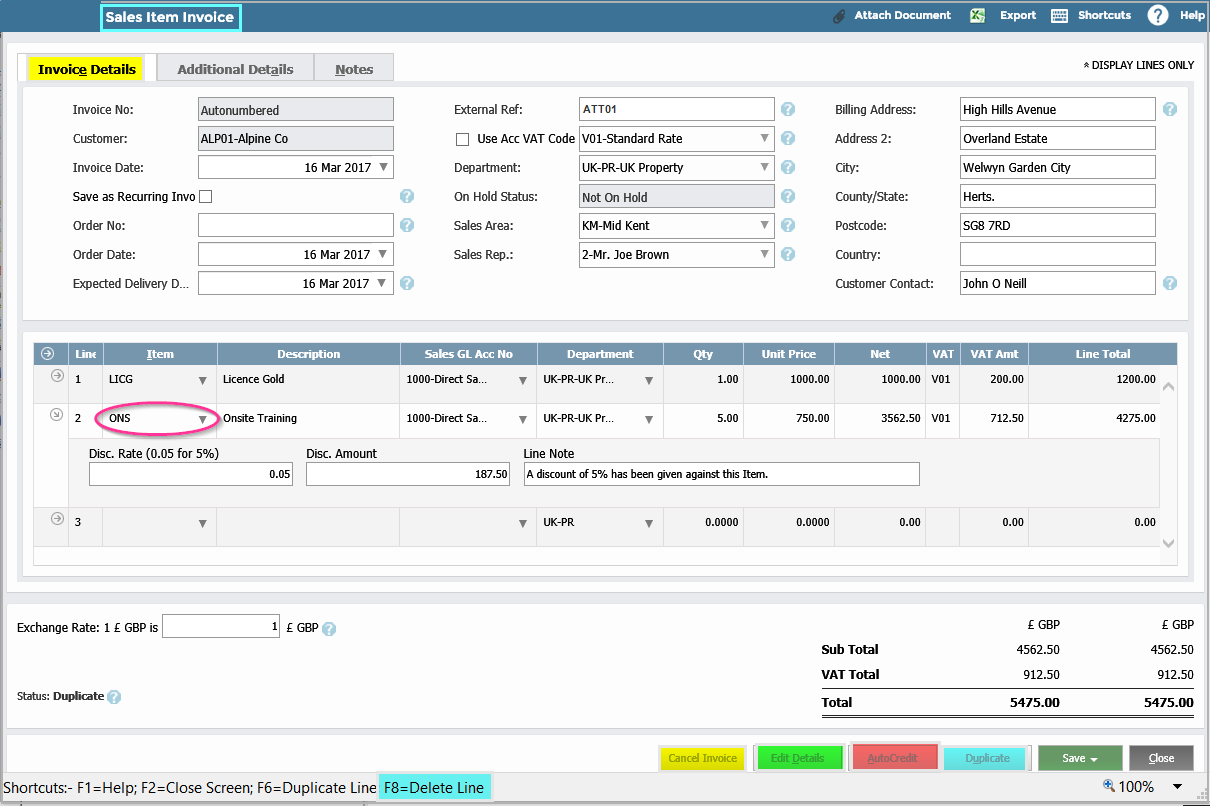
The Header portion of this Window should be filled in as follows;
The Invoice No. is controlled by a Setting in the “Company Details & Settings” program where auto-numbering can be switched “On” or “Off”.
Next, choose the Customer from the Drop Down provided which will retrieve and populate the details on the Invoice Header. The system now checks for duplicate Invoice Nos. for that Customer and will warn you, the User, if it’s found to already be in the system. Unlikely in the case of auto-numbering.
The Invoice Date is defaulted to today’s date, but you can change it using the Drop Down.
Save as Recurring Invoice: This topic is detailed in a companion article entitled “How does the Recurring Invoice Feature Work?”
The Order No. is irrelevant since this is an Invoice without an Order – but there may be some reference to a Customer Order No.
The Order Date and Expected Delivery Date are also largely irrelevant. They are also defaulted to today’s date but you can change them using the Drop Downs.
External Ref. - This is a number supplied by you to allow subsequent identification of the Invoice.
The Use ACC VAT Code and its accompanying Drop Down, inherited from the Customer Master record, indicate that this Rate of VAT is to be used on all Lines for this Invoice instead of the VAT Codes associated with the Products. When used, it is a default and can be over-ridden on any line.
The next field, Department (BI Code), is defaulted from the Customer’s Master record where it is an optional entry. A Department (BI Code) is a sub-division of the company and its uses and setup are detailed in the article “How do I Implement Extended Business Analysis?”. It is not a mandatory entry as you may not wish to use Extended Business Analysis or the Invoice might consist of several Departments. If there is an entry here, then it will be presented on each line of the Invoice where it can then be re-directed to another BI Code if required.
On Hold Status indicates whether this Customer is “blocked” at the moment for some reason.
Sales Areaand Sales Rep. are defaulted from the Customer’s Master record but can be changed using the Drop Down.
Billing Address comes from the Customer Master record and can be altered here.
You can alter or add a Customer Contact also.
Turning to the lower part of the screen which deals with the entry of the Invoice Lines, you can now temporarily remove the Customer Detail in the upper half of the screen by clicking “Display Lines Only”. Click again to restore. Similarly, the button highlighted in the Red Circle can be used to display/un-display details from the Inventory file for the Product nominated on that Invoice Line as well as Line Discount info.
Line Nos. are presented automatically. Click on the Line No. to expand it to view and insert optional Discounts, Stock information, etc. Click on “F8” to delete a Line on an existing Invoice.
Item: Enter the Item Code or choose it from the Drop Down. The example above shows a Line Item entry for a “Non-Stocked” Product. If, on the other hand, you were to enter a “Stocked” Product Code, then the Line presentation would look like this where you may have to also supply Stock Location information as to where from the goods were withdrawn;

The Description is presented for sight verification.
The Sales GL Codeis retrieved from the Inventory Product file which can be changed if required.
If you are using Extended Business Analysis then you will be asked to supply a Department (BI Code) in this next field – although it might be inherited from the Invoice Header, in which case it can be over-ridden here.
Next key in the Quantity of Item to be invoiced to the Customer.
The Unit Price (excluding Vat) is taken from the Item Master record, or, if the Customer has a “Price List” nominated on the Finance Tab of the Customer’s Master record, then the price from this Price List will be used instead.
The VAT (Tax) Rate Code is defaulted from the item record – or from the Customer record if the “Use Tax Code” and “Default Tax Code” are both set under Tax Settings on the Finance Tab of the Customer record. It can be changed at this stage using the Drop Down.
The VAT (Tax) Amt. and Line Total are now computed and presented.
Next you can enter an optional Discount Rate or Discount Amount for this Line. This will cause the Net, Tax and Line Total to be recalculated.
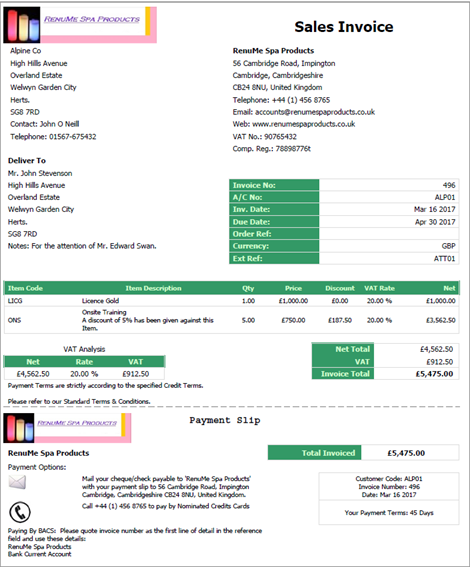
You now have the option to enter a Note against the Line which will be shown on the printed Invoice.
Exchange Rate. If the Customer is a Foreign Currency Customer then, at the start of the Invoice, you will be presented with an Exchange Rate from the Currency table at the lower end of the screen, which you can over-ride if necessary.

In this instance, the Invoice Line Prices will be calculated taking account of this Exchange Rate. The totals for both Currencies are shown at the bottom of your system Invoice.
Turning to the “Additional Details Tab” (which ideally should have been reviewed and modified, if necessary, at the same time as the “Invoice Details Tab”);
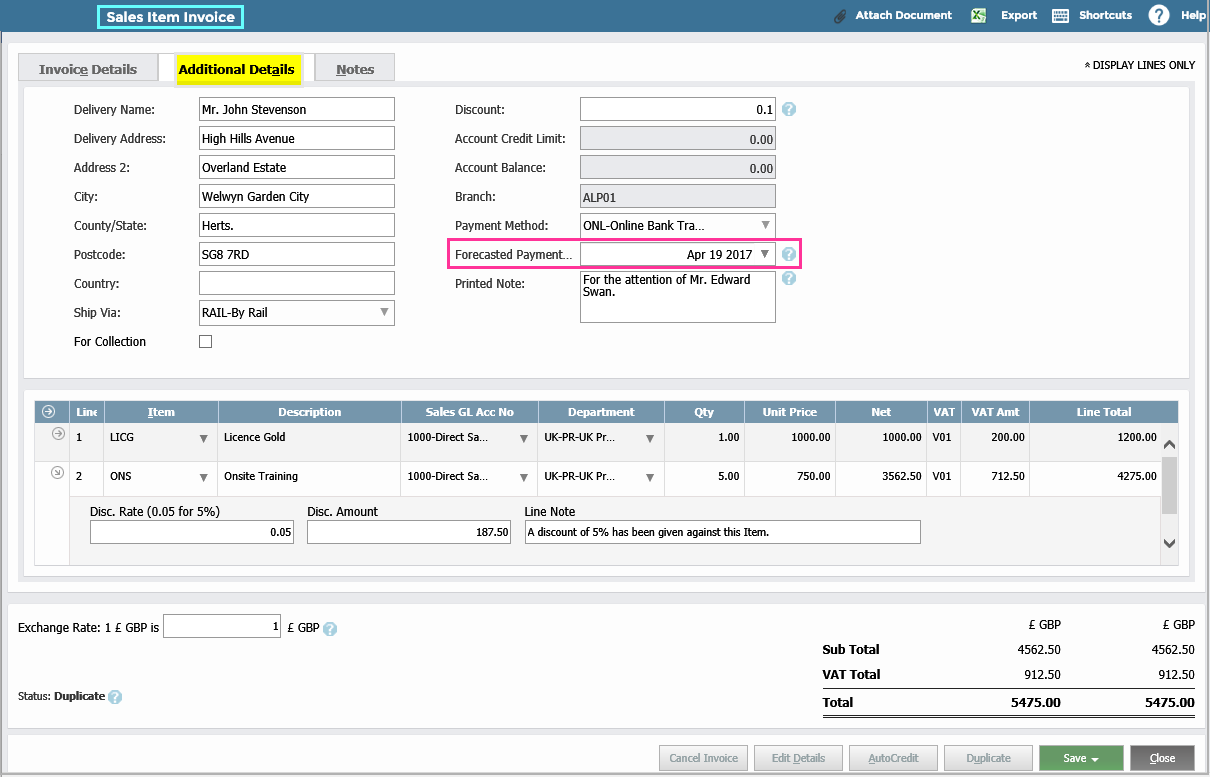
You can now change the Delivery details, if required.
Ship Via is inherited from the Customer’s Master record and can be changed now.
Click on For Collection if required. This will be notified on the printed Invoice.
Discount: Again, defaulted from the Customer’s Master record and applies to the Invoice as a whole. However you can change it here. If you do, you will be asked to confirm that it applies to all Lines on the Invoice and if so, the Net, Tax and each Line Total will be recalculated.
Payment Method: You can change the Customer Default here.
The Forecasted Payment Date is worked out (at the end of all Lines on the Invoice) based on your Customer’s payment history. If needs be, you can change this date using the Drop Down. The date will be used by Cash Flow Forecasting to predict when this Invoice payment will be received.
And here you can also add a Note to appear on the Customer’s Invoice;
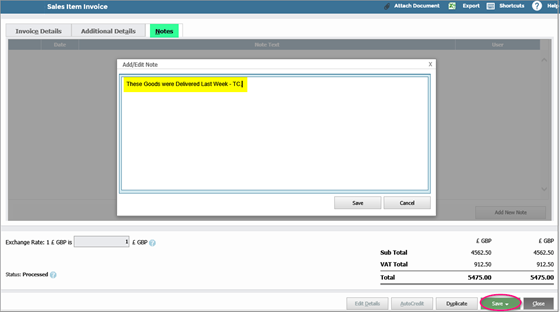
The third Tab on the Invoice Entry screen allows you to add internal Notes to the Customer Invoice;
3. Sales Invoice Amendment:
Prior to “Posting” (see 4. below) you can recall the Invoice at any time in order to amend it for any reason. Click on the Invoice No. as highlighted below to recall the Invoice;

You can now Delete Lines, Add new ones, change Quantities and Prices, Vat Rates, add Line Notes and Order Notes and so on. You can also amend General Ledger Codes and BI Codes. Click on the Item Code Drop Down to carry out these actions on any or all of the lines.
While you cannot Delete an Invoice, you can effectively nullify it by clicking on the “Auto-Credit” button which will create and allocate an exact replica Credit Note to the Invoice.
If there are amendments which you cannot perform (perhaps because the Invoice has already been posted), you can “Duplicate” the Invoice which will create a copy to which you can now add a new “External Ref.” and then modify it (including adding new Invoice Lines) as you require before “Saving” and emailing the new revised Invoice. The old Invoice will still remain in the system as it was and you can then “Auto-Credit” it.
4. Posting Invoices to the Accounts System:
At this stage your Customer Invoice has been entered and is available to View, attach Documents, and Notes. It has not yet been posted to the Customer’s Account in the Accounts Receivables Ledger or to the General Ledger. However, the Inventory Management System was updated with Quantities and Costs when you clicked “Save” on completion of the Invoice. (If you now delete Lines from the Invoice, these Quantities will be reversed).
To post the Invoice to the Ledgers, select the Invoices you want to post as shown below and then click on each “Post Selected” tick box.
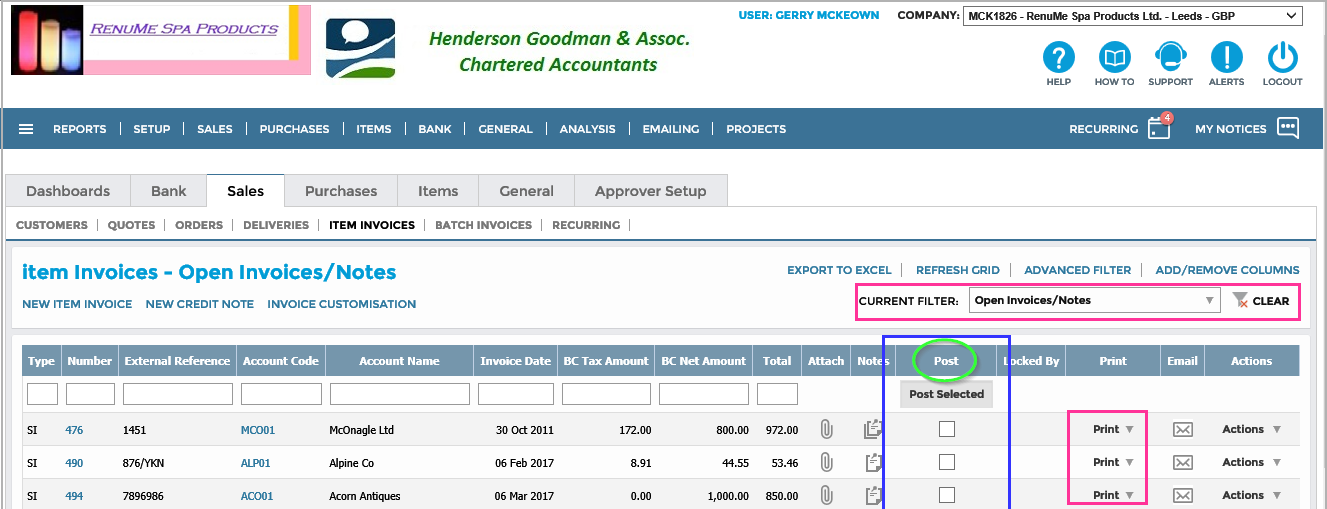
You can now Print and Email the Invoice from this Grid;
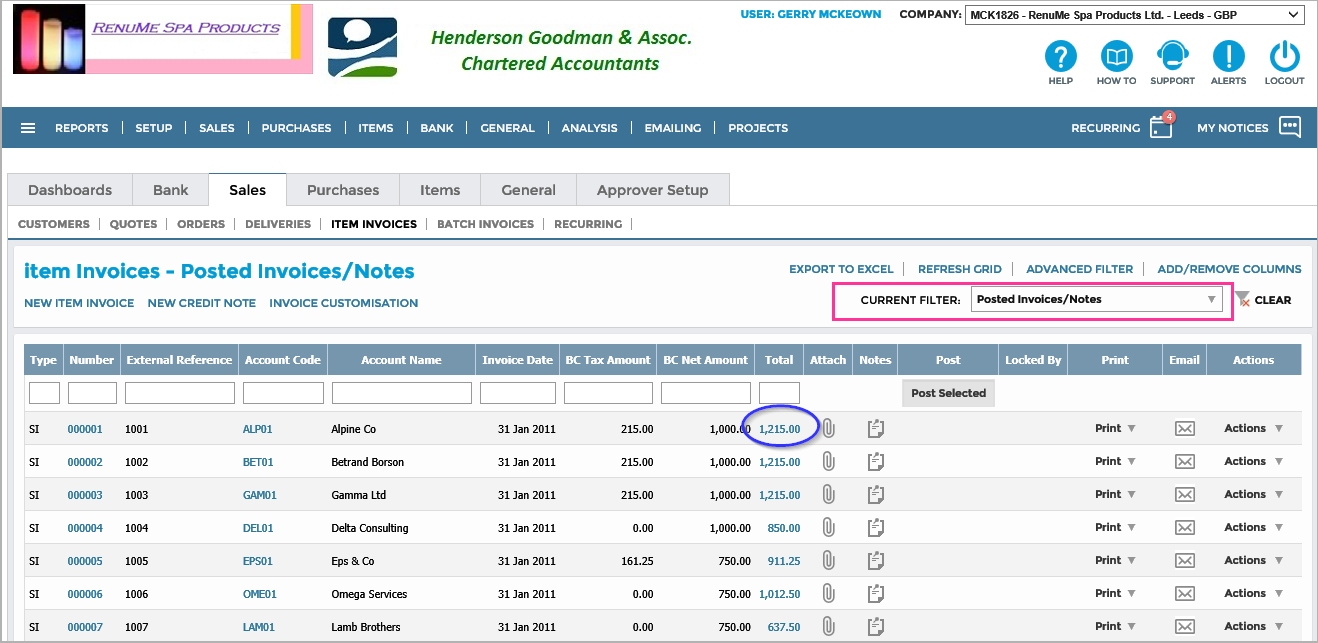
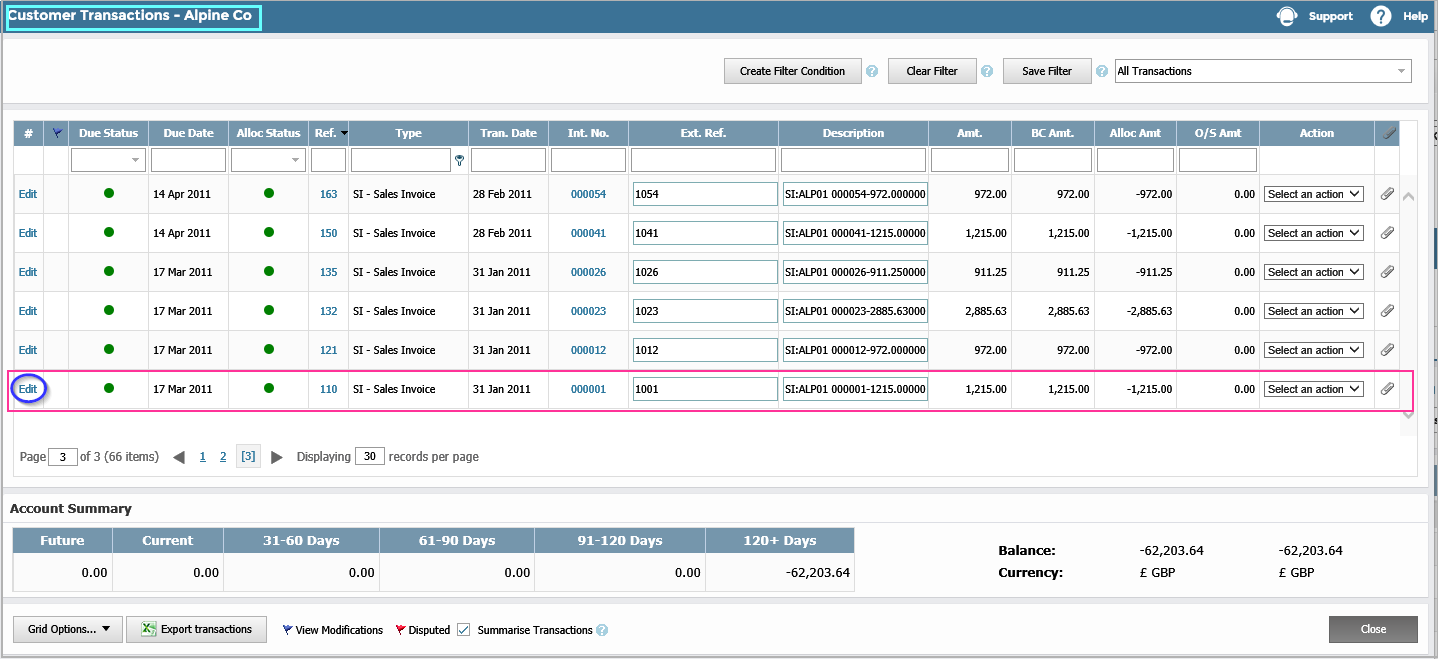
The Invoice will now disappear from this Grid and will appear in the Customer’s Account Grid which you can access by clicking on the Balance field below;
Any further amendment can only be made by following the instructions detailed in the article “How do I Amend, Correct or Delete a Transaction?”.
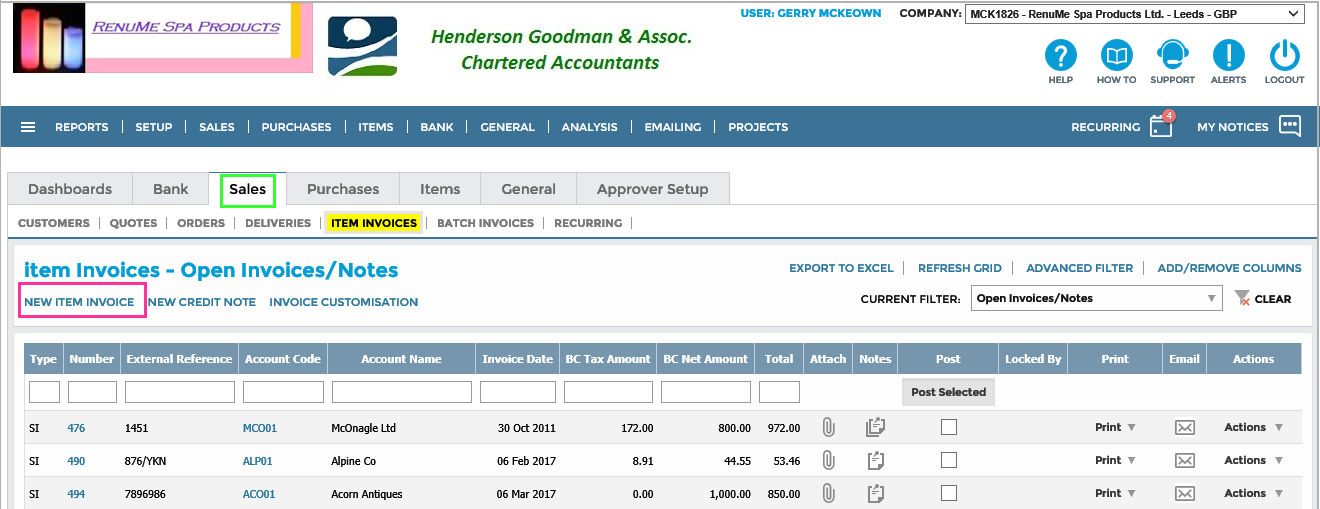
5. Viewing, Editing & Printing Previously Entered Sales Item Invoices:
To view or edit an existing Invoice simple go to the Sales > Item Invoices screen and enter your search criteria in any of the column headers. This screen defaults to Processed or Pro Forma Invoices but you can clear this by Clicking the Clear option on the Filter.
If the Invoice has already been posted the status will be "Posted". In this case, when you open the Invoice by clicking on the Invoice number, all fields will be ‘greyed out’ and cannot be edited. However if you click on the Edit details button at the bottom left of the invoice you can then update the Line Description, Address and Delivery Address on the Invoice.
A copy of a sales item invoice can also be printed from the Sales > Item Invoices screen. To do this simply click on the Print option for the Invoice and choosing which format you want to print
6. Copying / Duplicating an Invoice:
You can duplicate or copy an Invoice at any time, on the Sales > Item Invoices screen, by going to Actions > Duplicate or by opening it and clicking on the 'Duplicate' button. This will copy the contents of the Invoice to a new Invoice which will be saved with a new number when you process it. Of course, you can change the details of the ‘copied’ Invoice as required before saving it. In fact, the duplicate Invoice may have completely different line details than the original but you may want just the original ‘header’ information to remain.