Introduction
Using Batch Payments saves time in preparing payment runs. Once you prepare and process a Balch Payment run, all payments automatically post against the selected supplier account along with allocated matching Invoices. Batch Payments can also suggest a payment schedule based on a choice of parameters which you can edit anytime. If you use Payments Approval, you can link it to Batch Payments.
Suppliers (Vendors) Batch Payments lets you process payments, either through creating:
- Cheque Files for future printing.
- Online Electronic Files for transmission to the bank for clearing purposes.
See:
 Supplier Batch Payments Introduction (4.9) - AIQ Academy
 Supplier Batch Payments - Online (4.10) - AIQ Academy
 Supplier Batch Payments Cheques (4.11) - AIQ Academy
 How do I Implement Supplier (Vendor) Batch Payment Approval?
Supplier (Vendor) Credit Terms
Several factors determine a Supplier’s (Vendor’s) Payments to Date, and Invoices due, at Batch Payments. One is a Supplier’s (Vendor’s) Credit Terms. This is regardless of whether their account is in Debit or Credit.
Viewing Credit Terms
- Go to Purchases > Suppliers.
- Click the Supplier (Vendor) code to open Supplier Accounts.
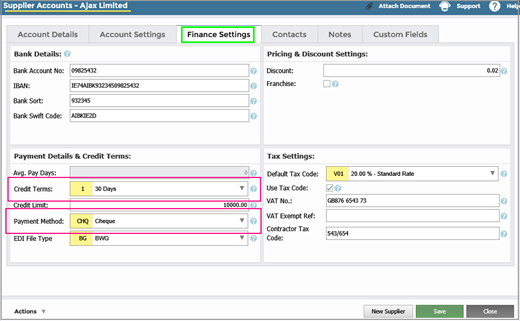
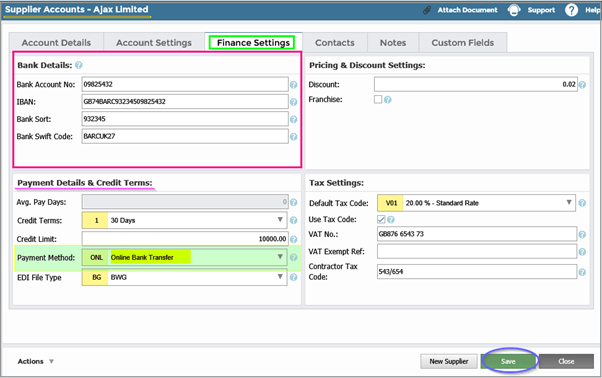
- In the Finance Settings tab, view your details under Payment Details & Credit Terms.
Creating and editing Credit Terms
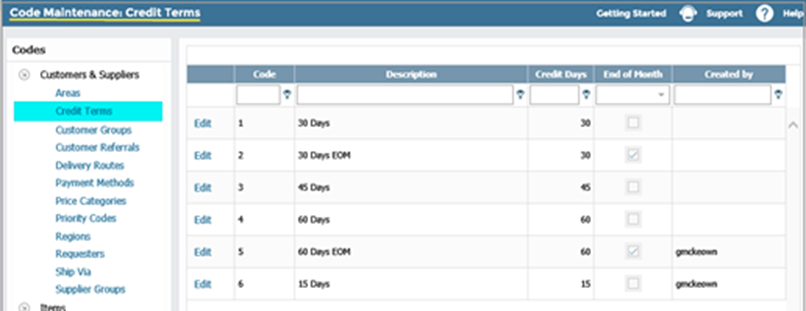
- Go to Setup > Codes Maintenance > Credit Terms.
- Find your account and click Edit or Add New Credit Term.
- Complete the details and click Save.
Supplier (Vendor) details
- Go to Purchases > Suppliers.
- Find the account and click on the GL Code.
- In Supplier Accounts, several criteria decide if the Supplier (Vendor) will be in a Batch Payment run:
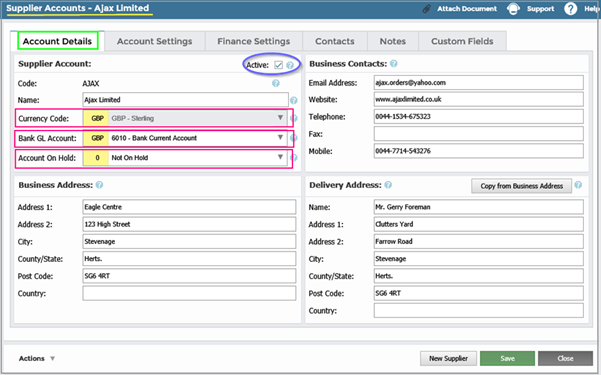
- Active: Tick this to make the Account active.
- Bank GL Account: The bank the Supplier gets paid from must be the chosen Bank Account for the payment run.
- Account On Hold: This must read Not On Hold.
- Payment Method: Find this in the Finance Settings tab. It must correspond to the Batch Payment method, either Cheque or Online Bank Transfer. If you have set the Supplier (Vendor) up as ONL you must also include details of their pay-in Bank Account.

Other criteria include:
- Accounts with outstanding Invoices will be included even if the Account is in Credit.
- Accounts with no outstanding Invoices or where the Balance is zero will be excluded.
- Un-Approved Invoices will be excluded.
See:
 How do I Implement Purchase Approval for Budget Holders?
 How do I Implement Purchase Approval for Non-Budget Holders?
Payment Files for Online Banking
Supported Bank Files
The following are the currently supported bank files:
- AIB (.EMTS)
- AIB Multi-Currency (.XML)
- ANZ Online (.ABA)
- BACS – UK (e.g. Barclays)
- Bank Of Ireland
- Bank of Ireland BACS UK
- Bank Of Ireland EFT
- Bank Of Ireland SEPA
- Bank Of New Zealand (.AFI)
- Bank Of Scotland - COL Bacs (Multiple Payment)
- Barclays.NET
- Bendigo (.ABA)
- CBA (.ABA)
- Citibank Cross Border Funds Transfer (GDFF)
- Citibank Cross Border Funds Transfer (CDFF)
- Citibank Domestic Funds Transfer (CDFF)
- Citibank SEPA Credit Transfer - Individual Debit (CDFF)
- Citibank UK ACH Credit/BACS (CDFF)
- Citibank UK Faster Payments - Single Immediate (CDFF)
- Citibank US ACH Credit (USFF)
- Citibank US ACH Credit (USFF) with Addenda Information
- Citibank US Funds Transfer (USFF)
- Generic Export JSON Format (.JSON)
- Generic Export XML Format (.XML)
- HSBC Asia Pacific, ACH (via iFile)
- HSBC Asia Pacific, Priority Payment (via iFile)
- HSBC Net (.TXT)
- HSBC Net PP/HVP (.XML)
- Lloyds BACS
- Lloyds BACS v2
- Lloyds Commercial Banking - BACS
- MUFG (.CSV)
- NAB (.ABA)
- NatWest (.TXT)
- NatWest Bankline International Payment (.TXT)
- NatWest Standard Domestic Payment (.TXT)
- On Pay
- PTX – Bottomline
- RBS Bankline, Ad Hoc Bulk Payment
- Santander BACS (.TXT)
- SEPA
- Splitska Banka SEPA (.XML)
- St George (.ABA)
- Ulster Bank with IBAN & BIC
- Ulster Bank, RBS
- Westpac (.ABA)
Adding a Payment File
First, complete your bank details, as follows:
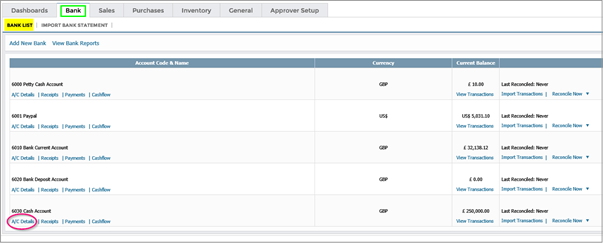
- To set up a bank account go to Bank > Bank List > Add New Bank. If your account is already set up, click A/C Details.
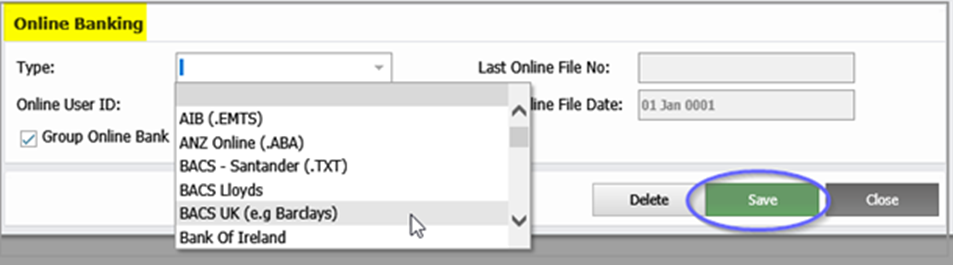
- In Payments File Settings, under Type, select the appropriate format for your company and country.
- Click Save.
Creating a Batch Payments run
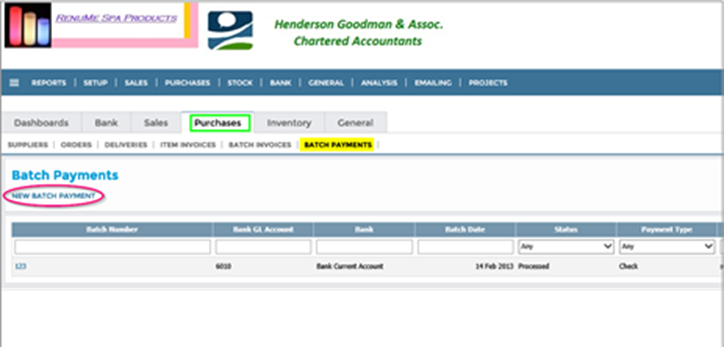
- Go to Purchases > Batch Payments > New Batch Payment.
- In the New Batch Payment screen, complete the following:
- Bank GL/Name: Select your bank.
- Type: Choose whether you want this run to produce Cheques or a file for onward transmission to the Bank Clearing system.
- Batch Payment Number: Enter a number to identify this Payment Run. It must be unique and at least 6 characters long. This makes the Batch Payment searchable and is for auditing purposes. You can also save it and return at any stage during the process.
- Payment Total: Highlighted in green. This totals the suggested payments and shows their effect on the Opening Bank Balance and Closing Bank Balance.
- Payment To Date: Highlighted in blue. This defaults to today’s date, but you can edit it. This, along with Credit Terms, determine which Invoices are due.
- Batch Payment Approver: If your System Administrator has implemented Payment Approval, then nominate an Approver.
- More Icon: Click on this beside a Supplier (Vendor) to display the invoices that qualify for payment. The transactions are colour coded. Green invoices qualify for payment in this run. Blue is for Supplier (Vendor) transactions that are not yet due for payment. Invoices marked Disputed will not show.
- Due Date: If you accidentally enter a date from a closed period, you will get a warning. The date will remain, but the transactions post to the next open period.
- Payment: You can amend these back to any amount, including zero.
- Suggest Payments: Click to display the list of the Supplier (Vendor) Accounts that have Invoices due, together with their individual Supplier Payment Amounts. After editing details, you can click again to get a new total.
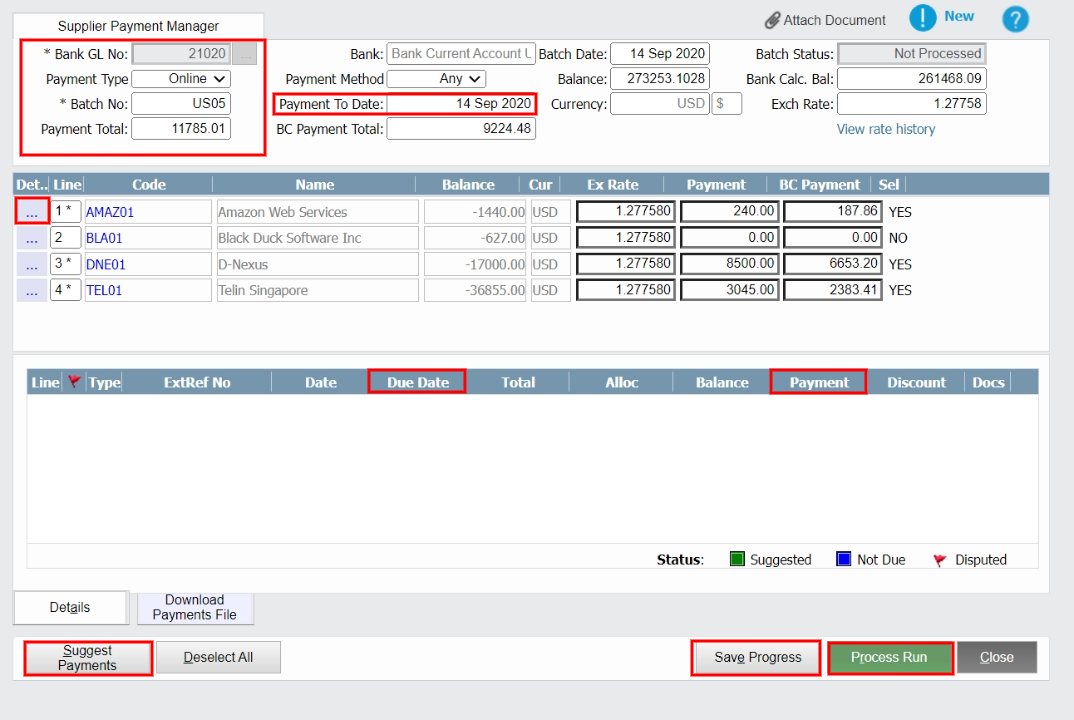
- Review the Transactions due for Payment, Payment Total, and Bank Calculated Balance. Click Save Progress to create a draft version of the Batch Payments.
- Click Process Run, or if your System Administrator has implemented the Payment Approval option, click Send For Approval.

See:
 How do I Implement Supplier (Vendor) Batch Payment Approval?
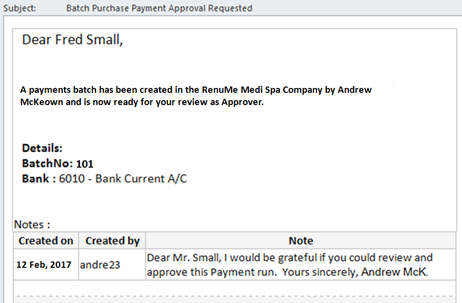
Approving a Batch Payment run
The selected approver receives a request email. They can log in, choose the Batch No. and further amend the Payment Run details. When satisfied, they can then approve the Batch Payment via an Approve Batch Payment button.
The Batch Payment run creator then gets an email update and the Batch Payment status in the Batch Payments Grid changes to Approved.
If you are both creator and approver, then you can instantly click Approve Batch Payment.
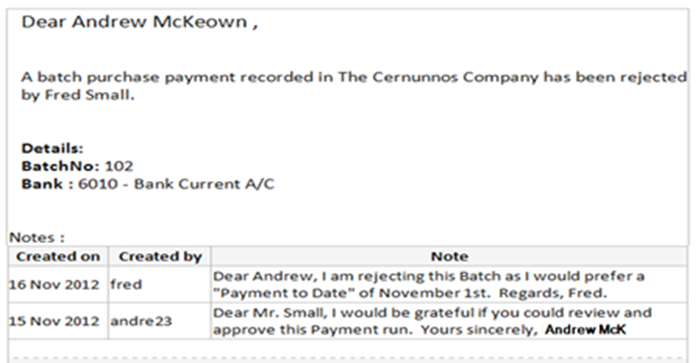
If the approver rejects the Batch Payment run, the creator will receive an email. In this example, the creator must change the Payment to Date. The Batch Payment will now need another Suggest Payments and, after any further amendments, another approval process.
Downloading files and uploading them to the bank
You can download the Bank Payments file onto your desktop, then upload it to your Online Banking System via your bank’s website:
- In the Supplier Payment Management screen, enter the date. The default for this field is today’s date. Use the date when the Supplier (Vendor) expects to be paid by their bank. This does not affect any of the posted payment transactions, instead, it updates the date in the download bank file used by the bank. If you enter the wrong date in this box, you can update it and download a new version of the file at any point.
- If there are errors in the batch, you will get an error.txt file. Open this file and follow the instructions to correct them. For security reasons, only admin users can update Supplier Bank Details. You can find an audit trail of any changes made to a supplier’s bank account details in the Report Manager under Assurance.
- Click Download Payments File. (An improvement has been made to Barclays.net payment file, allowing a custom reference per supplier. Enter the reference in the E-Payment Ref field in the supplier record. This reference will be populated in the payment file.)
- Save the file.
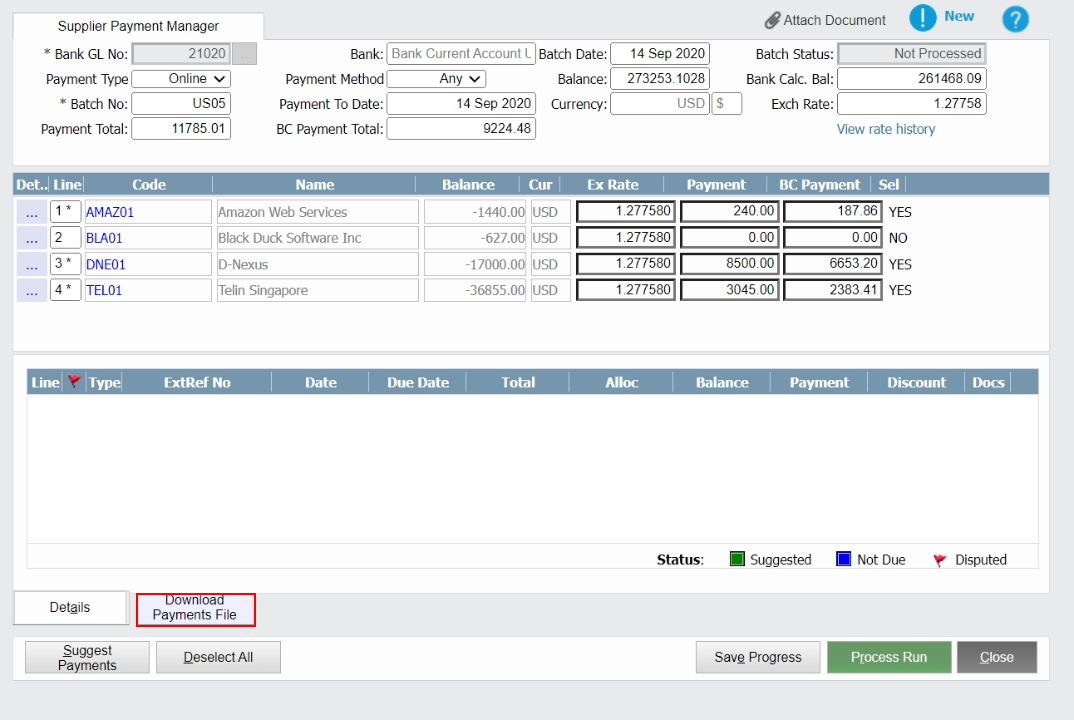
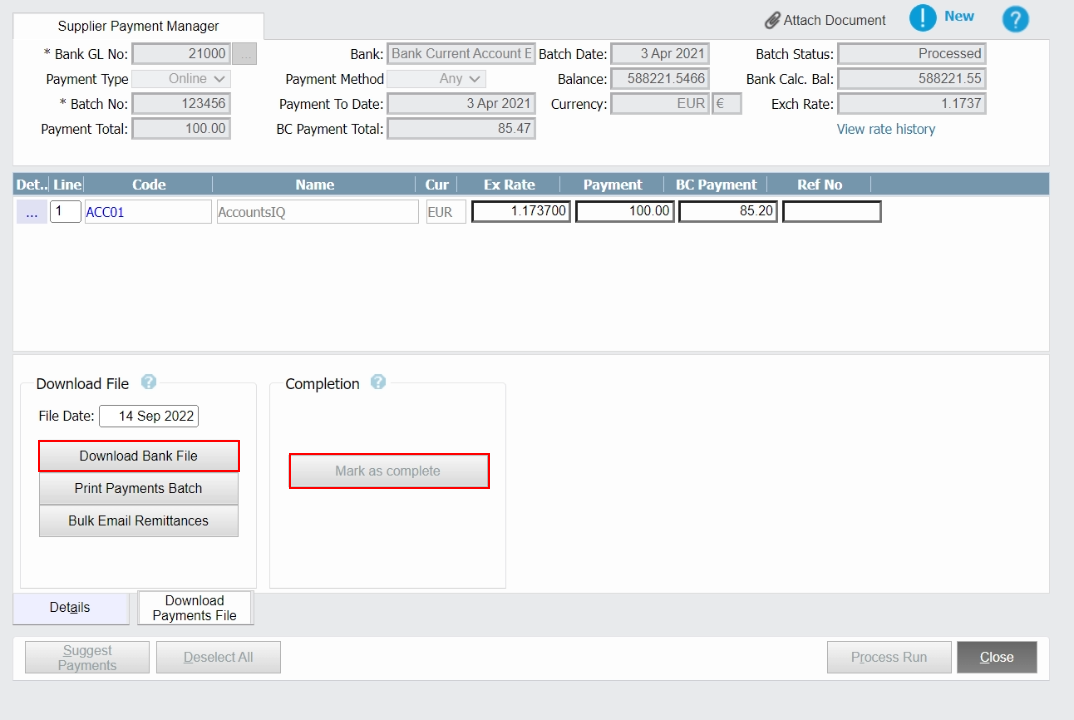
- Click Print Payment Batch.
- Click Mark as complete.
- Your bank will inform you, through their system, of any mismatches and anomalies that you may have to examine.
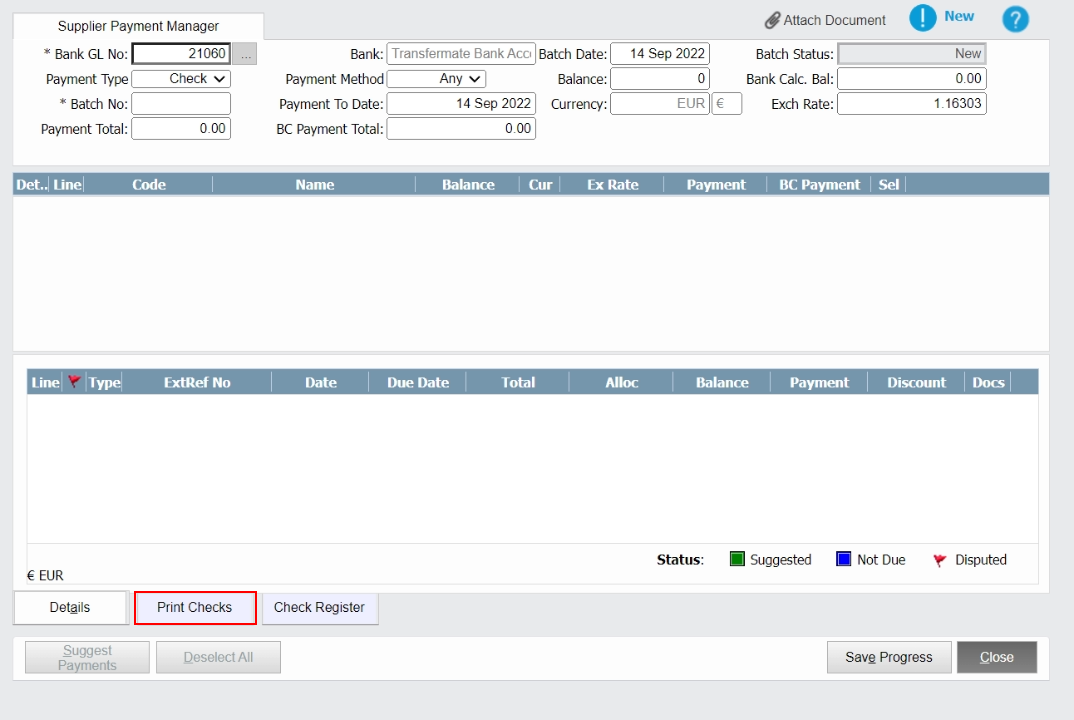
Cheque and Remittance Advice Note printing
- To see a Batch Payment run’s status, go to Purchases > Batch Payments

- Click on the Batch Payment No. to see that Print Checks and Check Register are no longer greyed out.
- Select Print Checks.
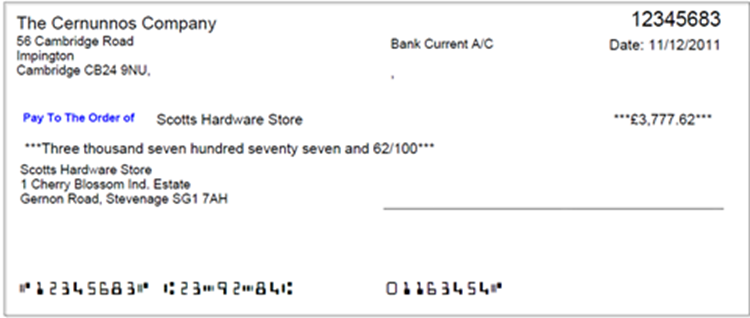
You can print cheques on:
- Pre-prepared Cheque stationery: For pre-printed stationery, and other formats of joint cheque and remittance advice, contact your system provider who will accommodate your specific requirements.
- Blank stationery: Cheque Nos. and Bank Account details are printed in a machine-readable font (MICR) for processing by the Bank clearing system when lodged by your Suppliers.
- In Next No. enter the start number of your first cheque and click Assign Numbers.
- Click Print Checks to produce a PDF File that you can Save or Print.
You can also print cheques by going to Purchases > Batch Payments and clicking on the Attach icon.
Click Check Register or Print Batch Payments for further report options.
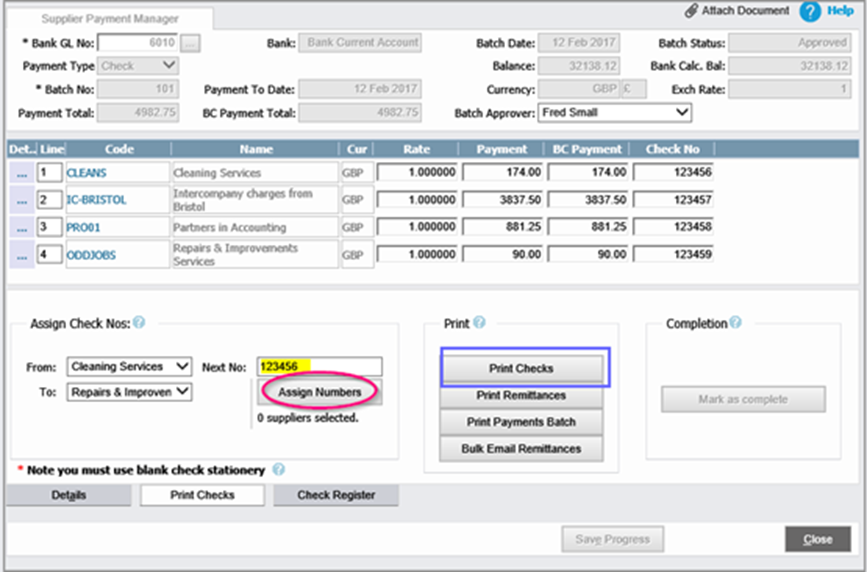

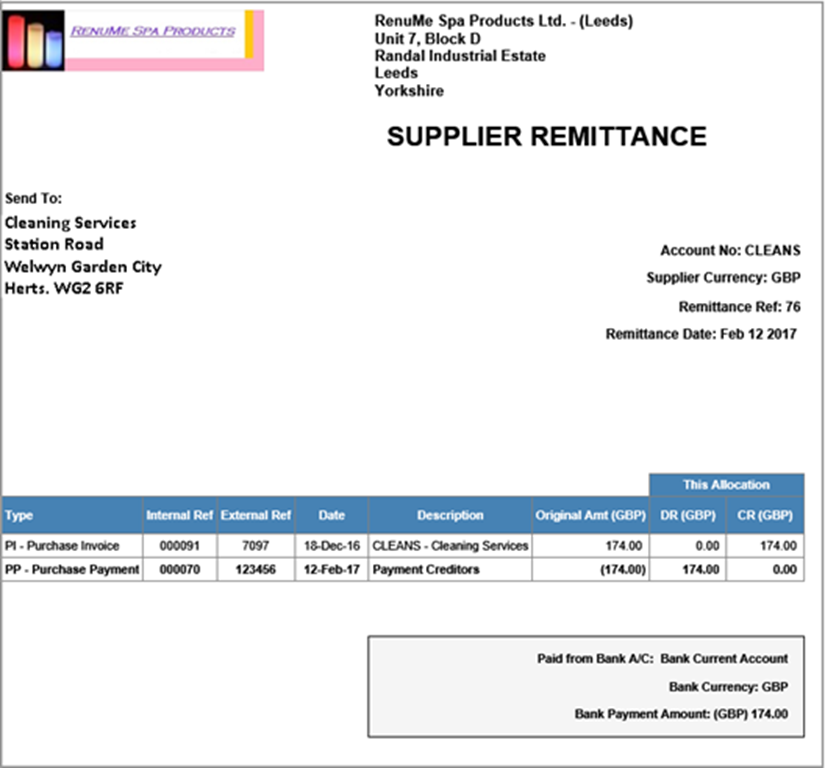
Click Print Remittances to print Remittances off separately.
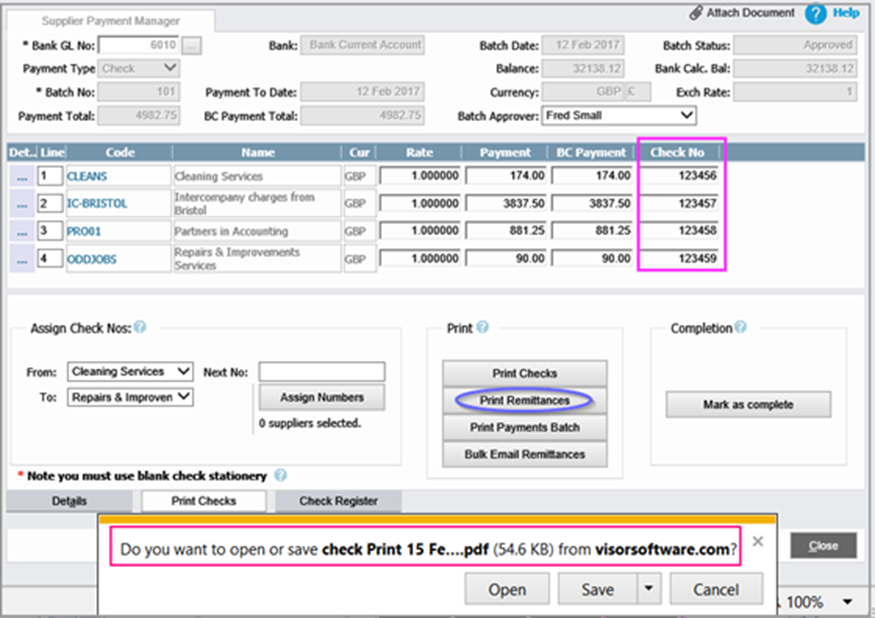
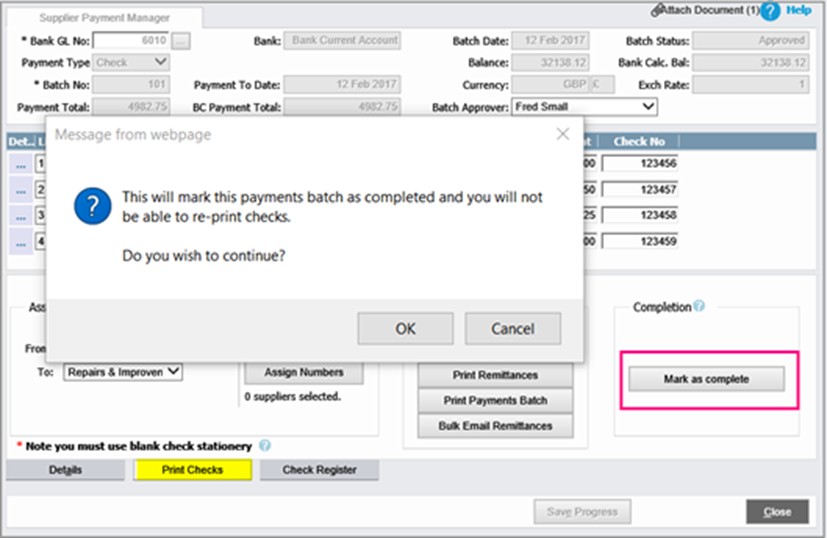
- Click Mark as Complete. This is important as the Bank Account you chose for this Payment Run is unavailable to the System until the process finishes.
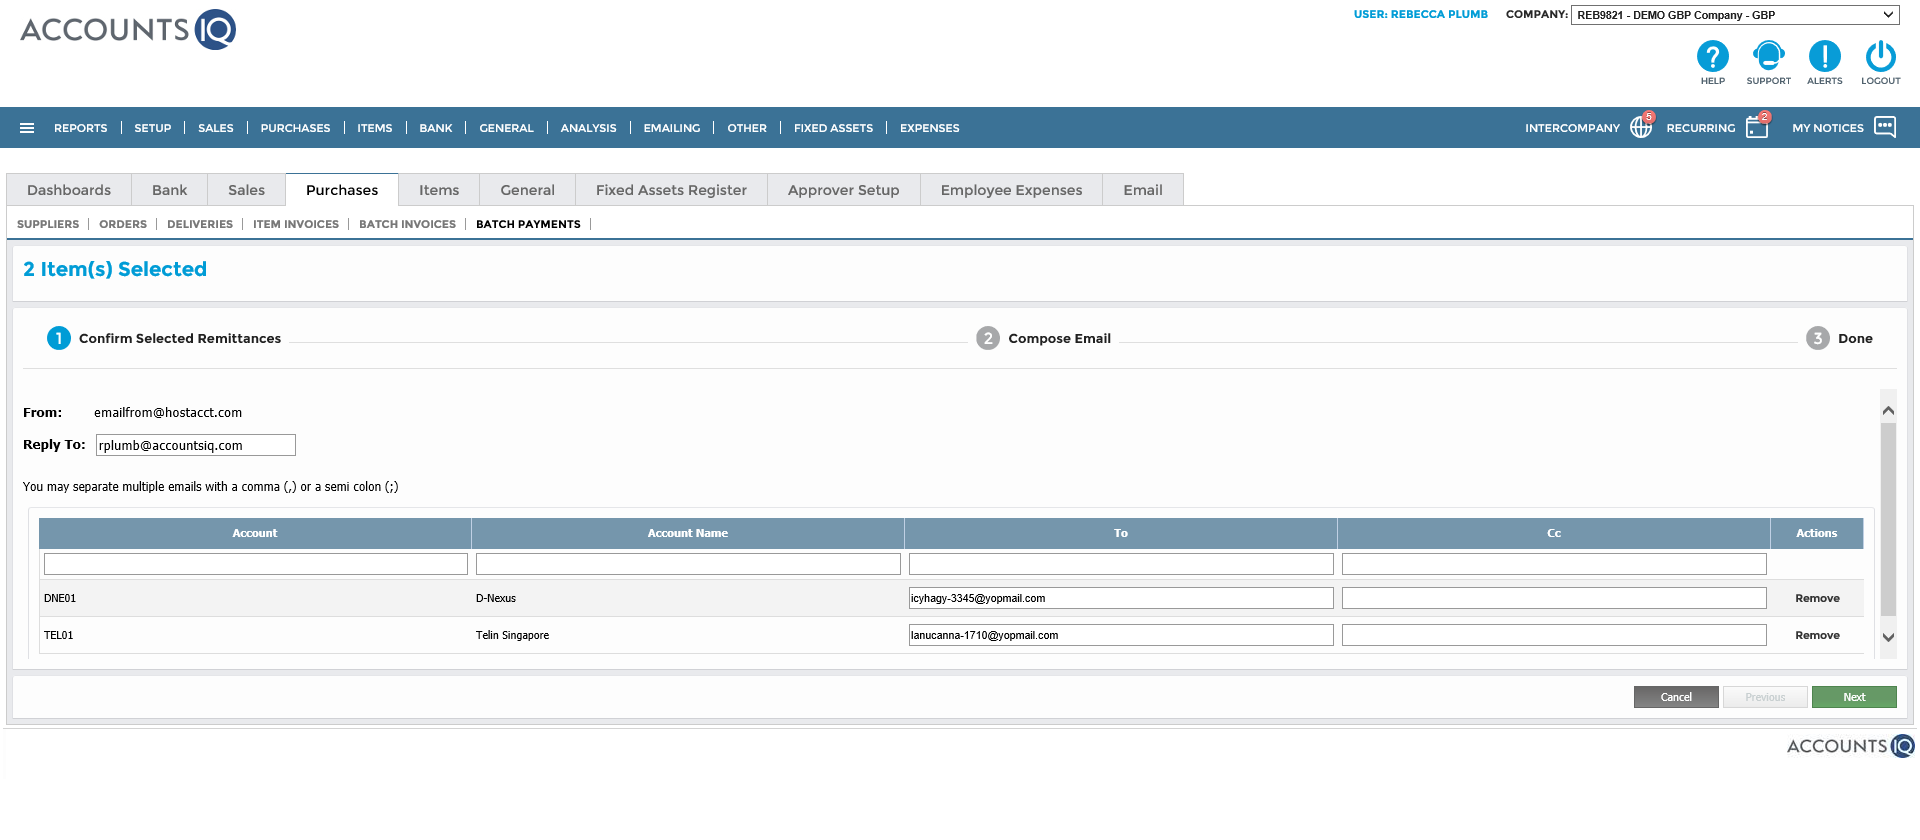
Batch Email Remittances
The Batch Email Remittances option will only be available after the Batch Payment run has been processed or, approved and processed if workflow approval is enabled in your company.
- In Supplier Payment Manager, click Batch Email Remittances to email your Remittance Advice Notes in bulk to your Suppliers (Vendors).
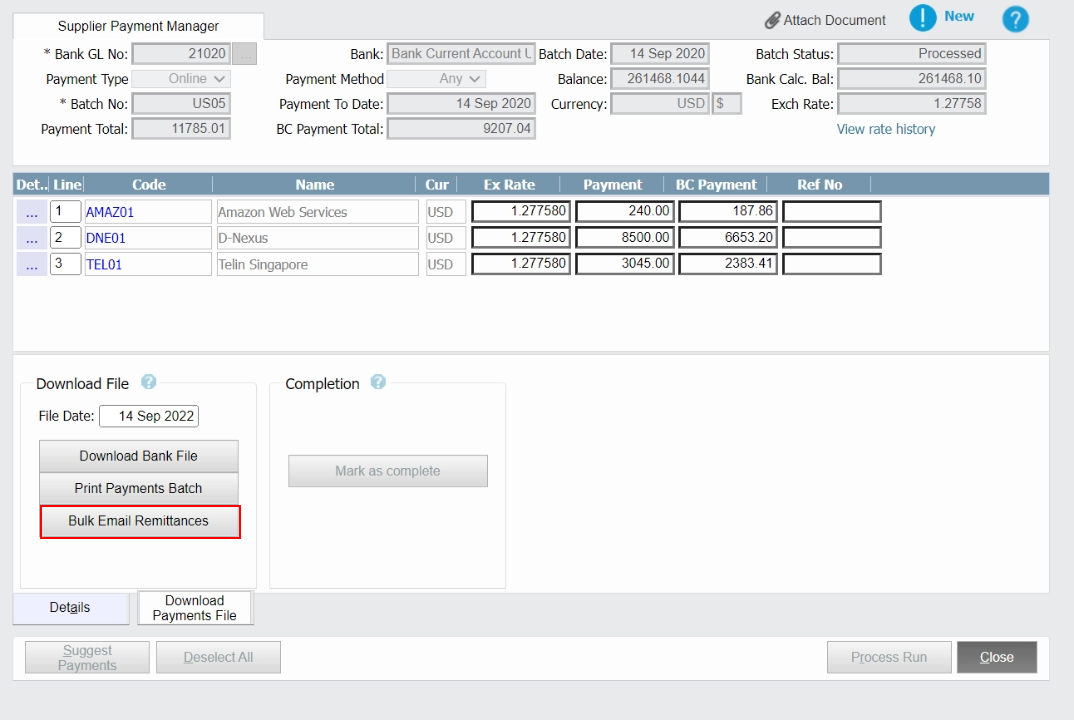
- The Reply To email address will default to the address from the Supplier (Vendor) Business Contacts or, if set, from the primary contact.
Check the recipient email addresses and click Remove for any that you do not wish to send. Any incorrectly formatted addresses will be highlighted. You can add more recipients by separating them with a comma or semi-colon.
- Click Next.
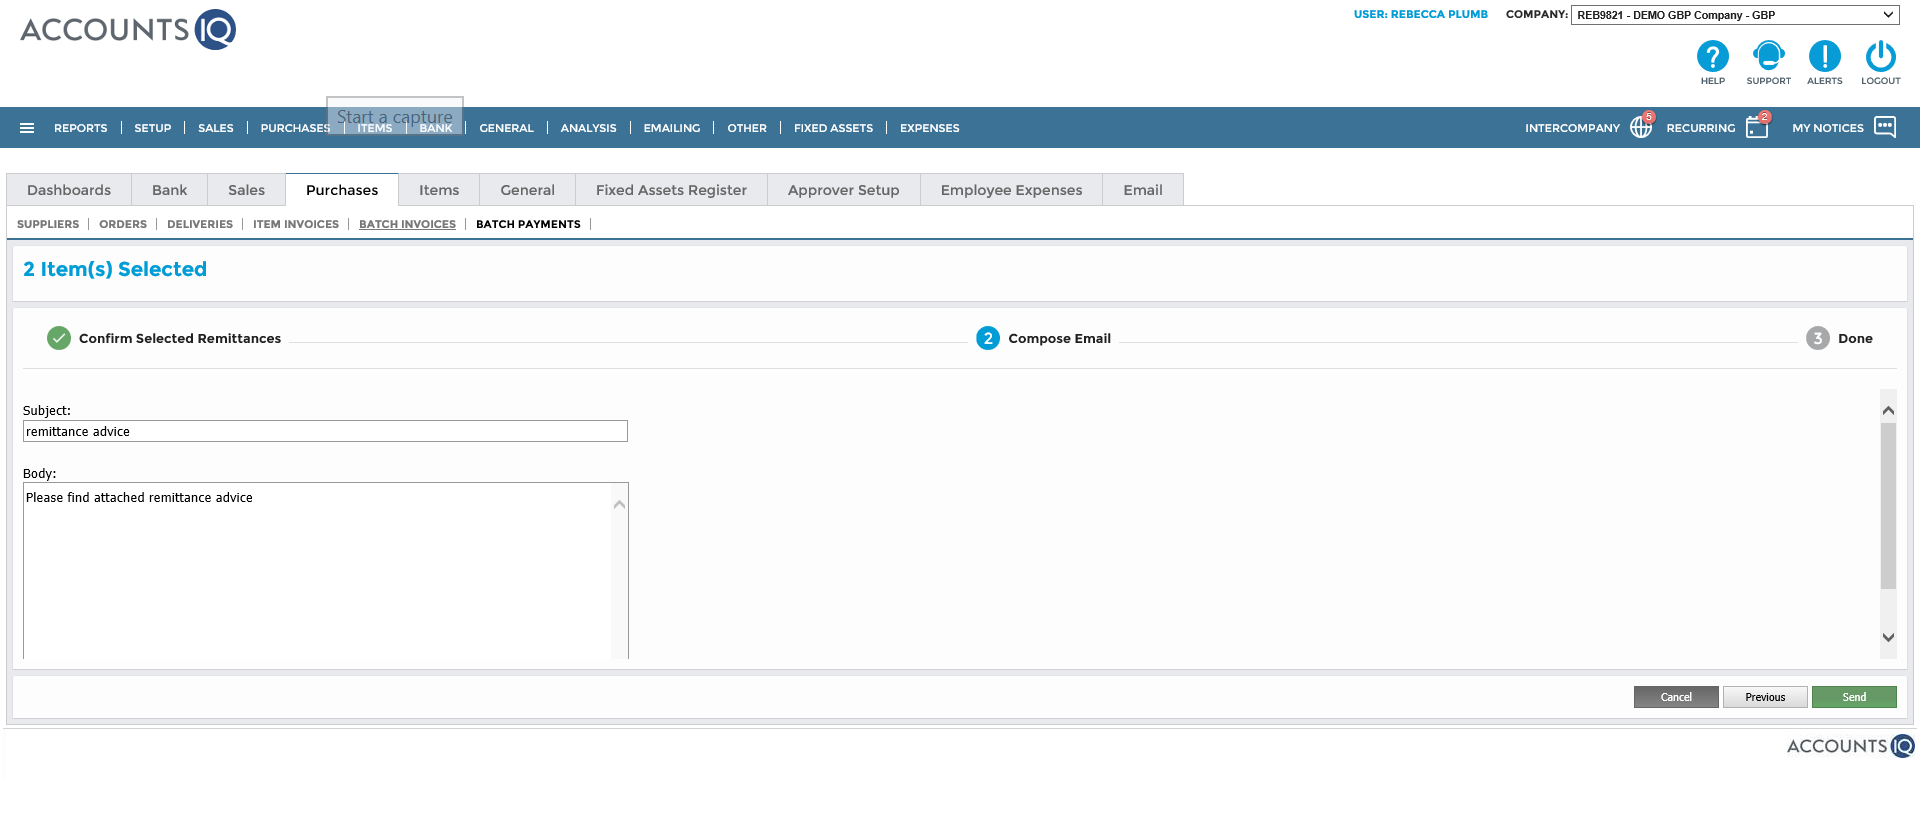
- Enter a subject and body text for the email. This automatically saves for the next time your batch email remittances.
- Click Send. All batch emails will go into a queue and will send in the background. You will receive a confirmation email when the Batch Payment has been completed.
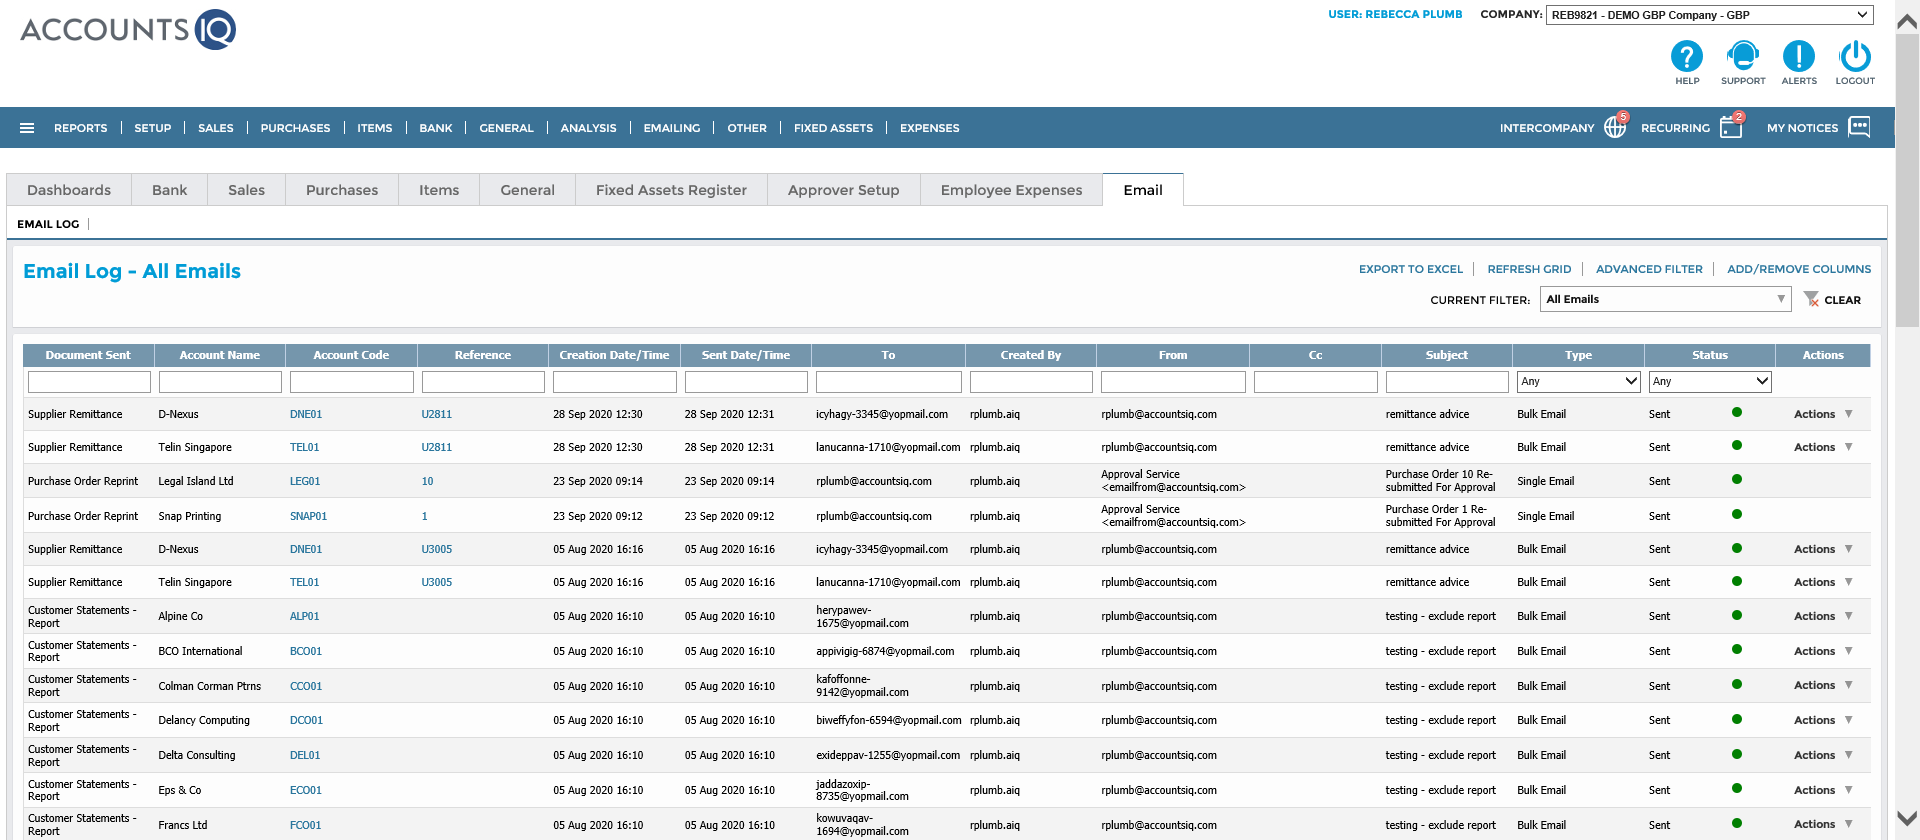
- Click Done to go to the email log or click Email in the ribbon.
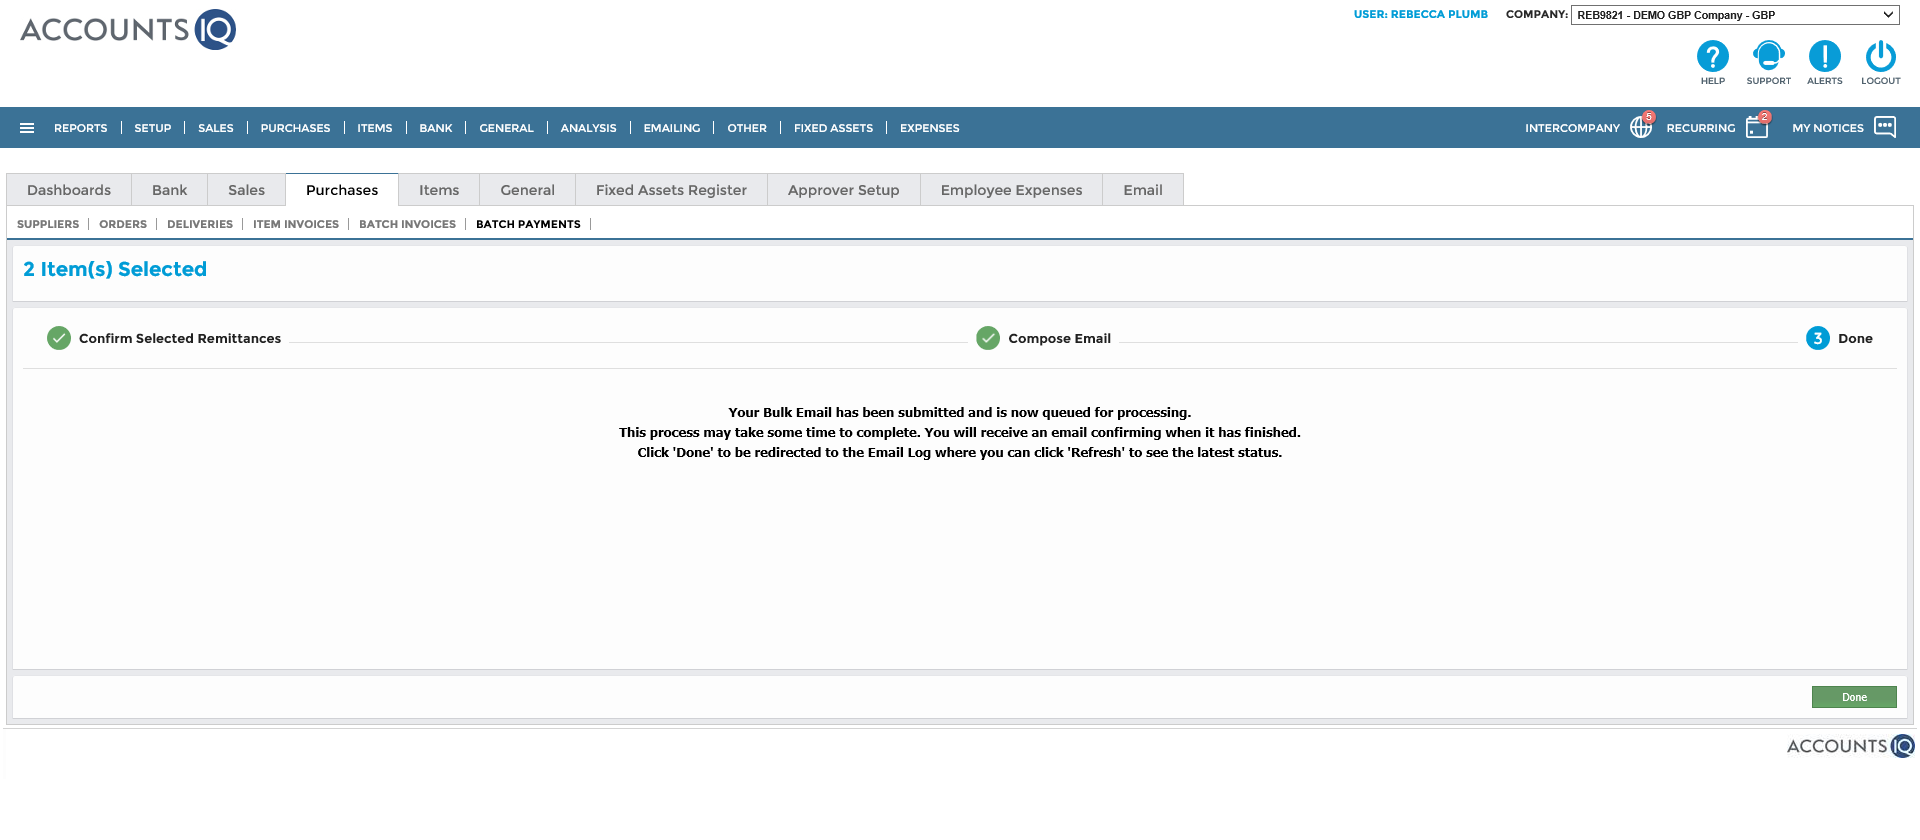
- The Email Log displays the status of all emails sent from the company. The grid does not update automatically, so click Refresh Grid. To see remittances, filter by Document Sent and Status. If any emails did not send, hover over the status column to see details of the failure and how to resolve any issues.
You can send remittances at any time, in two ways:
- Go to Purchase > Batch Payments. Find your Batch Payment and click its code to open. Click Download Payment File > Batch Email Remittances.
- Go to Reports > Report Manager > Purchase Reports > Supplier Remittance Batch Payment Print. You can send remittance by date or Supplier (Vendor).