
Introduction
AIQ allows Franchisors (Supplier) and Franchisees (Customer) to interact with each other and manage their Product and Product Pricing.
For example, the Franchisor can:
- Maintain a Catalogue of Franchise Products centrally for distribution to Franchisees, allowing orders and deliveries to flow easily between the two.
- Control pricing centrally.
- Access the Franchisee Accountancy systems directly to perform Group Consolidation of entities (Franchise and Franchisee Companies), in addition to Profit, Sales, and Purchase Analysis comparisons.
Franchisor Setup and Management
To set up a franchise, follow the instructions in this article, then customise your settings with reference to the following:

To set up and manage your users, see the following:
Setting up a Franchisor and Franchisee Entities
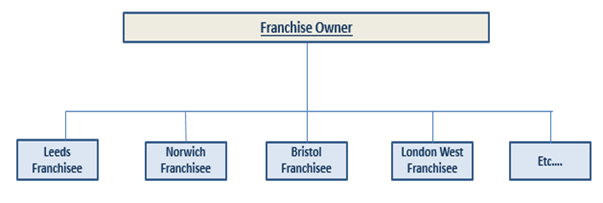
This example deals with a straightforward relationship between a Franchise Holder and multiple Single Unit Franchisees.
Step One: Create the Entities
Setup all franchise and franchisee companies. To speed up the process, you can create a prototype franchisor and franchisee company first following the instructions in this article, then use those entities as templates to create the desired number of franchise entities. See Creating a New Entity for more details.
Step Two: Assign the Entities as Franchise
Once you have all the relevant entities set up, assign them to a franchise in the Edit Entity Details screen.
- For Franchisors only, check Franchisor Entity.
- For Franchisees add the Franchisor ID. The Franchisor Company ID will be used to identify the Franchisor as a Supplier in the Franchisee Company.
Click Save.

See:
Nominating Franchisees as Customers and the Franchise as a Supplier
Optional: Set the Customer and Supplier Defaults to Franchise (Optional)
If most or all your sales and purchases are between franchise members, you can set defaults for quicker customer and supplier setup. Then for any non-franchise customers and suppliers, you can deselect this option in their account during setup.
- Log into a franchise companies.
- Go to Setup > System Defaults.

- Perform the following for both Customer and Supplier Defaults. Set any general defaults needed. Then check Franchise to automatically flag all subsequent Customers in the Sales System as a Franchisee and Suppliers in the Purchase system as Franchisor.

- Click Process.
- Repeat the process in each of your franchise entities.
Add Franchisees as Customers to the Franchisor Company
- From the group portal, log into the franchisor company.
- Go to AR > New Customer.

- In the Account Details tab, enter the Franchisee’s Company ID in the Code field. To gain maximum benefit from analysis reports, ensure that each of your Franchisees has been set up with all the relevant analysis codes. See Managing Customer Master Records for more details.

- In the Settings tab, tick Is Franchisee.

- Click Save.
Add the Franchisor as a Supplier to the Franchisee Entities
- Log into one of the franchisee companies.
- Go to AP > New Supplier.

- In the Account Details tab, enter the Franchisor’s Company ID in the Code field.

- In the Settings tab, tick Is Franchisee.

- Click Save.
- Repeat the process in all franchisee companies.
Create Inventory in the Franchise
The Franchisor’s Stock/Inventory Items are held centrally and then released to Franchisees upon ordering. The Stock/Inventory facility does not prevent either Franchisor or Franchisee from holding other items in their Inventory Management system. This part of the Catalogue refers only to those products classified as controlled Items for distribution to Franchisees.
Step One: Set up Item Codes
- Log into the franchisor company.
- Go to Setup > Codes Maintenance.

-
Set up Item Groups, Item Sub-Groups, Item Locations, and Item Sub-Locations. See Using Codes Maintenance for more details.

- Use Groups and Sub Groups if you have:
- A mixture of Franchise and Non-Franchise Items. For example, in Items, you could use the Sub-Group to separate them.
- A mixture of Franchise and Non-franchise Customers or Suppliers. The Customer or Supplier Group field or the Sales Representative field lets you produce separate Sales Analyses reports for Franchise and non-Franchise related Products or Customers.

Step Two: Set up Item Inventory
In the franchise entity, go to Items > Product Items > New Product Item.
Set up each of the Products that you will be controlling and distributing to your Franchisees, as outlined below, referring to Managing Items for more details. Code Items to get maximum benefit from Analyses Reports.
General tab:
- Enter the Standard Price which is the Franchisor’s Selling Price per unit and the Franchisor’s Trade Price. At Invoice stage, you can override this Price and offer Discounts.
- Tick Issue Warning If User Tries Sell Below Margin? to produce a warning at Invoicing if the combination of the price and discounts results in an overall price less than the Average Cost plus Margin amount.

Inventory tab:
Complete the Default Location and Sub Location.
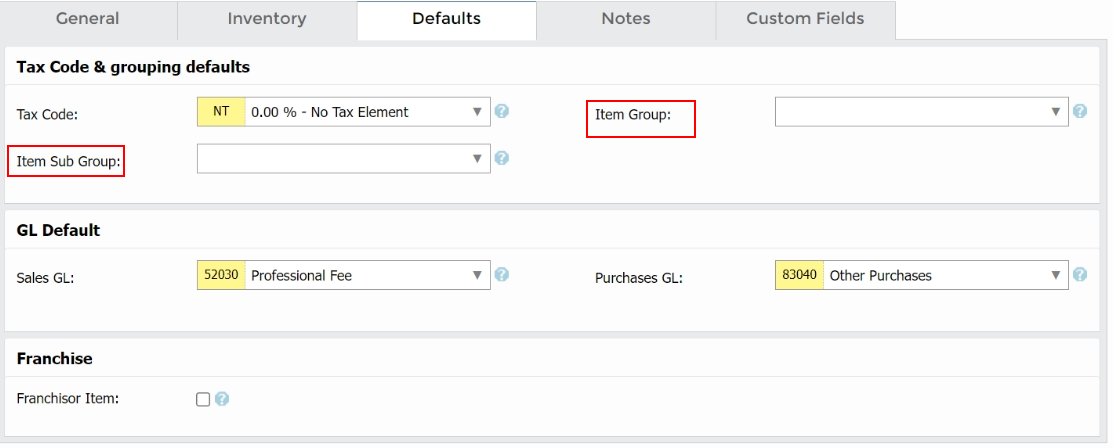
Defaults tab:
- Tick Franchise for each item.
- Add Tax Code, Item Group and Item Sub Group details.
- The GL Defaults are the system defaults, but you can override them.

Finish by clicking Process.
See:
Copy the Inventory to the Franchisees
- Log into the Franchisor Entity.
- Go to Setup > System Defaults and open Item Defaults.

- Here you will see the Default Settings for every item that you set up in your Catalogue. Make and adjustments needed and check Franchise.

- Click Franchise Transfer to transfer each of these flagged products to each of the Franchisee entities. When the Franchisee Companies open their Inventory System, they will then see the Franchise Catalogue Items in their Product Items listings. Franchisees can modify Sales Pricing, but cannot modify Last Cost, Average Cost and Margin.

Franchisee Ordering
Franchisees can order from franchisors as follows:
- Log into the relevant Franchisee Company.
- Go to Purchases > Orders > New Order.

- In the Supplier field, enter the Franchisor ID and complete the Order Details.
- Click Save.

See:
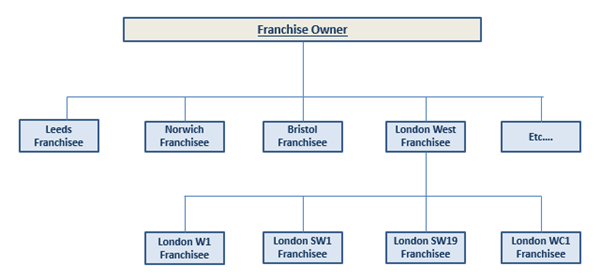
Multi-level Franchises
In this example, London West is a Regional Franchise Holder (a Sub-Franchisor) with several Franchisees under it. It is also a Franchisee as it is under the Franchise Owner.
Regional Franchisors
- Designate it as a Franchisor as described in Section 2 above.
- In the Regional Franchisor, set up all the relevant franchisee companies as customers. These Franchisee Companies can be customers at both the Franchise Owner and Regional Franchisor levels.
Regional Franchisees
- Regional Franchisees can have both the Franchise Owner and Regional Franchisor as their Suppliers. Set them up as Suppliers using the relevant Company ID. This facilitates Order Processing through either Franchisor as required.
Reporting
Reporting
Franchisee Companies should use the standard:
- Sales Analyses Reports
- Customer Reports
- Supplier Reports
- Item Reports.
Multi-Company Consolidation allows for further reporting, including overall Sales and Purchase analyses.