
Introduction
Customers can pay using the following Payment Methods:
- Cheque
- Online Transfer
- Direct Debits
Info: Only Euro Denominated IBAN compatible
If you have customers that use direct debit, then periodically carry out the Batch Direct Debit process. The system will search for all Customer Accounts whose Payment Method is Direct Debit (DD) and check if any of these accounts have outstanding balances.
The Batch Direct Debit process uses the To Date you enter and the Customer's Credit Days to calculate the Balance Outstanding up to that date. For example, if the To Date is September 30th and a Customer Account has 30 Credit Days, then only those transactions in August and earlier will be part of the balance owed.
Once a Batch of Direct Debits is in progress for a particular Bank Account, you cannot create another Batch for that Bank Account until the current one is complete.
See:
 Using Sales Receipts and Allocations


Setting up a Customer for Direct Debits
Go to Sales > Customers and find the relevant account in the grid. Click on its reference to open the Customer Master Record.

In the Account Details tab:
Ensure both Currency Code and Bank GL Account are both set to euro.

In the Finance Settings tab:
- Ensure the Customer’s IBAN and Bank Swift Code are complete and accurate as the direct debit process uses these rather than the Bank Account Codes.
- Under Payment Method select DD (Direct Debit).

In the Custom Fields tab:
- Enter the Customer’s DD Signature Date. This is the date on the Direct Debit Mandate and is required by the EazyEFT clearing system.
- In DD Payment Type, select Ongoing or Final.
Click Save.
See:

Processing a Direct Debit Batch
Step One: Complete the header details
- Go to Sales > Direct Debit Batches > New Batch to open the Direct Debit Batch screen.

- Complete the following:
-
Bank GL Account: Only bank accounts that do not have open batches can be selected here.

- Direct Debit Type: Complete from their respective dropdowns.
- To Date: This determines the date from which the balances owed by Direct Debit Customers will be calculated, given each Customer’s Credit Days.
- Payment Collection Date: This is the date on which you require the Direct Debits to be executed by the clearing system.
- Batch Reference: Add a Batch No.
-
Bank GL Account: Only bank accounts that do not have open batches can be selected here.
Step Two: Amend Transactions as needed
Info
Do not use Int No to attempt other changes to the transaction such as to the Amount. These changes will not be saved and will have no effect. Instead, make any changes to transactions before starting the Direct Debit Batch run.
The list of qualifying Accounts appears automatically. If there are Unallocated Credits in any of the Balances, these will be highlighted in pink. Resolve these before proceeding, otherwise they will not be included in the balance.
- Click on the relevant balance in the Amount column to open the Receipts and Allocations window. See Using Sales Receipts and Allocations for more details.
- When finished, click Save.
Transactions are included by default. To exclude a transaction:
- To view the transactions that make up the Direct Debit for a Customer, click on the arrow icon.
- Uncheck Included. This exclusion will be saved automatically.

When you have finished making your amendments, save a hard copy for future reference or auditing purposes by clicking on Export Batch.

Step Three: Create the Extract file
Click Download Extract > Generate for EazyFt. Save the resulting .txt file to a memorable location on your desktop to await further processing.

Processing the Direct Debit Extract File in EazyEFT
About EazyEFT
Next, you need to format the extracted file to work for your Bank or Direct Debit provider. We work with EazyEFT who will assist you if you do not already have a service provider. Note that extra charges/subscriptions may be required to format and process the output file. Your EazyEFT contact will arrange access to this program and provide any necessary support required. EazyEFT has help resourses to guide you through the setup.
EazyEFT Setup
First, you first need to:
- Identify your Company
- Identify your Bank Account(s)
- Identify your Customers
When this initial setup is complete, you only need to re-visit this section when you want to add new Banks or new Customers.
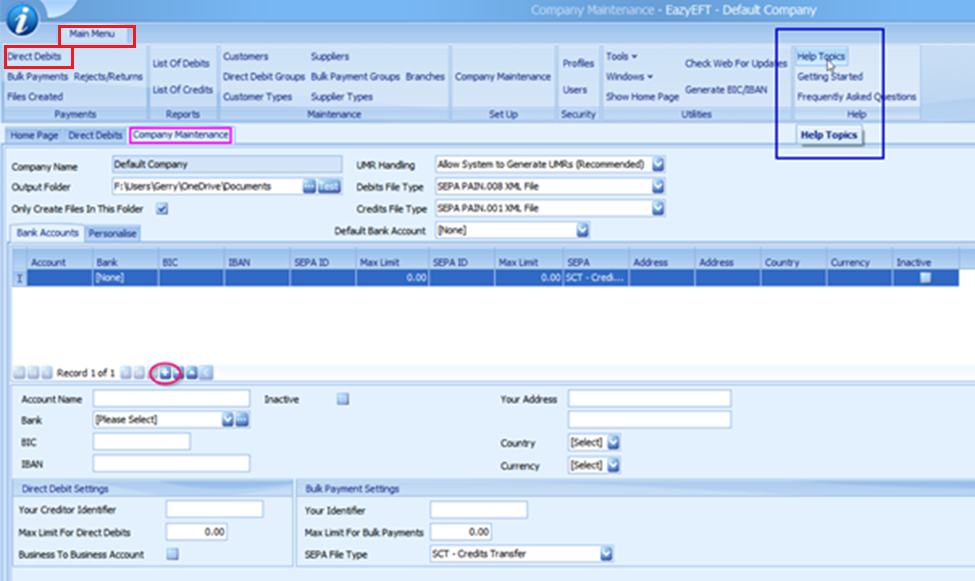
Step One: Identify your Customer and Bank Accounts
- Go to Main Menu > Direct Debits.
- In the Company Maintenance tab, set up your Company and Bank Account.
Step Two: Identify your Customers
In the Customers tab, set up your Direct Debit Customers.
Alternatively, if you do not set up any customers in EazyEFT, in the AIQ Customer Master Record, in the Custom Fields tab, complete the Direct Debit Mandate. EazyEFT will then set up all your customers automatically when you import the Extract file into EazyEFT.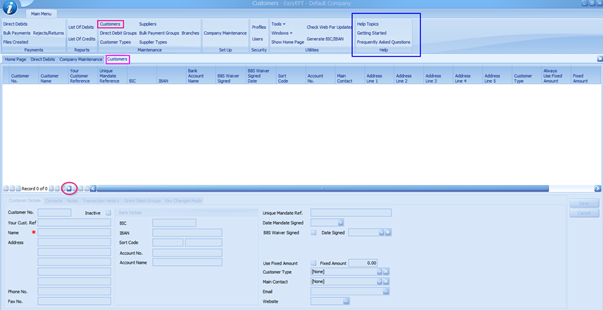
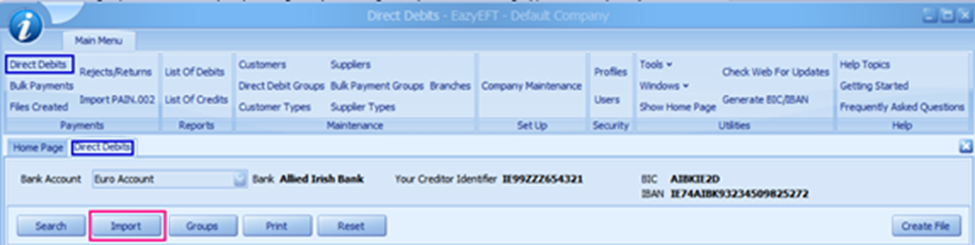
Step Three: Process the Extract file
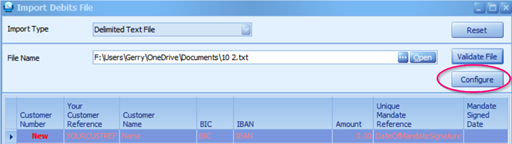
- In the Direct Debits tab, click Import to open the Import Debits screen.
- In the File Type dropdown, select Delimited Text File. Browse to the location where you stored your .txt file, click Open, followed by Validate File.
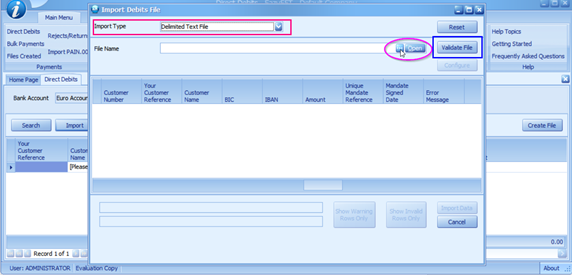
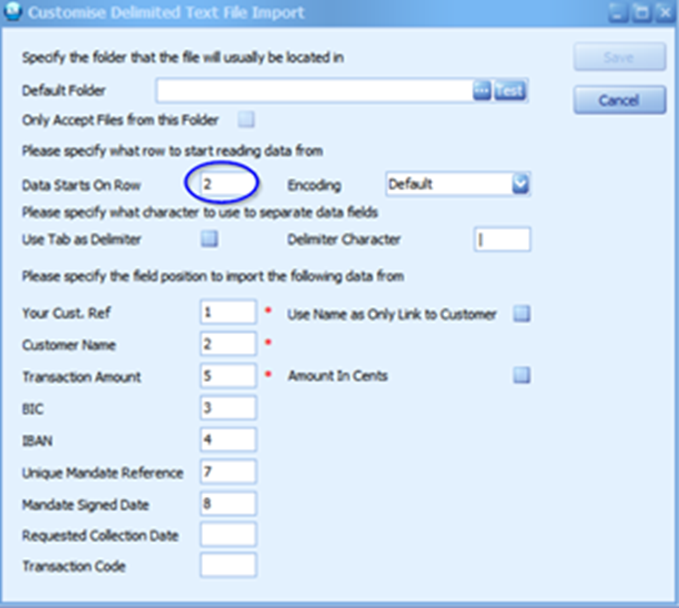
- If Validate File shows the first record as being in error, click Configure. In the Customise Delimited Text File Import screen change the Data Starts On Row field to “2”.
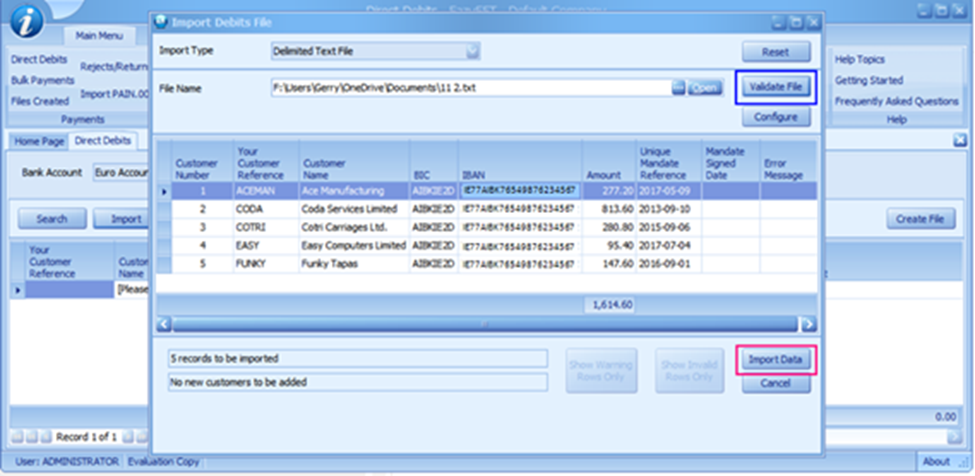
- Click Validate File again. The .txt file is matched against the Customer Records stored within EazyEFT. Any errors will appear here. Correct them before further processing. If everything is OK, click Import Data. Override or correct any minor errors if still present.
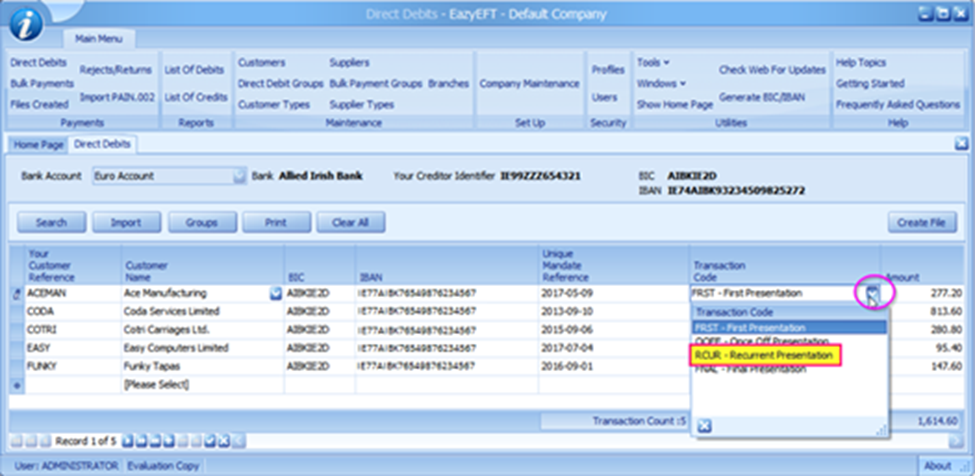
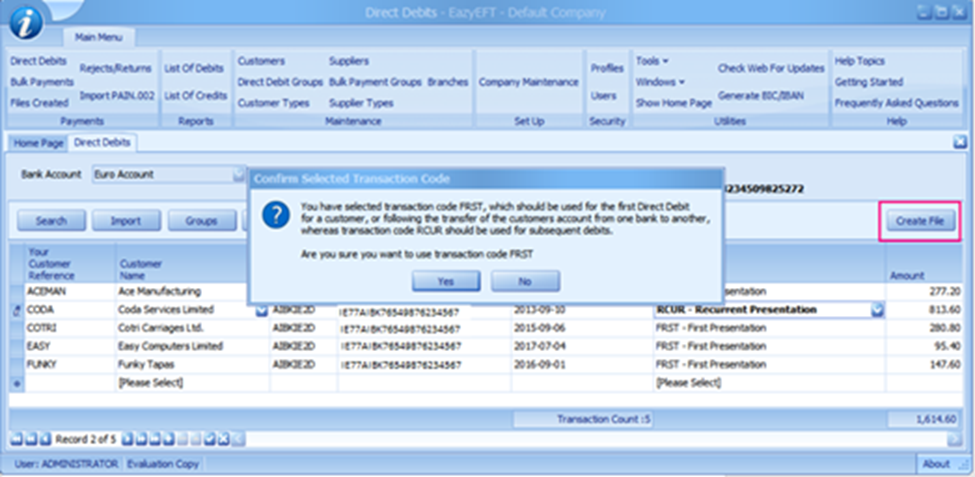
- Change the Transaction Code on each record (where necessary) from First Presentation to Recurrent Presentation.
- Click Create File and enter the Collection Date. This should be the same as that used in the Accounts system when you generated the Extract file.
- Take note of Total Amount, Requested Collection Date, and Authorisation Cut Off Time. If it is close to 4:00 p.m. on the day, it may be necessary to move the Requested Collection Date forward.
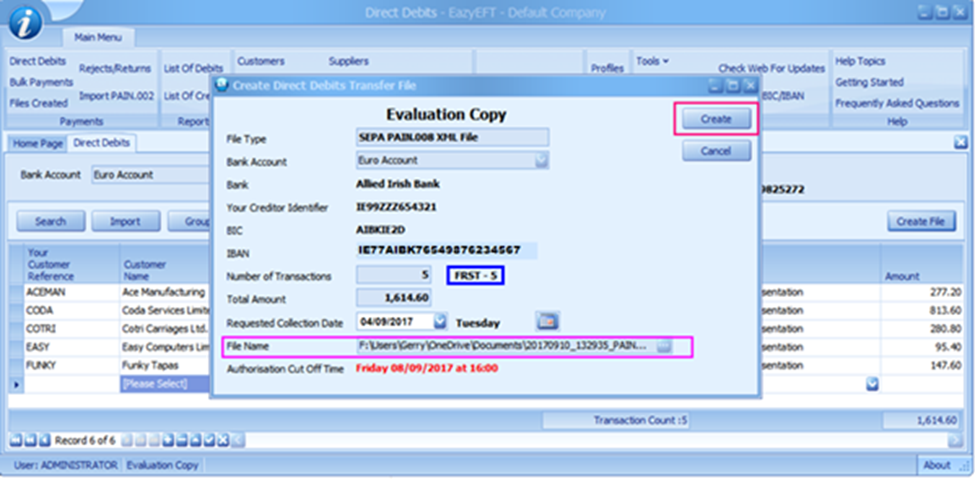
- Click Create to create the Bank upload file. In the case of AIB it is a SEPA PAIN.008.XML file. It will be created in the folder you specified at Company Setup stage against the File Name. Print a report of the transactions for auditing purposes.
Step Four: Upload SEPA file to online banking system
Log into your Online Banking system and upload the file from the save location, according to your Bank’s instructions. Your Bank will indicate whether the file was accepted.
Step Five: Declare results in EazyEFT
- Return to the EazyEFT system to declare the result of the Upload.
- Go to Files Created > Go. This will result in a list of all the files you have processed so far. The first entry is the most recently uploaded.
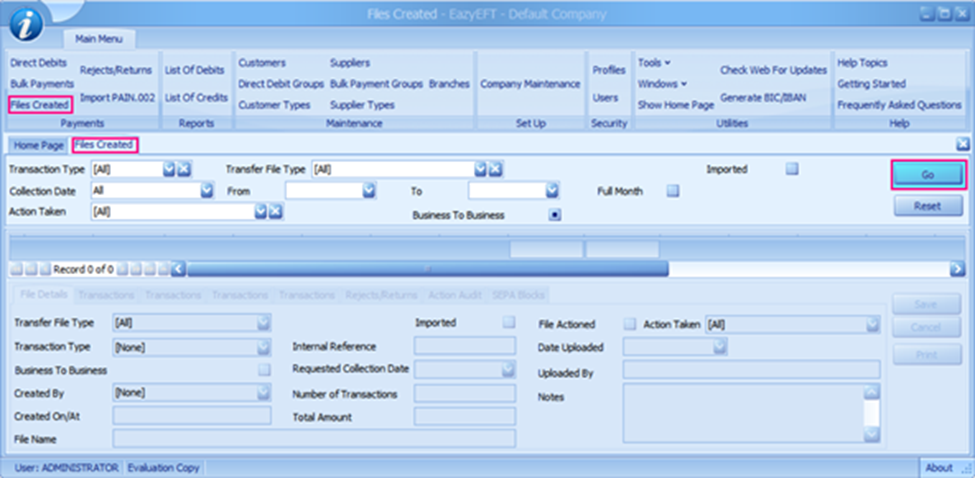
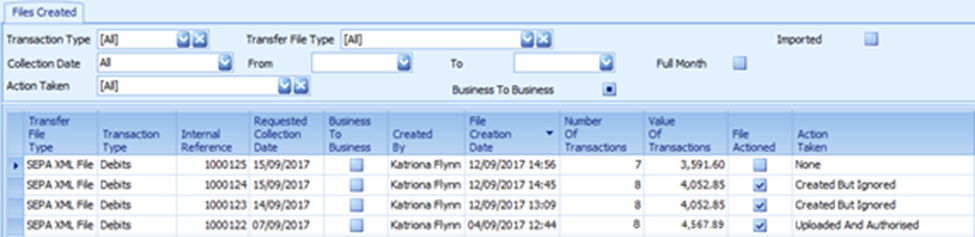
- Complete the EazyEFT processing for this file by selecting the relevant option from the Action Taken dropdown.

Allocating the Direct Debits
Once you have processed the Direct Debit Payment file, you can create allocations:
- Go to Sales > Direct Debit Batch and find the Batch you were working on in the grid.

- Click on Allocate to finish the Batch. This will create a DD Receipt in each Customer Account which is then allocated against the Invoices making up the Direct Debits in the Batch.

Rejections
If the bank rejects any of the Direct Debits in the uploaded file, you can attend to this later during Batch Reconciliation. We recommend carrying out multiple reconciliations during the month rather than only at month-end. This allows for correction near the time of the transaction failure.
Cancelling a Direct Debit Mandate
Step One: Amend the Customer Master Record
When a customer requests that you cancel their Direct Debit, do the following:
- Go to AR > Customer and find the relevant account in the grid.
- In the Custom Fields tab, change DD Payment Type to Final.
- Click Save.

Step Two: Create the final Direct Debit Batch
Create any outstanding Invoices against the Customer Account which you want to include in this final Direct Debit. The process is the same as described earlier (see Processing a Batch of Direct Debits), however, note the following:
-
Accounting System: Set DD Payment to Final rather than On-going in the Direct Debits Batch.

-
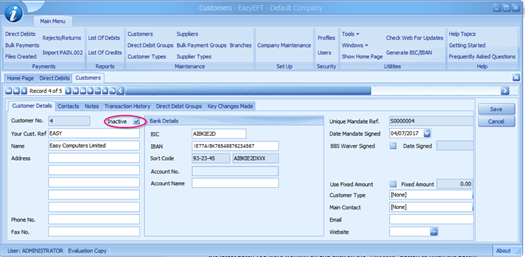
EazyEFT: Log into the EazyEFT system and follow the steps detailed previously to generate and process the Bank Upload file. Next, in EazyEFT, select the relevant Customers to de-activate by ticking Inactive.
Step Three: Final Customer Account amendments
There are two options in the Customer Master Record:
- Deactivate the Customer by unchecking Active.

- If you want to retain the Customer’s Account, change the Payment Type to another option than Direct Debit.
