Introduction
What is the Time and Billing Module?
The Time and Billing module, along with the full AIQ suite, make up the Project Accounting system. This system provides extensive budgeting and reporting capabilities, full supplier purchasing facilities, and client billing and account administration.
The Time and Billing module records:
- All employee time against projects and activities for any number of client projects.
- All associated expenses, supplier bills, and other miscellaneous charges and outgoings for each project.
This facilitates project and client billing by tracking all charges and costs for a project together with backup documentation. Based on this data, you can post transactions, produce project profitability, receive payments, manage suppliers, and more.
Find it in the sidebar:
.png)
User Types
There are three types of system users:
- Administrator: This user has the highest level of privilege and full access to all facilities. They set up the system configuration parameters, set up and add new employees, and detail the activities conducted by the business.
- Approvers (Team Leaders): This user is responsible for setting up and managing individual projects and supervising and approving the team’s timesheets and other submissions. This role also includes client billing which feeds into the system. Approvers cannot access the Configuration Settings.
- Project Employees: This user performs activities as part of a project and must record their time, expenses, and other outgoings for approval by their team leader and subsequent entry into the system. Project Employees have reduced menu options compared to administrators.
Project Administrator Responsibilities
The responsibility of the Project system administrator includes configuring and maintaining the parameters and settings, including:
- General parameters
- Current Employee details
- Activities carried out by the business.
- Expense and outlay Categories
In addition, the project administrator will have set up Extended Business Analysis with relevant Project Codes containing Dimensions and Elements.
See:
 Using Project Accounting as a Project Employee-
 Using Project Accounting as an Administrator - Legacy
 Using Extended Business Analysis
 Using Extended Business Analysis for Job or Project Analysis
Setting up a New Project
- Go to Projects > Time and Billing to open the module.
- Click Projects.

- All the previously set-up Projects will appear here. Click Add a New Project to open the Create New Project screen.
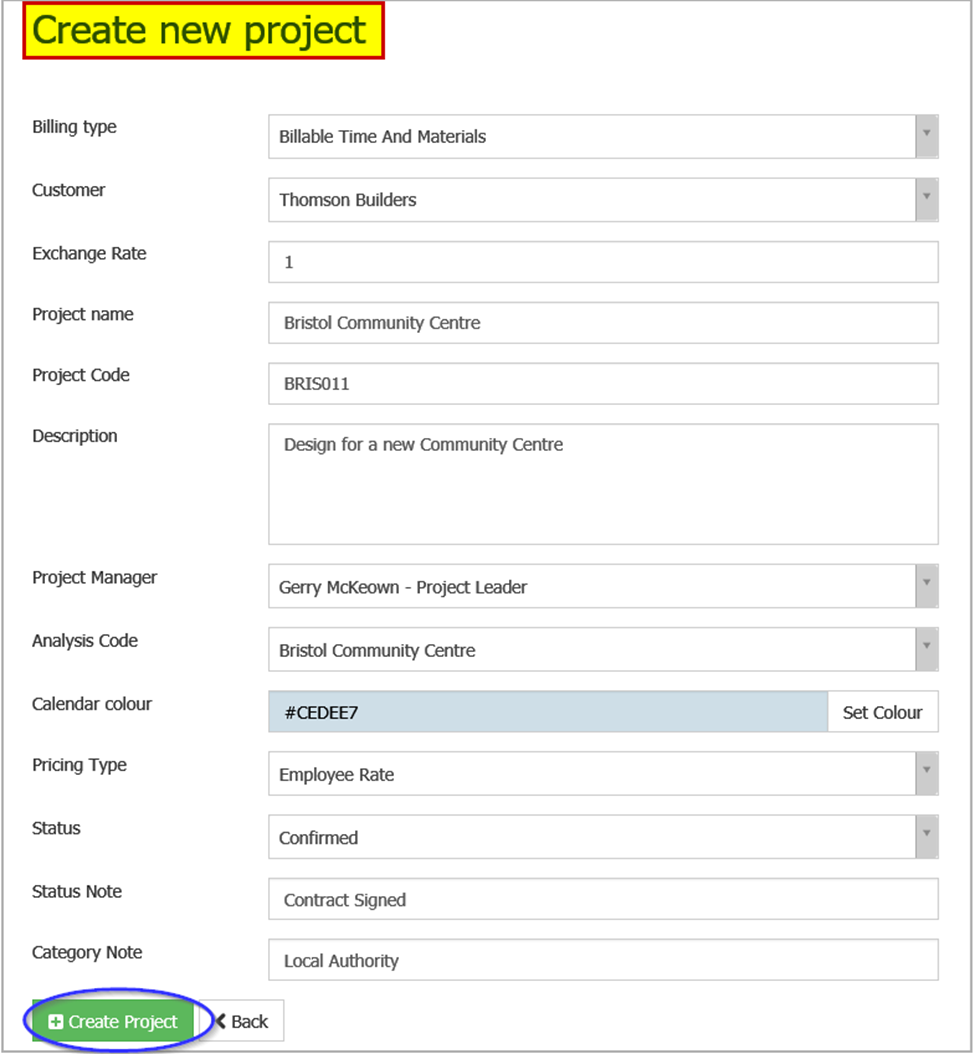
- Complete the following:
- Billing Type: The other fields on this form depend on the Billing Type chosen. Here we have chosen to set up a Project which is Billable, therefore it requires a customer and further information.
- Customer: Select the Customer from the dropdown list. They must already be set up in the main Sales system.
- Project Name: Give a unique name to this Project that will identify it throughout the system.
- Project Code: Give a unique Code (for your own use) to the Project.
- Description: This is a brief description of the project.
- Exchange Rate: This comes from the Customer Master Record.
- Analysis Code: This relates to the Extended Business Analysis aspect of the Accounting System. It must be set up in advance so that you can select it from this dropdown. The Analysis Code (renamed as Project Code), along with the relevant General Ledger Code, becomes part of each posting from this module to the General Ledger. These codes track Profit & Loss by individual Project.
- Calendar colour: Colour coding assists in viewing Projects on the schedule.
- Pricing Type: Select either Activity Rate or Employee Rate. When timesheets are entered into the system, this Project-level parameter dictates whether the Employee Charge-Out Rate or the Activity Rate per Hour is used to calculate the Client charge. The Employee Rate per Hour is on the Employee’s record and the Activity Rate per Hour is on the Activity Record in the Configurations module.
- Status: Projects have a status of either Confirmed or at Quotation stage, but you can still process timesheets, expenses and other outlays against a Project, despite its status still being Quote.
- When finished, click Create Project.
See:

Creating the Project Plan
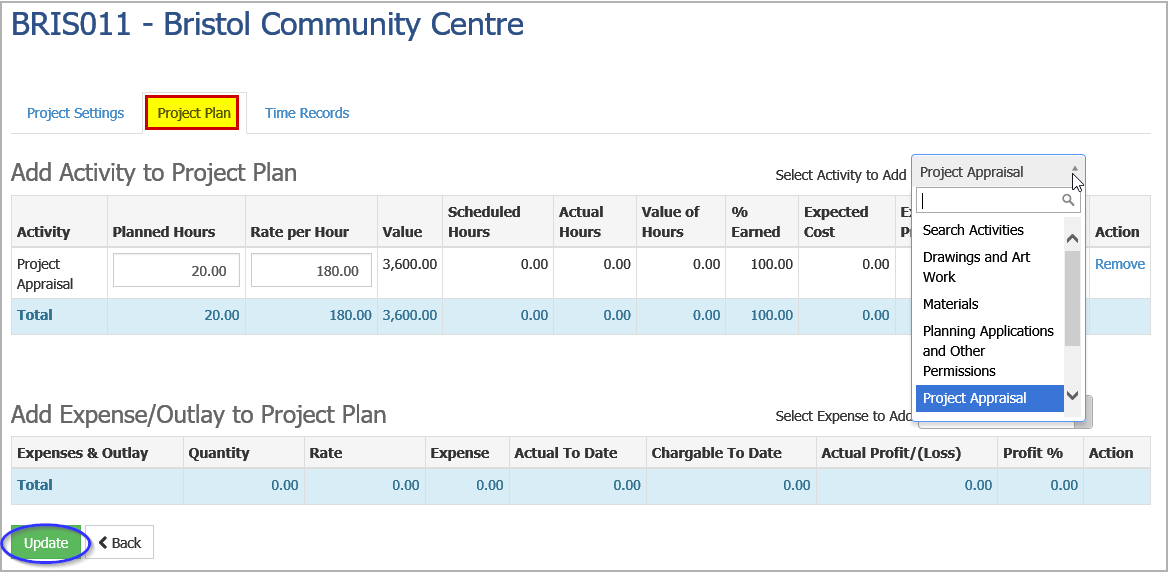
In the Project Plan tab, you can view all the business Activities that the Projects set up previously and the progress of the Project.
- In the Select Activity to Add dropdown, select each relevant Activity in turn.
- Enter the total Planned Hours for each Activity to build up the work plan. You can override the default Activity Rate per Hour for this Project here.
- Enter any planned or anticipated Expenses or Outlay for the selected Activities.
- Click Update.
Creating the Schedule
The schedule is the work plan agreed upon with the Client. It shows who is responsible for tasks and when. The schedule can be modified.
- Go to Schedule from the main menu. If the system administrator ticked Show all Projects to Employees during Employee setup, then all options will be available to you, otherwise, it will be just the projects you are involved in.
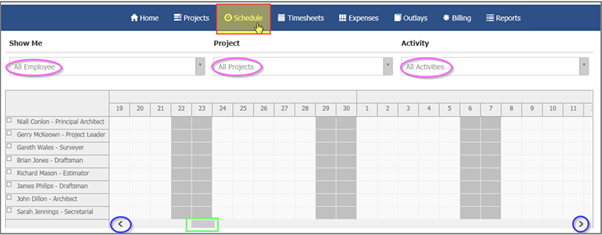
- Select the relevant parameters from the dropdowns. Navigate through the calendar by using the arrows at the bottom of the screen. Move through the range chosen by the arrows using the horizontal slider.
Example
In this example, the administrator has already set up:
- The Approver, also known as Team Leader.
- The Team.
- The initial Activity, Project Appraisal in the Activities table to schedule resources against this Project and Activity.
- The Bristol Community Centre project in the Projects table.
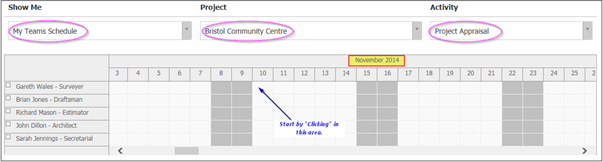
The steps are as follows:
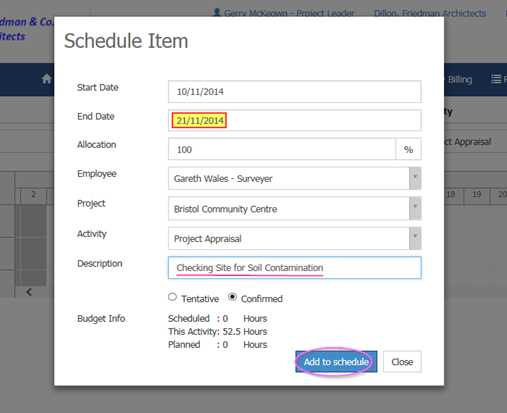
- We are going to schedule this Activity against the surveyor, Gareth Wales, starting on Monday, 10 November. Select the cell that corresponds to the Start Date and the Employee to open the Schedule Item screen.
- Change the End Date if necessary. It is initially set to the Start Date.
- Change the % Allocation of the Employee’s time.
- Enter a brief description of the work relating to this task.
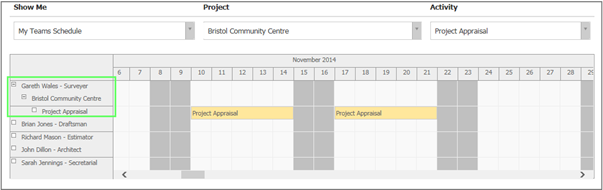
- Click Add to Schedule. You will see it appear in colour coding in the Employee’s schedule.
Managing Schedules
You can also drag the start or end date of an item to lengthen or shorten it.
You can also drag the item from one Employee to another:
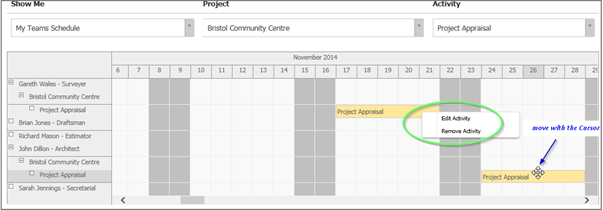
Hover over the item to see a short description of its contents.
Right-click on the item to edit or remove it. You can:
- Schedule other tasks for an item against the Employee or against another Employee.
- Schedule other tasks for other items against this Employee or against other Employees.
Depending on the parameter that the Project Administrator chose in Configuration > General Settings > Schedule Settings tab, the system will:
- Maintain the Allocated (Scheduled) hours against the Planned hours at the time of Activity creation or addition of/to the Project.
- Build the Planned hours from the Scheduled Hours.
Managing Team Timesheets, Expenses, and other Outlays
When the Project Administrator set you up as an Approver, you were allocated Project Employees as members of your Team. Part of your role as a Project manager is to ensure that you submit your Team’s timesheets and expenses for Approval in a timely manner.
View your Team’s Timesheets
- Go to Timesheets > My Timesheets. As an Approver, you can view the status of your own timesheets as the default.
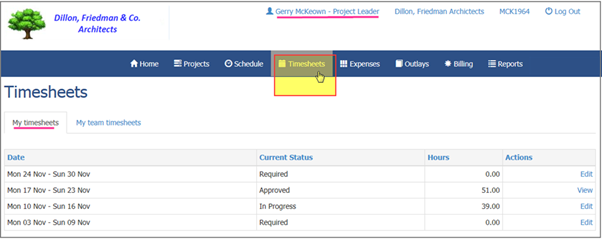
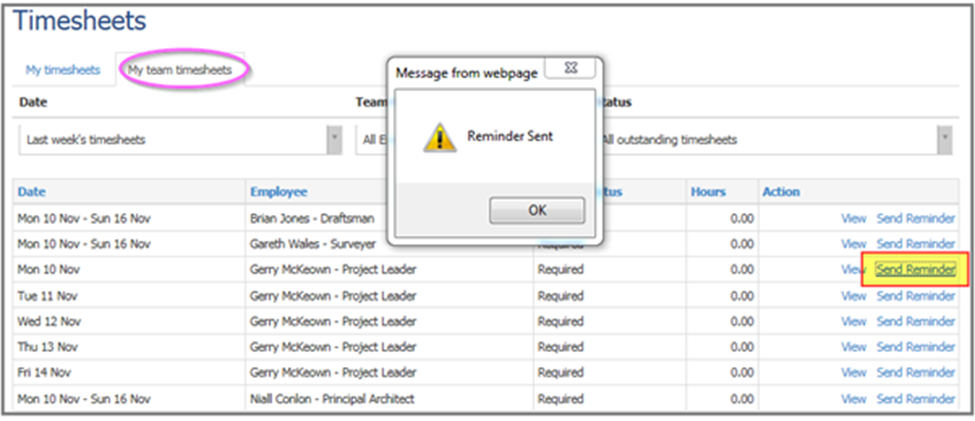
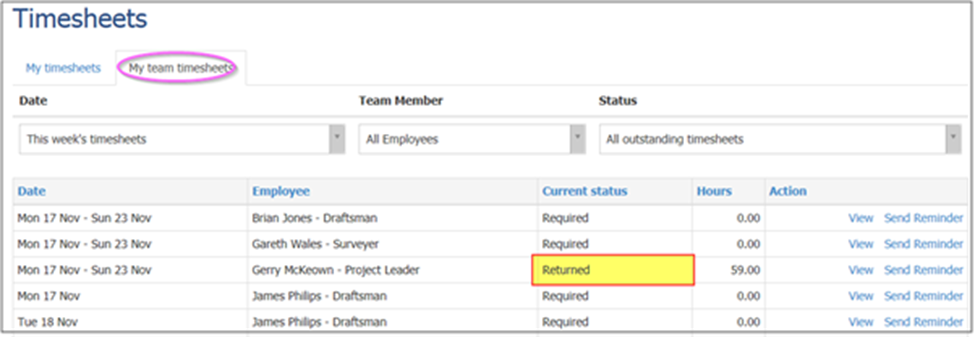
- Click My team timesheets.
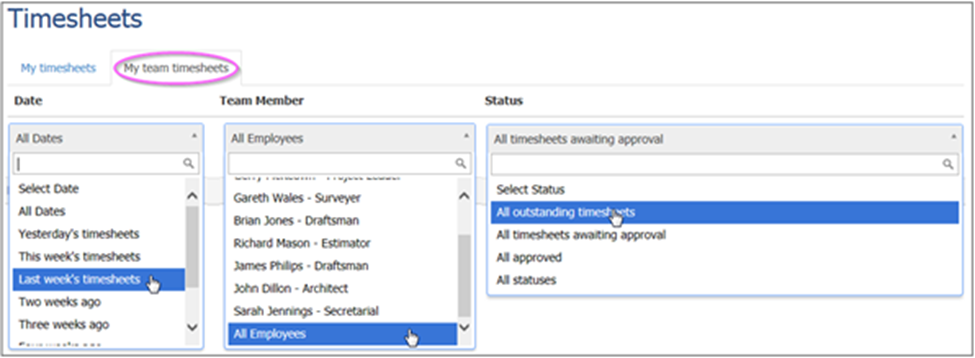
- Select the required parameters from the dropdowns to view the timesheet of any Employee on your Team and its status.
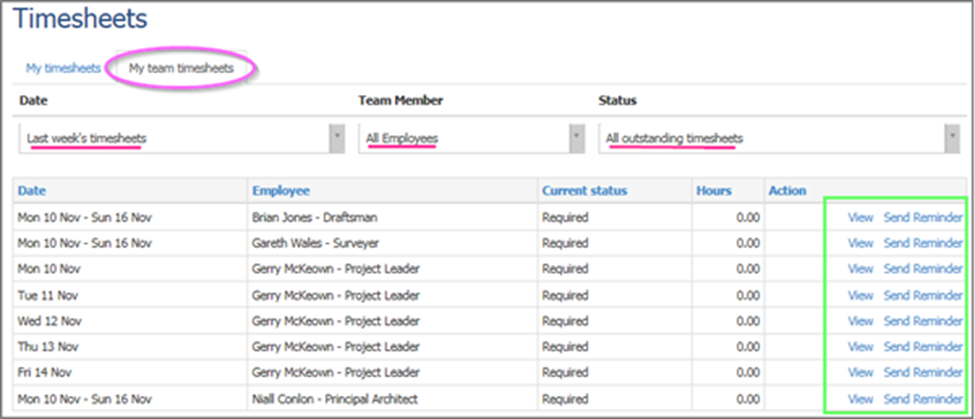
- View the timesheet details or click SendReminder if it is outstanding.
The Reminder email will be as follows: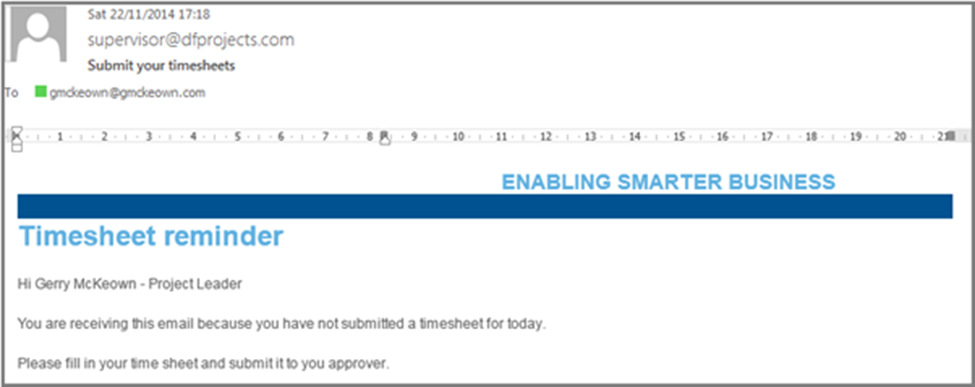
Approve Timesheets
In the case of timesheets awaiting Approval by you:
- Select All Dates, All Employees, and All timesheets awaiting approval from the dropdowns. This will produce a list of your Team’s submitted timesheets awaiting approval by you, the Team Leader.
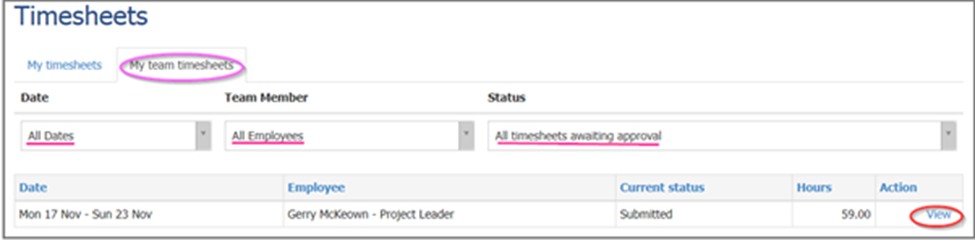
- Click View.
- Click either Approve or Reject.
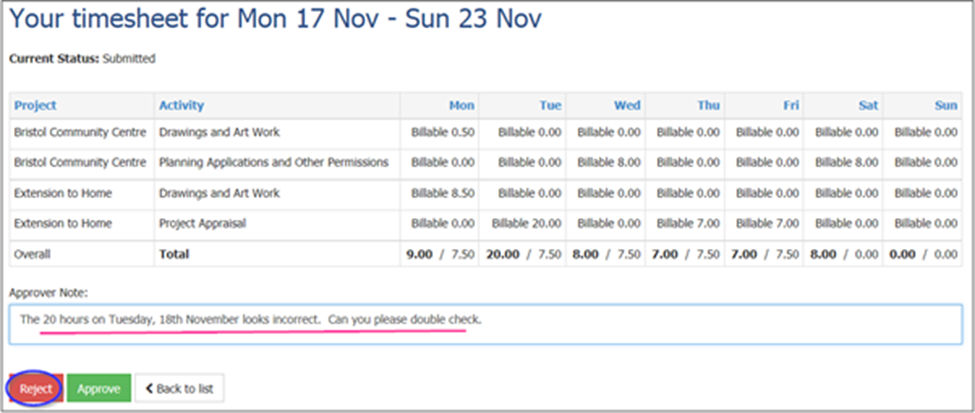
- If rejected, the disappears from the list of timesheets awaiting Approval and returned to the list of Outstanding Timesheets. It will have a status of Returned and need correction and resubmission by the originator using the Edit function in the My timesheets tab.
After Approval, the timesheets become available for Billing along with other Project Employee submissions regarding Expenses and other Project Outlays.
Expenses and other Outlays Approval
As with timesheets, all Project Employee Cash Expenses and other Supplier-related Outlays are subject to approval by you, the Team Leader. Follow the instructions given above.
The approval of Expenses and Outlays automatically causes Invoices to be posted to the Purchasing system against the relevant Supplier Account (Outlays) and Employee Supplier Accounts (Expenses).
See:

Reviewing and Updating Projects
Before raising Invoices against Clients, you may want to review the progress of a Project and then complete further actions and enter Provisions.
- Go to Projects.
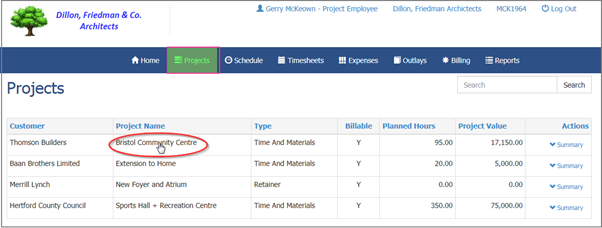
- Select the Project to review.
Project tab
- In the Project Plan tab, you can modify Activities, such as the Planned Hours and/or the planned Rate per Hour for this Project. It will not modify the standard rate per hour for that Activity set up in the Configuration section.
- To add a new Activity go to Select Activity to Add and select the new Activity. You can then enter the Planned Hours and modify the Rate per Hour if necessary. Note that you are only modifying the Project Plan and any changes you make will not affect the Actuals to Date.

- Click Update or to abandon the changes, click < Back.
Time Records tab
The Time Records tab displays a summary of the time, costs, and charges for each Employee working on the Project against each Activity that Employee was scheduled to or worked on.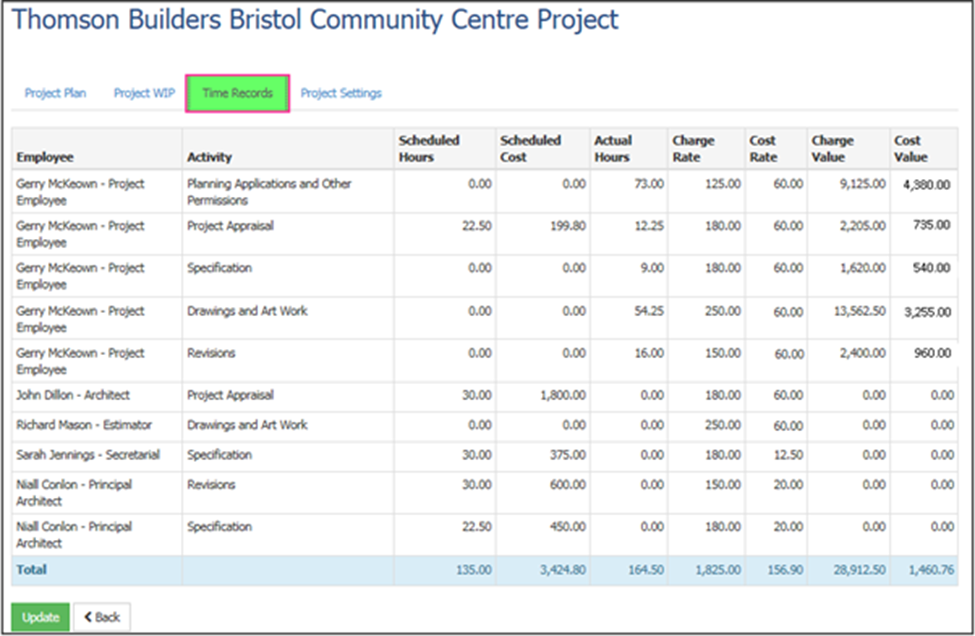
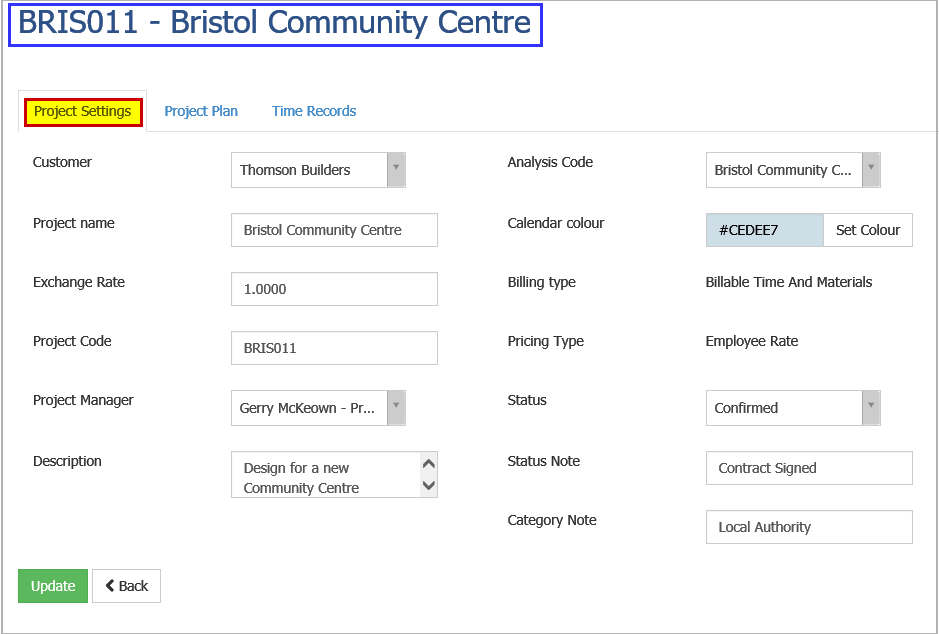
Project Settings tab
In the Project Settings tab, you can modify fields relating to the Project details, but not those involved in the creation of Project Costs and Charges.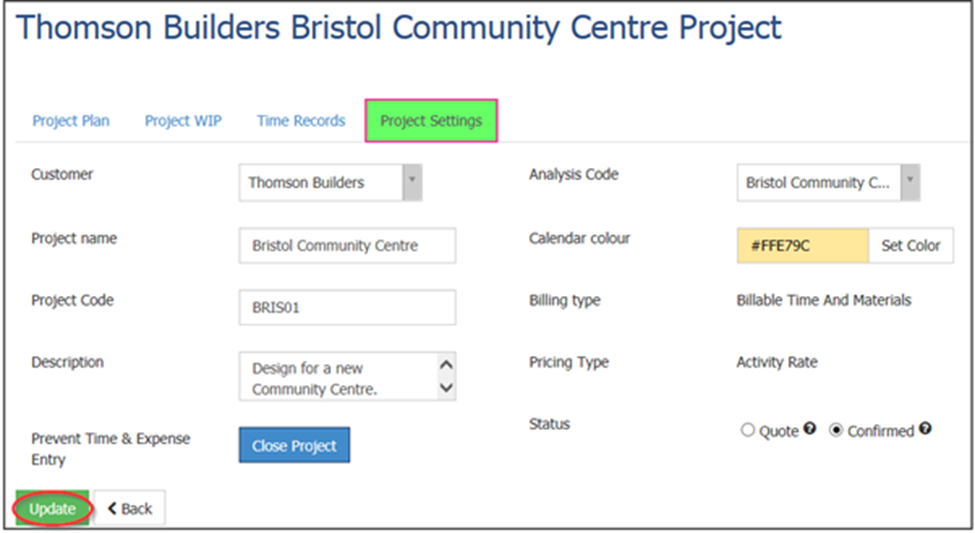
Project WIP tab
To update the % Completion or % Recoverable:
You can update the % Completion (and/or % Recoverable in the case of Expenses and Outlays) against any Activity (or Expense charge).
In the % Completed field, enter the percentage completion against the Activities. This will re-calculate the remaining Work in Progress value and update the Recovery Rate. The same is true for the % Recoverable field, under Expenses.
The system recalculates the Suggested Provision as follows:
- Value of Incurred Hours - (Value of Planned Hours X % Complete).
The Suggested Provision in the case of Expenses/Outlays is:
- (100% - % Recoverable) X Chargeable to Date Amount.
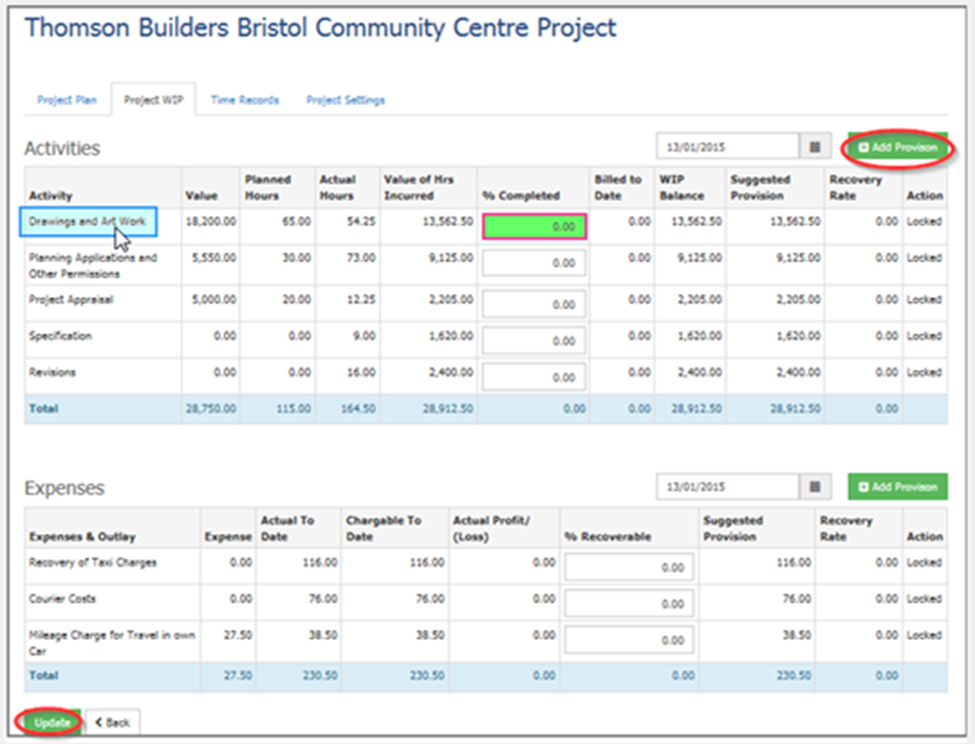
To Add Provisions:
You can add Provisions, for example, in the event of non-chargeable time for re-work.
- Click Add Provision.
- Select the Activity against which to make the provision to open the Project provision (Activities) screen.
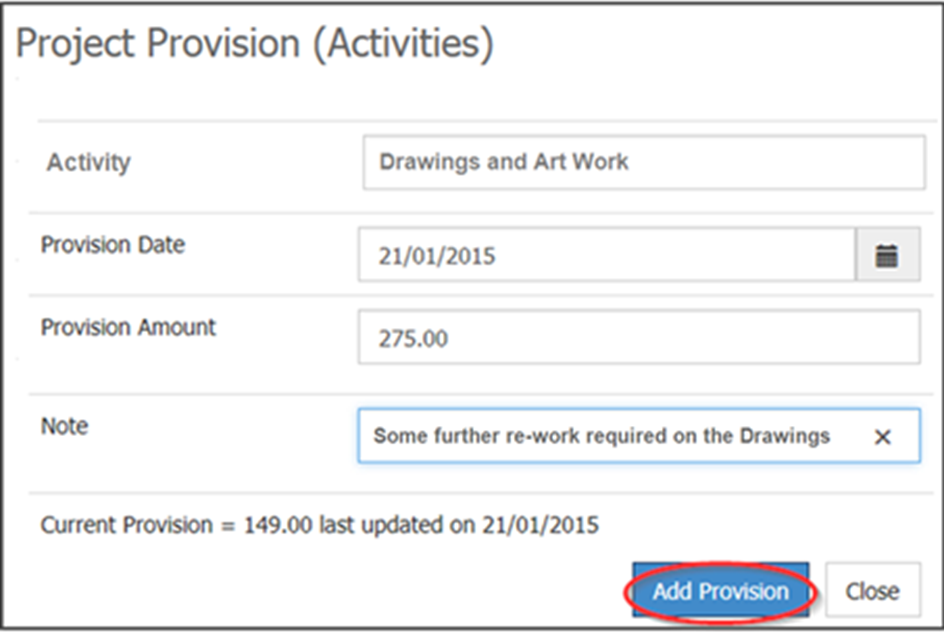
- Fill out the provision details.
- Click Add Provision.
- Repeat steps 1-4 in respect of Expense/Outlay Provisions.
Project Billing
To Generate Invoices:
Periodically, bill your clients for work carried out to date, or finished Projects.
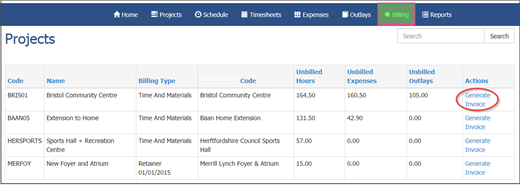
- Go to Billing to view a list of all Projects with approved timesheets or expenses/outlays and are outstanding.
- Next to the relevant item, click Generate Invoice. This will generate an invoice as well as all its associated postings in the accounting system.
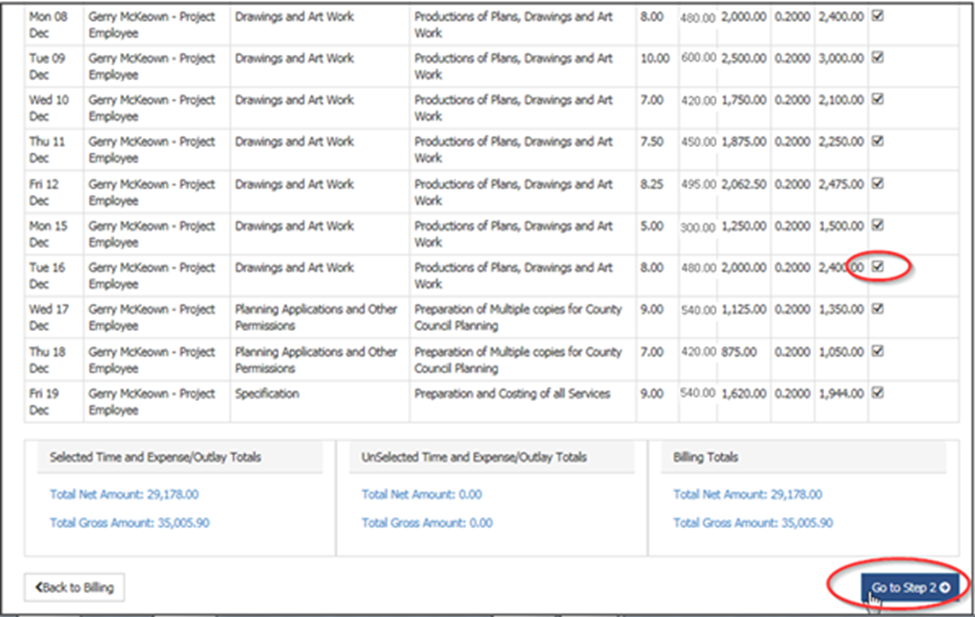
- In the Unbilled time screen, you can see all the outstanding unbilled time per Employee on each Activity. These are included by default.
- Under the Include in invoice column, untick any to de-select them.
- In the Invoice Date field, enter a date.
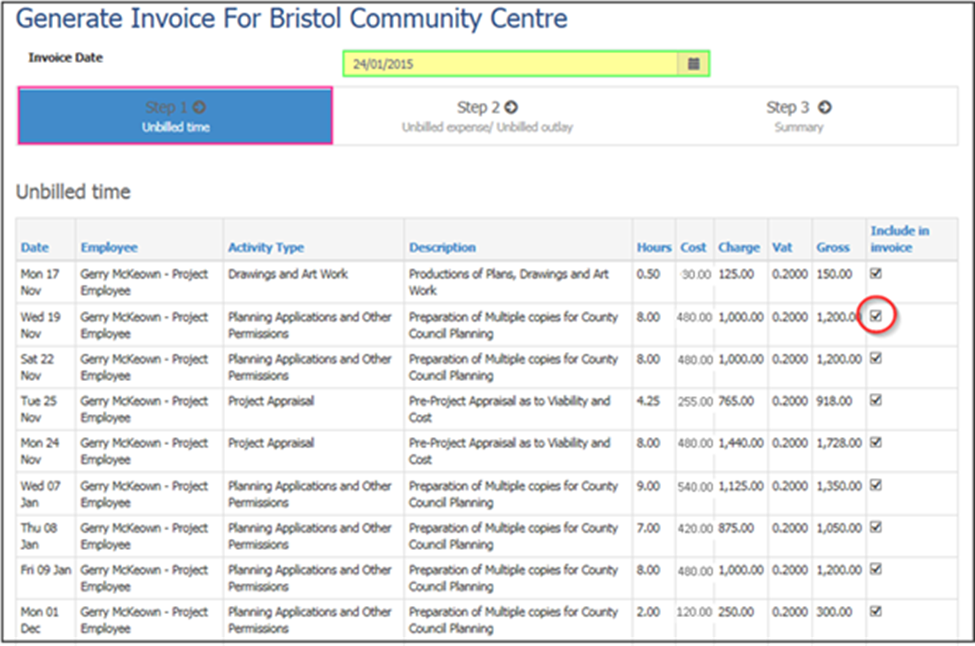
- Click Go to Step 2.
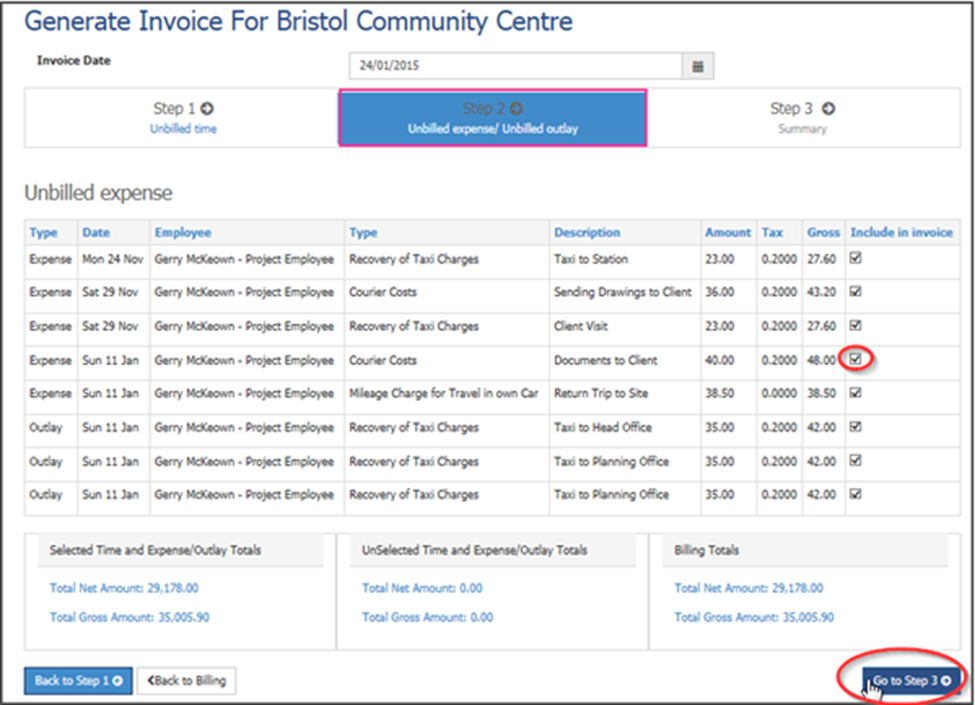
- Complete the Unbilled expense/Unbilled outlay in the same way as Unbilled time.
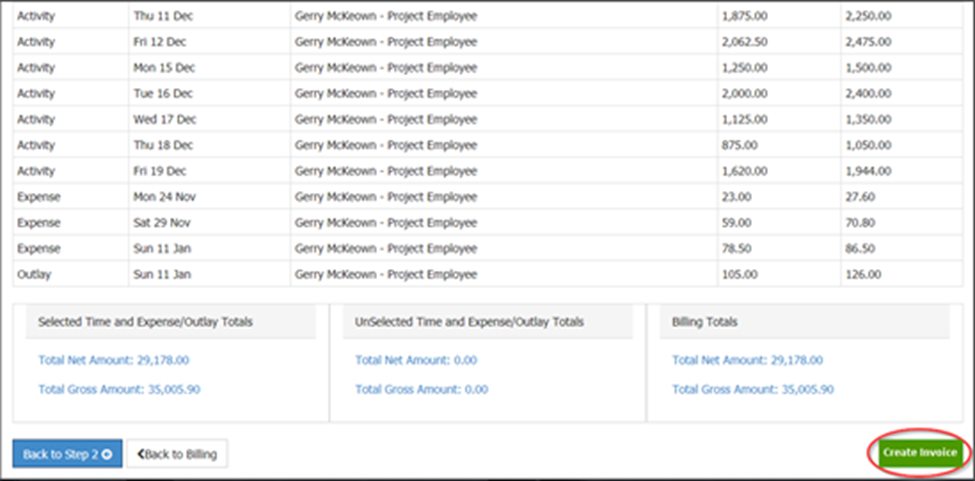
- Step 3 is a Summary of the data presented in Steps 1 and 2. Click Create Invoice to generate the Invoice.
Integration with the Sales and Purchasing Systems and General Ledger
To print or email the Invoice:
Go to AR > Item Invoices and find the relevant invoice.
- Using the relevant Print dropdown, select the desired format.
- Click the relevant Email icon and follow the instructions.
To post the client invoice:
- Go to AR > Item Invoices and find the relevant invoice.
- Tick the relevant invoices in the Post column.
- Click Post Selected.
To post the expenses and outlay purchase invoices:
- Go to AP > Item Invoices and find the relevant invoice.
- Tick the relevant invoices in the Post column.
- Click Post Selected.
If the invoice must go through approval, the Invoice status will read Pending, rather than Processed.
See:

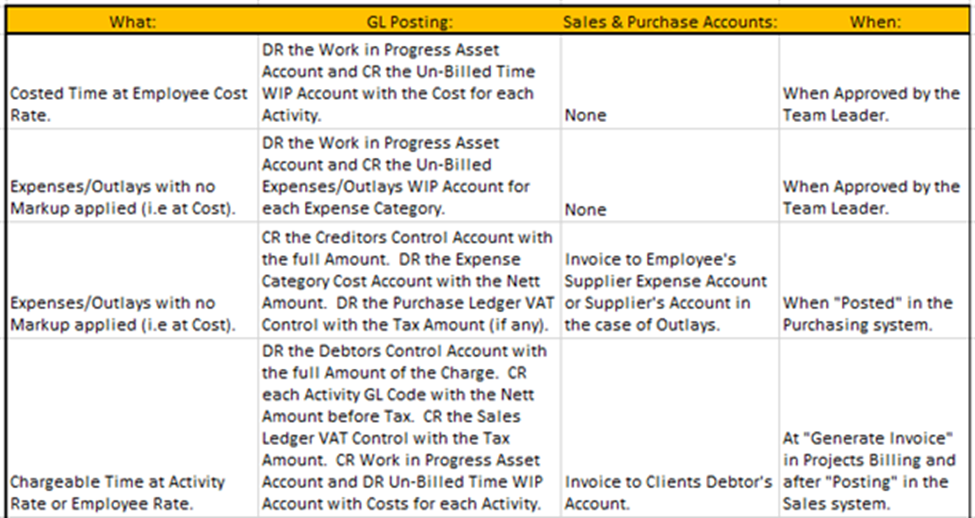
Work in Progress Postings
Work in Progress postings are made to the WIP General Ledger Accounts set up by the Administrator in the Configuration module.
- WIP for Time is generated by timesheet approval and is reversed on billing.
- WIP for Expenses and Outlays occur on Expense/Outlay Approval and are reversed when the resulting Invoice is posted to the Supplier (Vendor) Account.
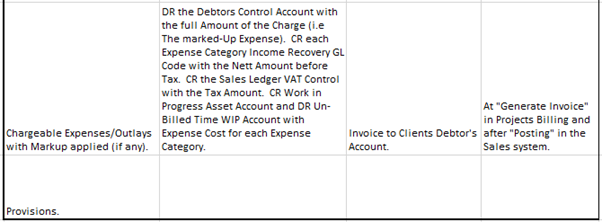
Here is a summary of the Ledger postings and their schedules:
Project Reporting
Viewing Reports
- Go to Reports in the main menu to view the available reports.
- Click View to open any.
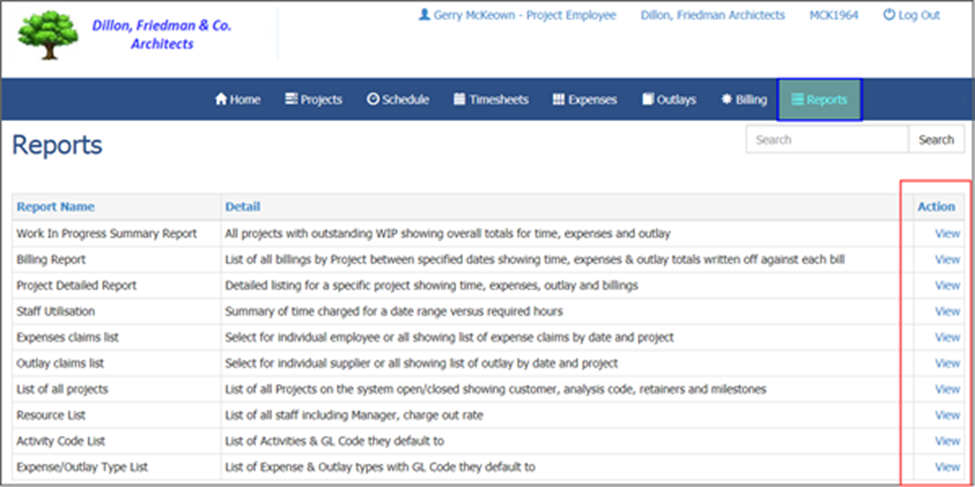
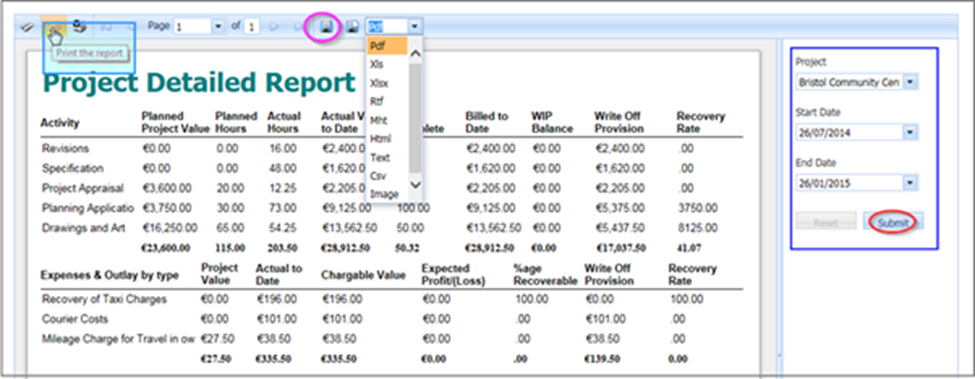
- For each report, you can:
- Set parameters.
- Print the report by clicking the print icon.
- Export the report by selecting from the format dropdown.
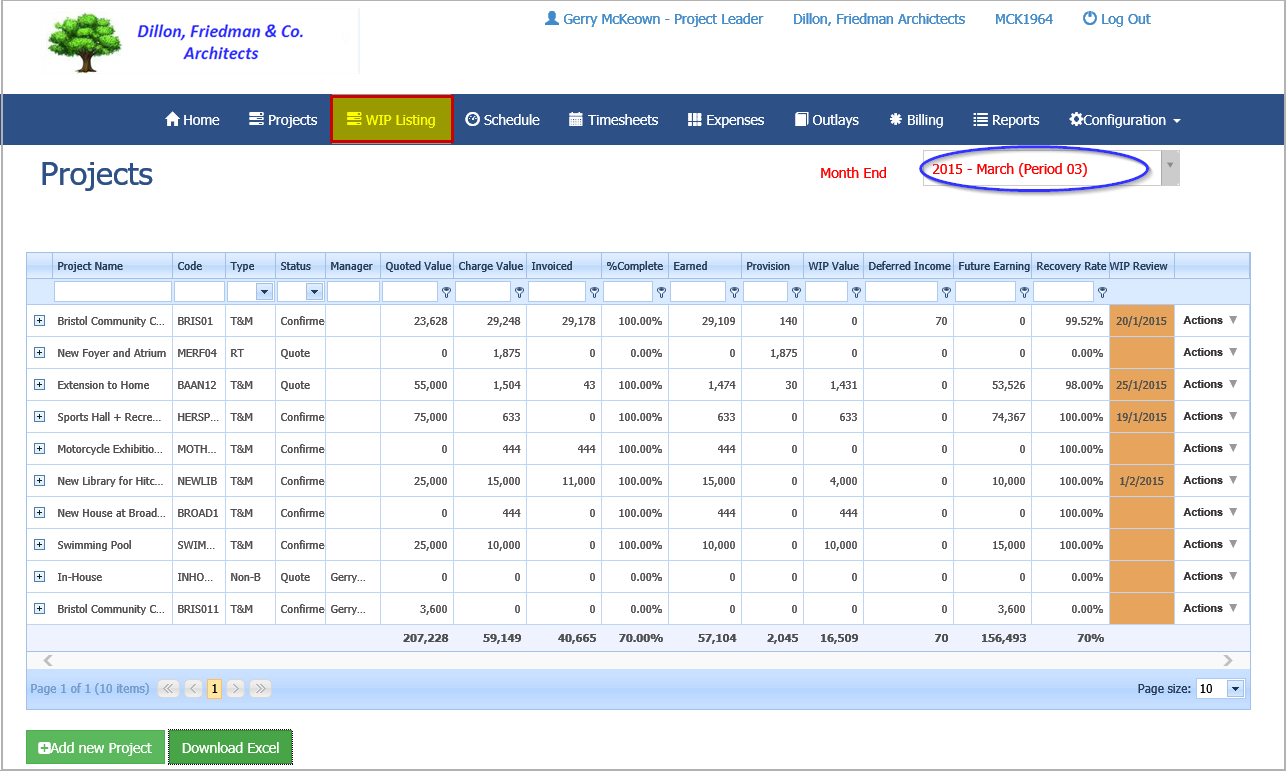
Viewing Project Status
You can also view the status of each Project from WIP Listing in the main menu.