Introduction
What is the Time and Billing Module?
The Time and Billing module, along with the full AIQ suite, make up the Project Accounting system. This system provides extensive budgeting and reporting capabilities, full supplier purchasing facilities, and client billing and account administration.
The Time and Billing module records:
- All employee time against projects and activities for any number of client projects.
- All associated expenses, supplier bills, and other miscellaneous charges and outgoings for each project.
This facilitates project and client billing by tracking all charges and costs for a project together with backup documentation. Based on this data, you can post transactions, produce project profitability, receive payments, manage suppliers, and more.
Find the module in the sidebar:
.png)
Who is Project Accounting for?
The Project Accounting System is an ideal solution for the following types of businesses and activities:
- Accountancy and Tax Advisors
- Architectural Practices
- Engineering and Construction Projects
- Management Consultants
- Marketing Agencies
- Software Providers
- Trust Administration
User Types
There are three types of system users:
- Administrator: This user has the highest level of privilege and full access to all facilities. They set up the system configuration parameters, set up and add new employees, and detail the activities conducted by the business.
- Approvers (“Team Leaders”): This user is responsible for setting up and managing individual projects and supervising and approving the team’s timesheets and other submissions. This role also includes client billing which feeds into the accounting system. Approvers cannot access the Configuration Settings detailed here.
- Project Employees: This user performs activities as part of a project and must record their time, expenses, and other outgoings for approval by their team leader and subsequent input into the system. Project Employees have reduced menu options compared to administrators.
See:


Integration with Extended Business Analysis
Extended Business Analysis facilitates the reporting of Profit and Loss beyond the company-wide level. For example, if you have several offices, each with multiple departments, you could produce Profit Analysis Reports by location and department, or department in all locations, as well as overall.
Example: An Architecture Practice
In this example, an Architectural Practice with several offices takes on a variety of projects for its clients. The practice wants to report on progress and profitability by:
- Individual project.
- Type of client, such as local authority, commercial, or private.
- Office.
First, we must set up these parameters in Extended Business Analysis before using the Time and Billing system.
- Go to Setup > Dimensions.
- In the Department tab, rename the tab to reflect what is in the Time and Billing system (here, Project Codes) and click Update.

- In the Analysis Groups tab, enter a Group Code for the first Analysis Group (OFFICE), followed by its Description, and Group code length. This is the maximum number of characters permitted in entries against this Code. Click Update.
- To set up further Analysis Groups, click (+Add).
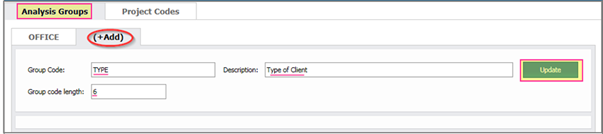
- For the OFFICE Group, open its tab, and click Add New Office. Enter each of the Group members along with a Code and Description. Click Update. Repeat this process for all tabs.
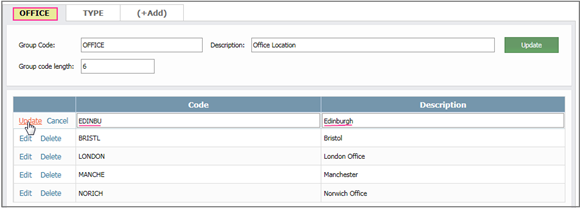
If your needs evolve in the future, you can expand the Analysis Groups and their members.
When the Project Approver sets up new projects, the Project Code will be added to the system along with its Analysis Group details.
See:
 Using Extended Business Analysis
 Using Extended Business Analysis for Job or Project Analysis
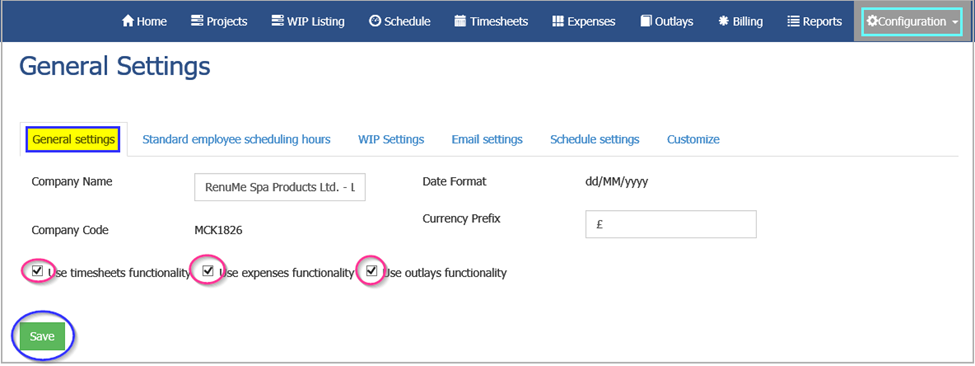
Configuration: General Settings
You must have Administration privileges to perform these tasks otherwise the configuration settings will not be available to you.
Go to Projects > Time & Billing.
Under Configuration, select General Settings.

General Settings tab
- Complete the following:
- Company Name: This defaults to that already in use in Company Details & Settings in the main system. However, you can override it here if needed.
- Date Format: This comes from Company Details & Settings in the main system (US Format or Euro Format). You cannot change this.
- Company Code: This comes from Company Details & Settings in the main system. You cannot change this.
- Currency Prefix: This is the default for the Company. You can change it, but the system allows for multi-currency Billing and Accounting later.
- Tick the three checkboxes.
- Click Save.
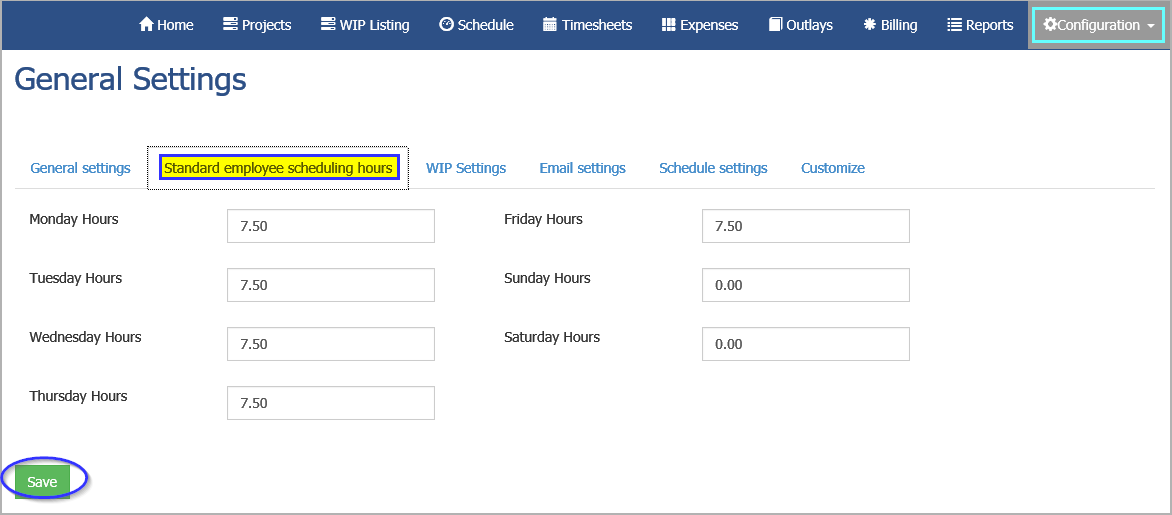
Standard Employee Scheduling Hours tab
Here you can define the standard working week. Projects in other countries may have different working weeks and hours.
Complete the hours for each day and click Save.
WIP Settings tab
Here you can nominate General Ledger Codes for posting unbilled time and expenses. There are three options regarding the treatment of WIP:
-
Option One: Post WIP values as time and expenses are approved, meaning the value of WIP builds.
At the end of the month, the manager indicates the stage of completion of each activity and determines the earned value of each project based on the quoted value. If the earned value is less than the time value, a Provision is posted to reduce the WIP to only recognise the earned amount. This provision is a movement so you may recover it at a later stage.
Select the relevant GL Codes from the dropdowns and click Save. 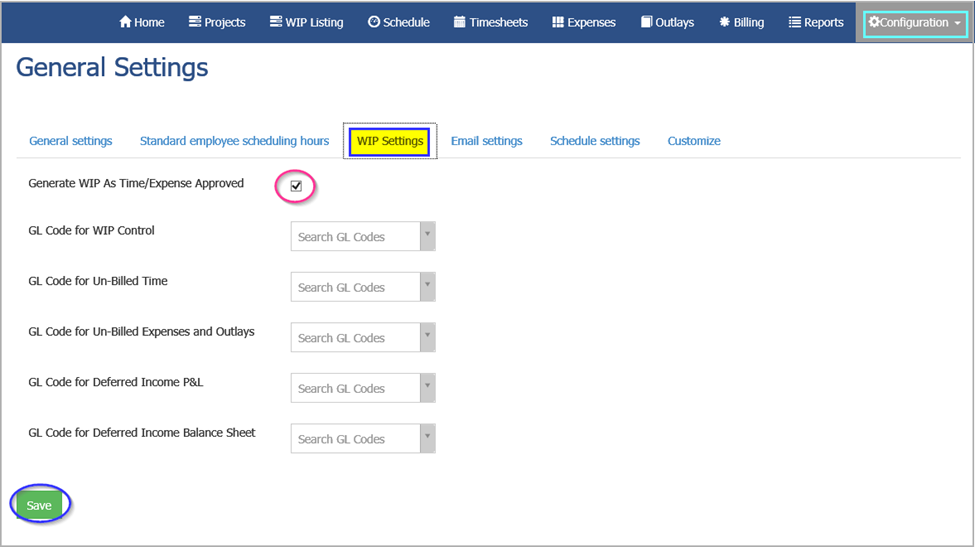
-
Option Two: Untick Generate As Time/Expense Approved.
In the screen that appears, select Monthly. This will post WIP and Deferred Revenue as a month end transaction. This is a movement in WIP or Deferred Revenue value based on the value earned against each activity in the project. This is effectively an income recognition adjustment for value earned but not yet billed or in the case of Deferred Revenue, Value invoiced but not yet earned.
- Option Three: Choose not to post WIP data by selecting None.
Click Save. 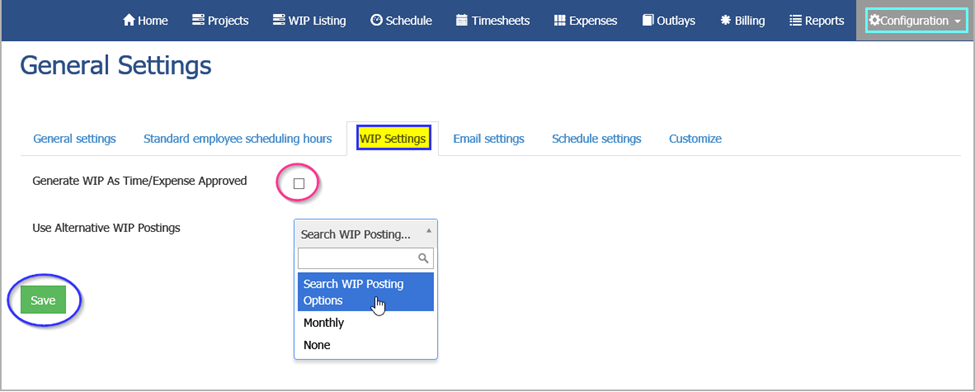
Email Settings tab
The email settings configure communication between the system administrator and the employees working on the Projects.
Complete the following:
- System Email Name: This is what you would normally expect to see in the From line of an outgoing email.
- Send reminders, At: These options are Send Reminders and No Reminders. If you select the former, enter a time in the At field.
- Additional Employee Setup Text: Enter the text each employee gets welcoming them to the system after initial setup.
When finished, Click Save.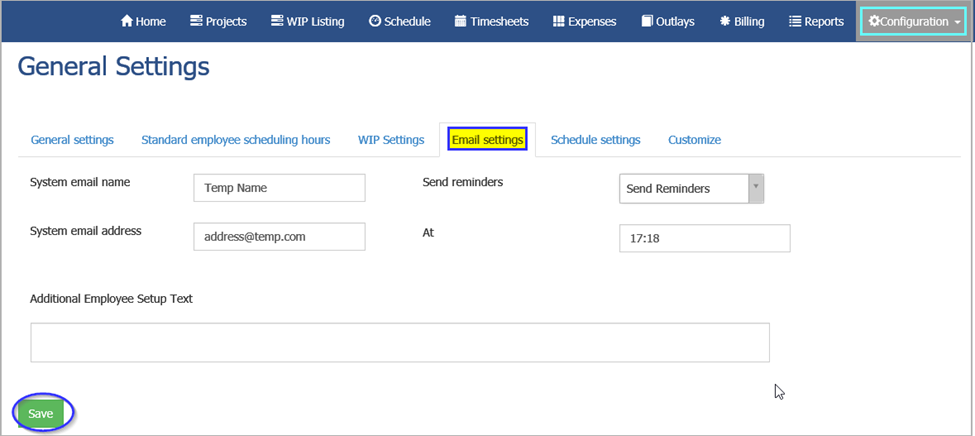
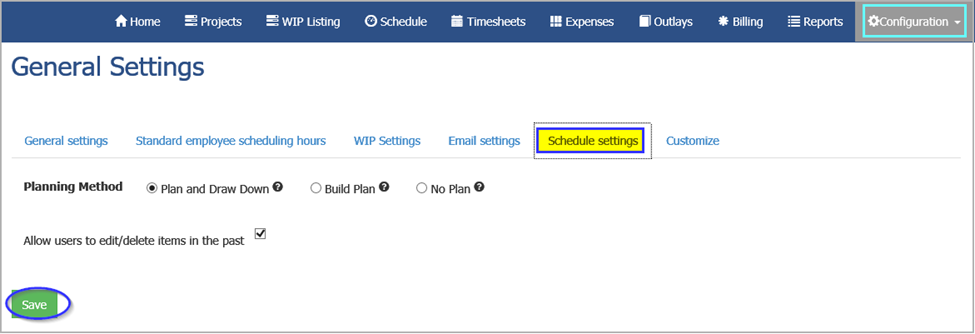
Schedule Settings tab
The Schedule Settings tab lets you allocate resources against Activities within a Project over time. It can maintain three distinct sets of hours against each activity:
- Planned: These are budgeted hours entered when creating the activity.
- Scheduled: The Project Approver enters these hours.
- Actual: These hours come from the timesheets.
Select one of the following:
- Plan and Draw Down: Here the Approver specifies the activities and the amount of time planned against each. (Set this under Projects Overview.) Subsequently, the Project Approver allocates resources and personnel to each activity and these hours are known as the Scheduled Hours.
- Build Plan: This means that the Planned Hours derive from the Scheduled Hours.
-
No Plan: This means that the system does not track either Planned or Scheduled Hours or use the schedule part of the system.
Customize tab
The Customize tab lets you choose a theme colour. You can also select a company logo for use throughout the system and in communications, invoicing, and reports. 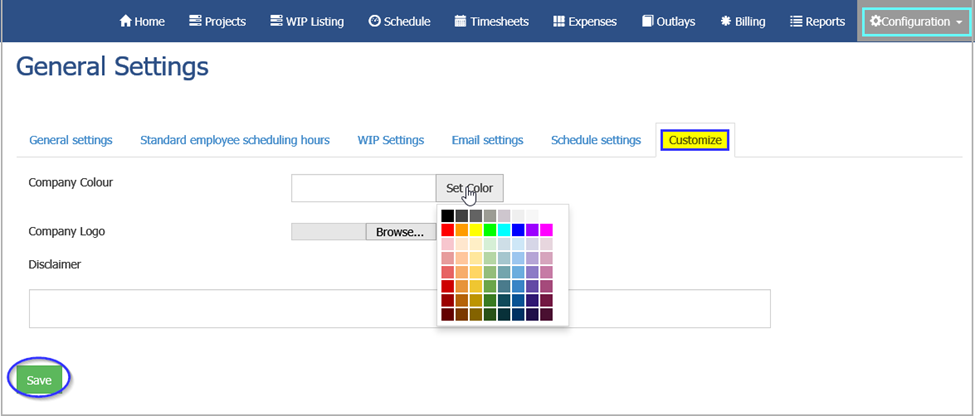
An example of customisation:
Configuration: Employee Details
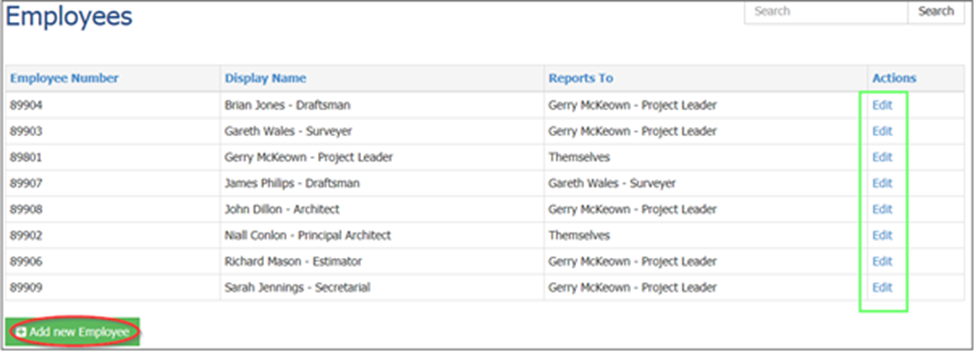
The next step in the configuration process is to set up of the Employee data. Employees can be Administrators, Approvers, Employees, can be full- or part-time, or contractors. Employee details allow for both Charge-out Rates and Cost Rates per hour.
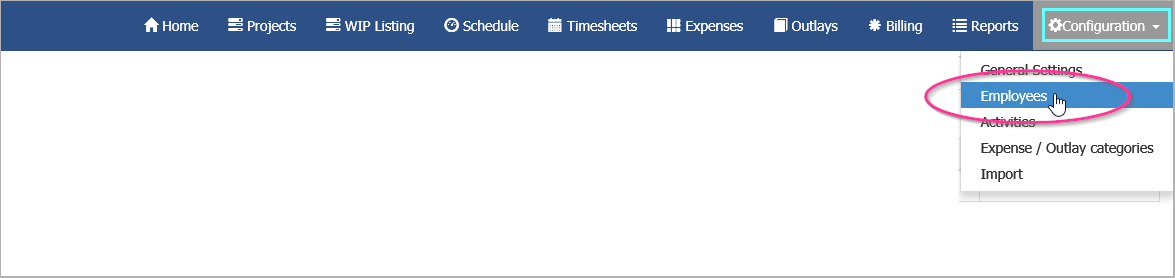
- Go to Configuration > Employees.
- Here you can:
- Edit existing Employee details by clicking Edit.
- Add a new Employee’s details by clicking Add new Employee.
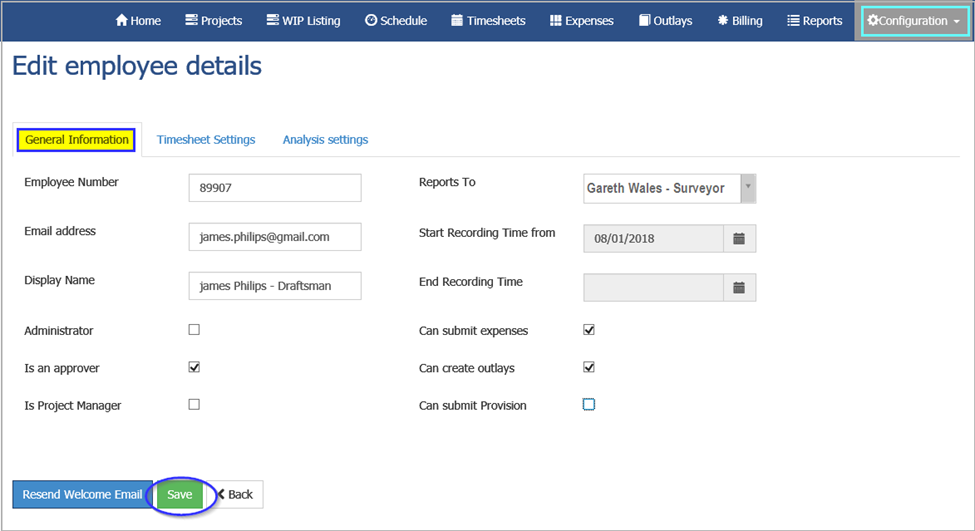
General Information tab
Complete the following:
- Employee Number
- Email address
- Display Name
- Administrator: Tick to allow the user to access these Configuration settings.
- Is an approver: Tick to add the user to approvers for timesheets, expenses, other outlays, and everything in the system other than configuration settings. Approvers are also “Team Leaders” in the scheduling section of the system.
- Reports To: Select one Approver. An Employee can report to another Employee who is an Approver who in turn can report to another Approver.
- Start Recording Time from: This is the date from which timesheets will be expected, and if not received, the Approver will chase them up using the Reminder facilities.
- Can submit expenses: This permits the user to submit expenses.
- Can create outlays: This allows the user to enter and submit other outlays in respect of minor fees such as taxis, couriers, or small supplies.
-
Can submit Provision: This allows the user to provide for potential write-offs of some Project works and costs and is only for persons with that specific authority, such as Administrators or Approvers.
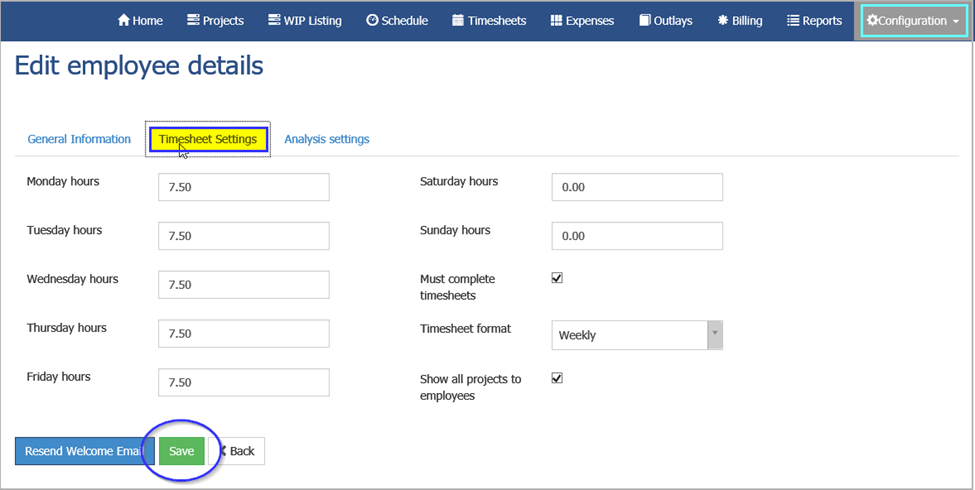
Timesheet Settings tab
The standard Working Week you set up earlier appears here, but you can edit it if needed.
Complete the following:
- Must complete timesheets: Tick if appropriate.
- Timesheet format: The formats are Daily and Weekly and will affect the behaviour of any Reminders you set.
-
Show all Projects to employees: Tick if this employee will work on more than one Project and when filling in returns (such as timesheets, and expenses), the list of Projects will have multiple entries.
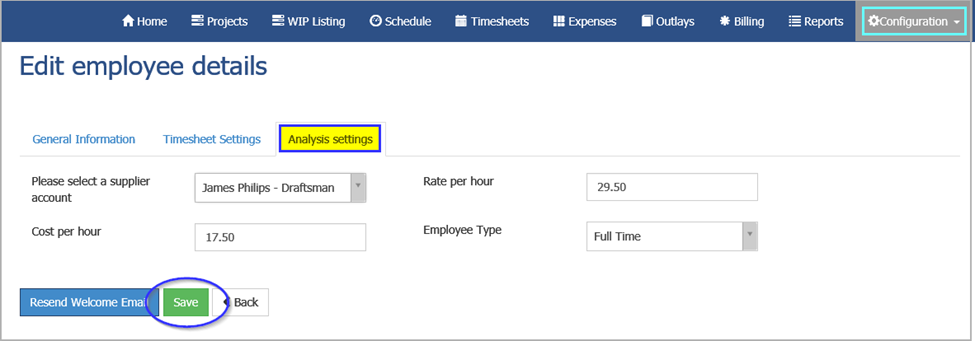
Analysis Settings tab
The Analysis Settings tab details:
- Cost per hour, Rate per hour: The Charge-out Rate is only used when a Project specifies that the Employee Rate should be used instead of the Activity Rate to calculate the Client charge.
- Employee Type: Select Full Time, Part Time, or Contractor.
- Please select a supplier account: An Employee’s Supplier (Vendor) Account must first be set up in the Purchasing System so they can then receive any approved expenses in the form of Purchase Invoices. These Invoices will later be paid for in the Purchasing system.
Configuration: Activities
You can record time spent on a Project against various Activities. Define Activities with a level of detail that reflects the project’s time, cost, and charge, and is appropriate for your industry. For example, in the IT Industry, the activities could include:
- Coding
- Documentation
- Holidays
- Sickness
- Study
- System Design
- Testing
- Training
- User Specification
Or an Architectural Practice could have Activities such as:
- Appraisal
- Costing
- Design
- Drafting
- Planning Applications & Permissions
- Surveying
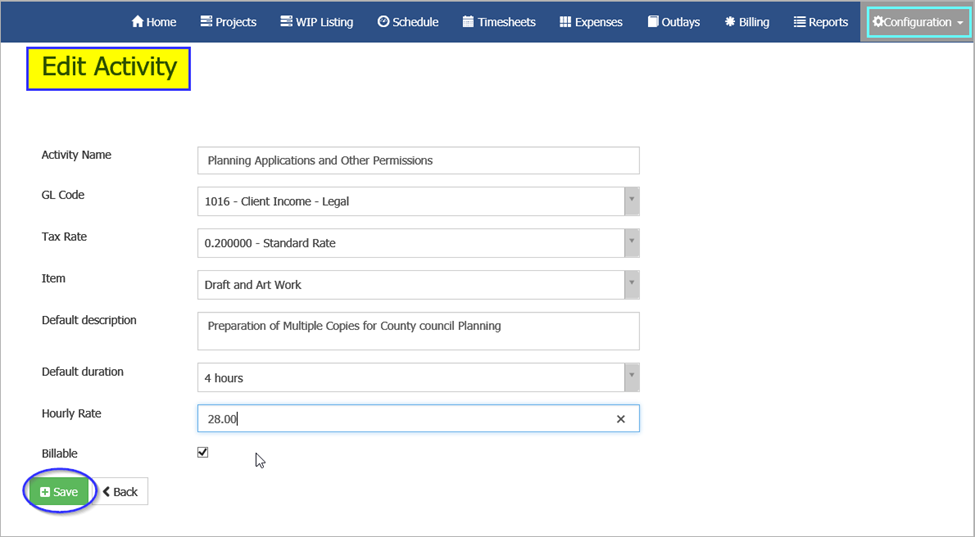
Set up Activities
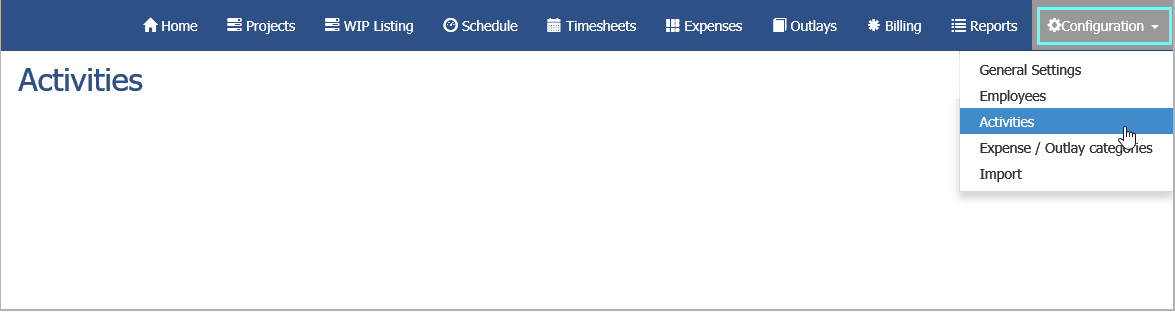
- Go to Configuration > Activities.
- Click Edit or Add new Activity as relevant.
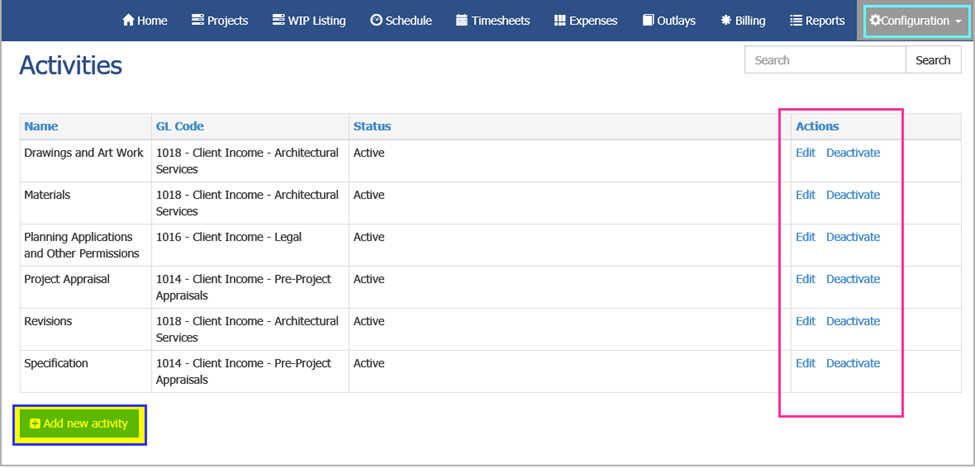
- Complete the following:
- Name: Enter a unique name for identification purposes.
- GL Code: Income arising from this Activity will be posted to this Revenue Account in the General Ledger.
- Tax Rate: This is the rate for this Activity during Billing. It comes from Codes Maintenance in the main system.
- Item: This comes from the Inventory Management System (Maintain Services/Non-Stock Items) and identifies the type of Service carried out by the company within this Activity. It will feature in Product/Service Sales Analysis.
- Default description: This is optional and provides a more comprehensive reason for the charge.
- Default duration: This is optional. It is the minimum chargeable time for this service.
- Hourly Rate: This is the charge-out rate for this service in the company’s Base Currency.
- Billable: This indicates whether this service should be charged to the client.
Info
When submitting timesheets, each employee must equal or exceed the total hours for the week specified in Employee Details > Timesheet Settings (see General Settings above). Therefore, to account for non-billable activities such as sickness, holidays, training, and administration, set up these Activities against an internal Project called "In-House" or similar.
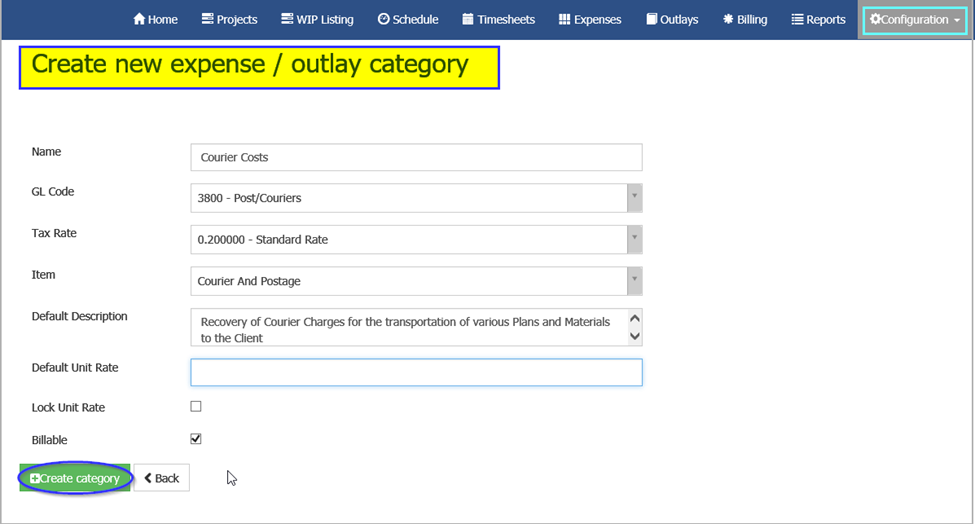
Configuration: Expense/Outlay Categories
Expenses are incurred and paid for directly by employees working on a Project, whereas outlays are in respect of charges which are signed for by an employee.
Although other modules deal with expenses and outlays, this module captures and records them against the Project Account for (possible) subsequent charging to the client. For analysis and reporting purposes, it is necessary to categorise them before using them for recording purposes.
- Go to Configuration > Expense/Outlay categories.

- Complete the following:
- Name: Enter a unique name for identification purposes.
- GL Code: Enter the Income Recovery account in the General Ledger against which to code the recorded amounts.
- Tax Rate: This rate applies to this Charge on Billing. The rate comes from Codes Maintenance in the main system.
- Item: This comes from the Accounting System’s Inventory Management System (Maintain Services/Non-Stock Items). It identifies the type of charge incurred by the company within this Category of Cost recovery.
- Default description: This is optional and provides a more comprehensive reason for the charge.
- Default Unit Rate: This is optional. Some Item charges may be incurred on a per unit basis, such as agreed “per diem” subsistence amounts, mileage charges, or photocopying per page. The Default Unit Rate is the amount charged each time this Item occurs (in Base Currency). At the relevant stage in the expense/outlay entry process, enter the number of units.
- Lock Unit Rate: This indicates whether this rate can be overridden at Expense/Outlay entry stage. Tick if users should not override this rate.
- Billable: This indicates whether this expense or outlay should be billed to the client or not.