Introduction
About Intercompany Transactions
Intercompany transactions include the recharging of shared costs or management fees or charges, intercompany trade, and the movement of payments or funds between companies.
Intercompany transactions can be between:
- Group subsidiary companies.
- Group companies and subsidiaries.
- Franchisors and franchisees.
- Independent non-related companies that want to reduce the re-entry of data.
How does AccountsIQ facilitate Intercompany Transactions?
With AccountsIQ, you can do the following:
- Auto-record intercompany invoices in the receiving entity.
- View intercompany balances between entities in real-time, allowing you to ensure Intercompany is reconciled through the period.
- Run the Intercompany Matrix report at month end to ensure your intercompany accounts are in balance.
What do I need to set up to use AccountsIQ Intercompany Functionality?
You need to perform the following three set-up tasks:
- Create Intercompany Debtors Control Account and Intercompany Creditors Control Account in your entities.
- Create an Intercompany Customer Account (Source entity) and an Intercompany Supplier (Vendor) Account (Receiving entity) in each entity that has an intercompany relationship.
- Connect Intercompany Customer Accounts in the source entity to the Intercompany Supplier Accounts created in the destination entity.
The Purpose of Control Accounts
Having specific Control Accounts allows you to:
- Eliminate intercompany transactions at consolidation level by linking the Intercompany Control Account to the same GL Category and Sub Category.
- Report intercompany accounts separately.
It is unnecessary to set up separate control accounts for all trading relationships. Instead, ensure that all Customer and Supplier (Vendor) Accounts nominate the default Control Accounts.
Currency considerations
Intercompany transactions are usually in the base currency of the source company, meaning they bear any cost of foreign currency fluctuations. Reciprocal invoice posting converts the currency in the sales invoice into the base currency of the destination company. This ensures that at month-end currency revaluation, the transactions from both companies cancel each other on consolidation.
Tax Considerations
Companies can charge different tax rates from each other where relevant. The default tax code comes from the source company account, but you can override this at the data entry stage.
See:
 Intercompany Introduction (13.0) - AIQ Academy
 Setup Intercompany Control Accounts, AR and AP (13.1) - AIQ Academy
 Create Inter-company Connections (13.2) - AIQ Academy
 Create Intercompany Transactions (13.3) - AIQ Academy
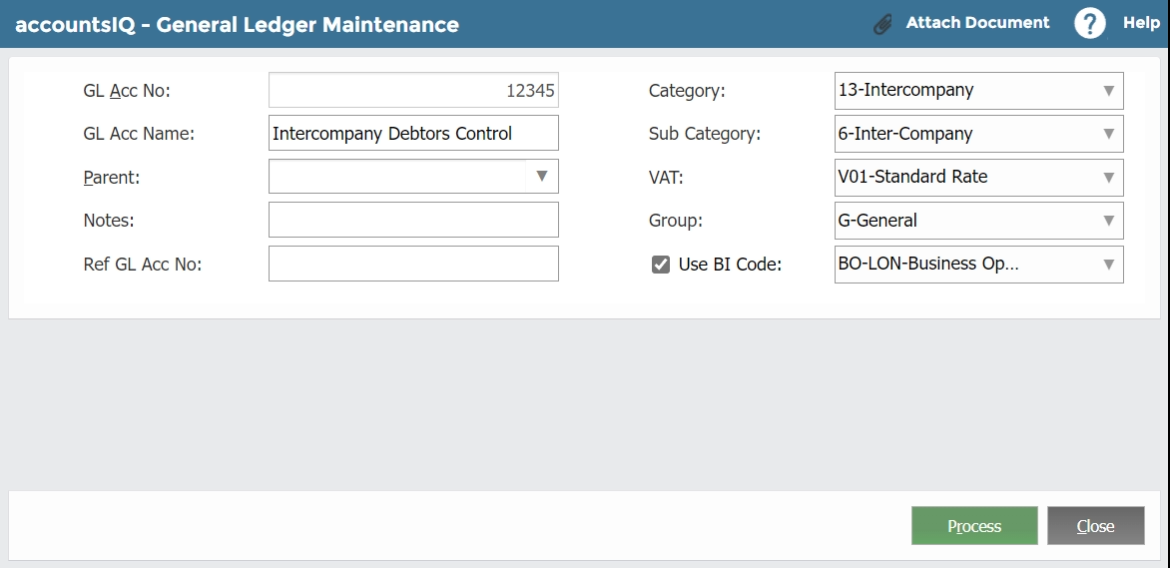
Creating Control Accounts
Step One: Set up the Intercompany Debtor and Creditor Control Accounts
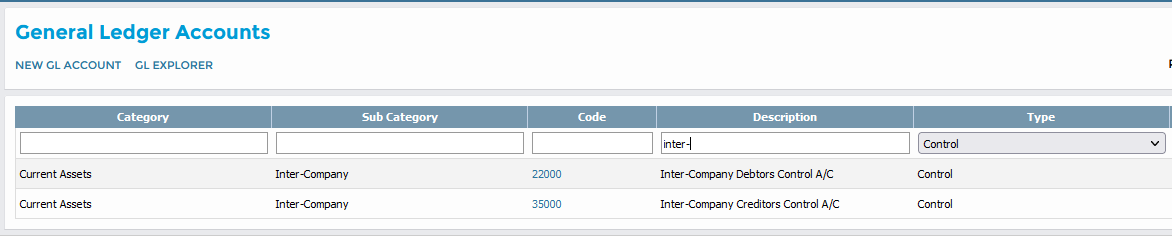
Creating the Debtor and Creditor Intercompany Control Accounts follows the standard GL Account creation process.
- For each company go to General > General Ledger Accounts > New GL Account.
- In GL Acc No, create a new GL code. Select the relevant Category and Sub Category.
- Click Process.

Step Two: Nominate the control accounts as Intercompany System Accounts
The system needs to identify the control accounts as Intercompany System Accounts.
For each company:
- Go to Setup > Company Setup > Codes Maintenance > System Accounts.
- Click Add New Control Account.
- Select Intercompany Creditors Control or Intercompany Debtors Control as relevant.
- Under Linked GL Account, select your account.
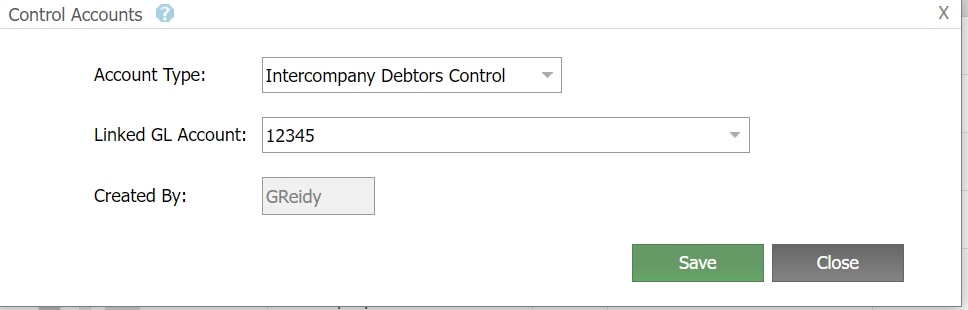
- Click Save.
If you want to make any changes later, click Edit next to the relevant control account in the System Accounts screen.
Step Three: Linking control accounts to the Consolidation Entity
Intercompany transactions must balance on consolidation. To automate this, in the Consolidation Entity, create accounts linked to each Control Account.
- Log into the Consolidation Entity.
- Go to General > General Ledger Accounts > New GL Account.
- Enter the same GL Code, Category, and Sub Category as the Creditors Control Accounts. This will link the control account to the Consolidation Entity.
- Repeat steps 2-3 for the Debtors Control Account.
Creating Intercompany Customer, and Supplier (Vendor) Accounts
To process intercompany transactions, you need to set up the following:
- Intercompany Customer Accounts in entities that initiate intercompany transactions, that is, entities that issue Intercompany invoices to other group entities. Create separate Intercompany Customer accounts for each entity that will receive invoices from this entity.
- Intercompany Supplier Accounts in entities that are the destination entity, that is, entities that receive Intercompany invoices. Create separate Intercompany Supplier accounts for each entity that will send invoices.
Create Intercompany Customer Accounts
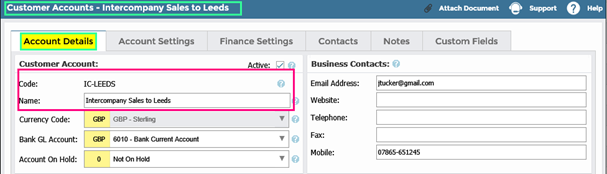
- Go to Sales > Customers > New Customer.
- In the Account Details tab note the following:
-
Currency Code: The currency in both the customer and supplier accounts must match.
-
Currency Code: The currency in both the customer and supplier accounts must match.
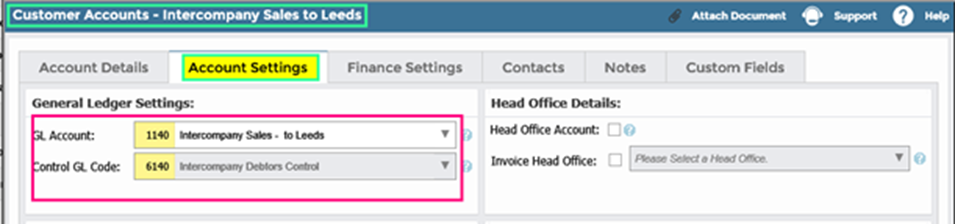
- In the Account Settings tab note the following:
- GL Account: Set up your account as an Intercompany Customer Account. You can decide to default to either the IC Clearing Account, IC Sales, or IC Company Cost.
-
Control GL Code: Select the Intercompany Debtors Control Account that you created earlier.
- In the Finance Settings tab note the following:
- Default Tax Code: Select the relevant code. If you do not want to charge VAT on intercompany transactions, set the Default VAT Code to NT.
- Use Tax Code: Select this.
Create Intercompany Supplier accounts
- Go to Purchases > Suppliers > New Supplier (Vendor).
- In the Account Details tab note the following:
- Currency Code: The currency in both the customer and supplier accounts must match.
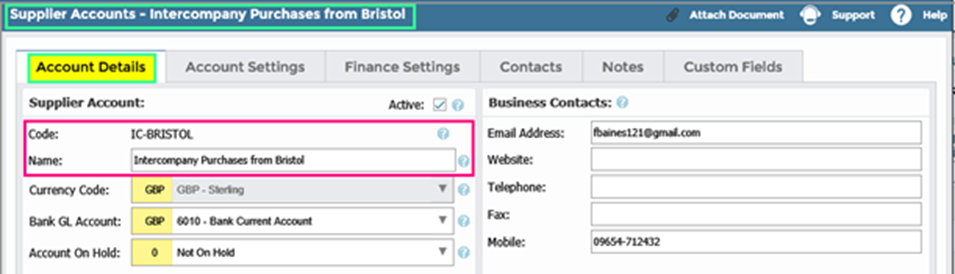
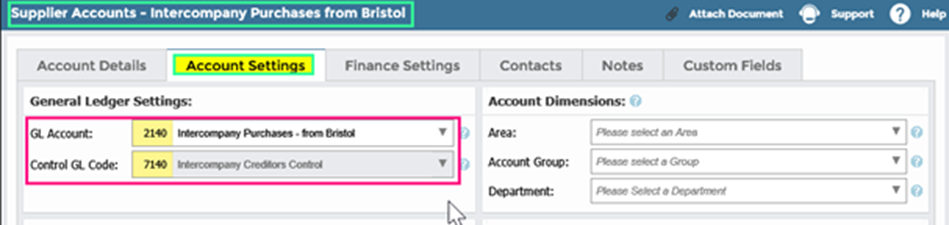
- In the Account Settings tab complete the following:
- GL Account: Set up your account as an Intercompany Supplier (Vendor) Account. You can decide to default to either the IC Clearing Account, IC Sales, or IC Company Cost.
-
Control GL Account: Select the relevant Intercompany Creditor Control Account that you created earlier.
- In the Finance Settings tab complete the following:
- Default Tax Code: Select the relevant code. If you do not want to charge VAT on intercompany transactions, set the Default VAT Code to NT.
- Use Tax Code: Select this.
Setting up Intercompany Connections
To use AccountsIQ Intercompany auto-posting and reconciliation features, you must create intercompany connections for each pair of intercompany trading entities in the group.
Intercompany connections are set up in the source entity and a separate connection must be created for each entity that is invoiced.
Step One: Generating an entity key
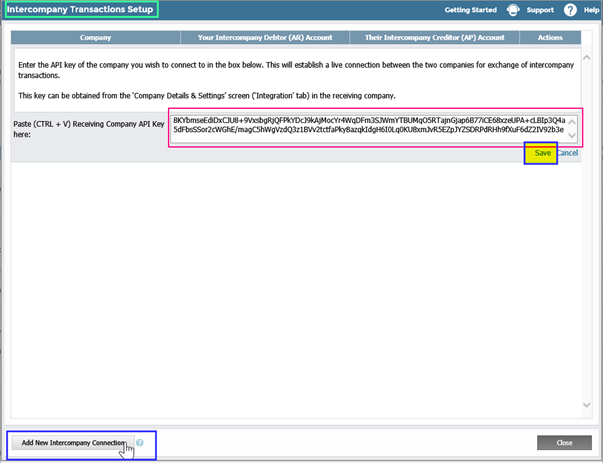
An entity key must be generated (and recorded for later use) for each destination entity, that is the one you want to create an intercompany connection with.
- Log into the destination entity.
- Go to Setup > Company Setup > Company Details & Settings > Integration.
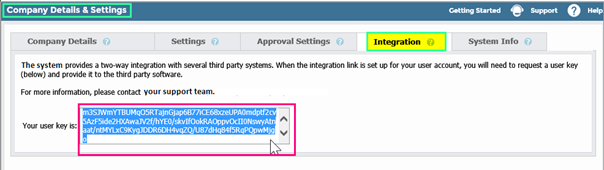
- Enter the password and click Request User Key.
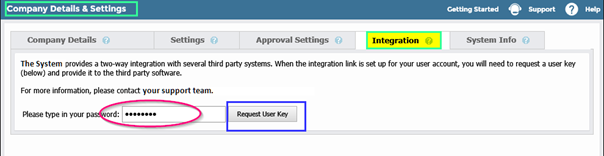
- Highlight the user key and click (CTRL+C) to copy. Ensure you copy all the text. Save it somewhere accessible for later use.
Step Two: Creating an Intercompany Connection
Intercompany Connections are created in the source entity, that is the entity that Intercompany invoices are issued from.
Your profile must have the permission 'Intercompany Transactions Setup' to perform this task.
- Log into the source entity.
-
Go to Setup > Intercompany Transactions Setup. Only users with an admin role will be able to see this link. If Intercompany Transactions Setup is not available on your menu, contact your System Administrator or your Support Team to set it up.
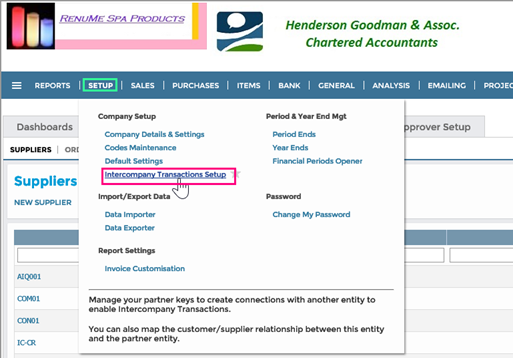
Click Add New Intercompany Connection.
-
Copy the entity key (as generated in step 1) for the receiving company that you require to create a connection with. Click Save.
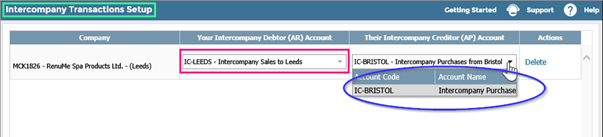
In the Your Intercompany Debtor (AR) Account field, select the Intercompany Customer Account created in the source entity for the destination entity.
In the Their Intercompany Creditor (AR) field, select the Intercompany Supplier Account created in the destination entity for the source entity.
Click Save.

Recording Intercompany Transactions
All existing transaction types which can be recorded to customer and supplier accounts, can also be recorded to intercompany customer and intercompany supplier accounts.
This section focuses on how to auto-record intercompany transactions in the destination entity when initiating the transaction in the source entity. To use this functionality:
- You must have completed the Intercompany Transaction Setup process as outlined above.
- Your profile must have the permissions 'Purchase Invoicing - Intercompany Transactions' and 'Sales Invoicing – Batch Invoices'.
Create an Intercompany Sales Batch Invoice
This follows the same process as a standard Sales Batch Invoicing.
- Log into the source entity from which you want to raise an intercompany invoice.
- Go to Sales > Batch Invoices > New Batch Invoice.
- Select the Intercompany Customer account for the entity you require to invoice. A notification should appear advising that an intercompany transaction will be created. If this does not appear, check that your intercompany setup was carried out correctly.
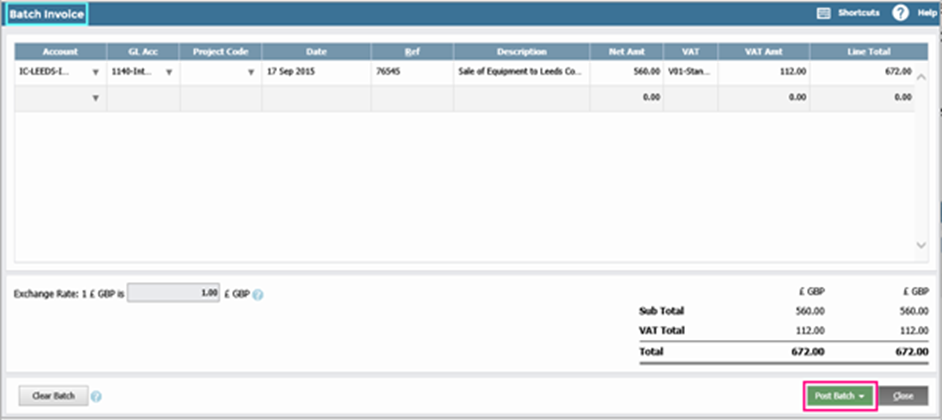
- Enter the invoice details, changing the defaults if necessary. You can complete multiple lines to create multiple invoices to different intercompany accounts, or you can create one invoice with multiple lines to a single intercompany account.
- Click Post Batch. A message will appear, stating that Intercompany Transaction has been posted successfully. A sales invoice is now created and posted in the source entity along with an equivalent auto-created Purchase Invoice in the destination entity.
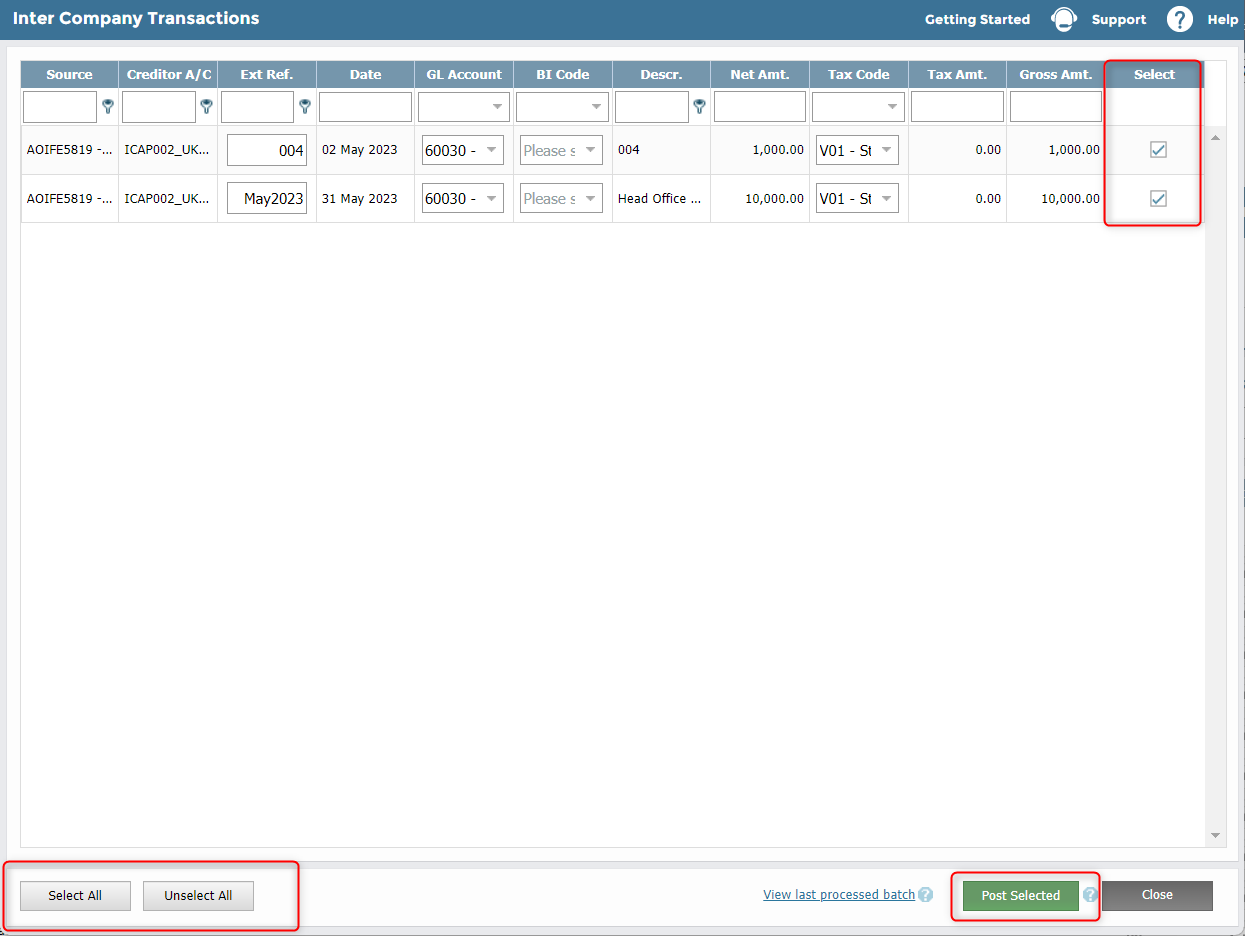
Receive the Auto-created Intercompany Purchase Invoice
- Log into the destination entity the intercompany invoice was issued for.
-
To view the intercompany purchase invoice details charges, click the globe icon. The Intercompany Transactions window will open.

- The Intercompany Transactions window shows all Unposted intercompany charges. Before accepting and posting these charges, you can override the default GL Account, BI Code, or Tax Code.
- Select only the charges you wish to post currently. Leave all other charges unselected for later posting. Alternatively, click Select All.
- Click Post Selected. Once a charge is processed, it will be cleared from the grid. The processed charge will now appear in two places: the Batch Invoices grid, and the Intercompany Supplier Account.
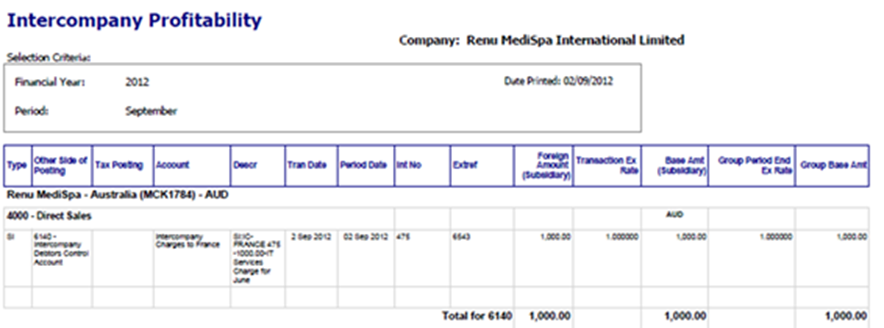
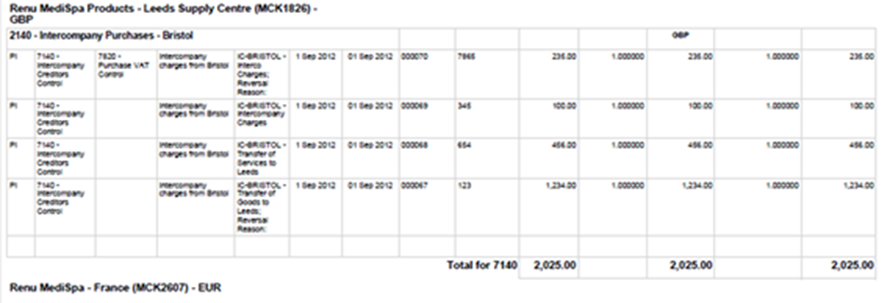
Producing an Intercompany Profitability Report
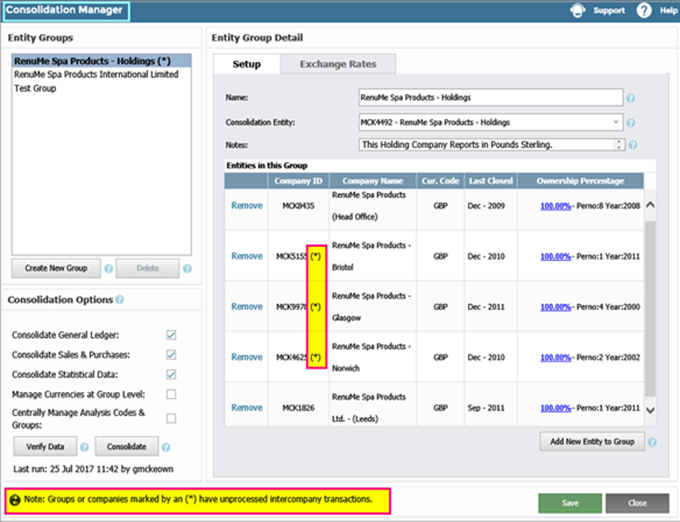
Step One: Eliminate Intercompany Transactions at Consolidation level
Method One: Consolidation
When companies have accepted all Intercompany Transactions, it is advisable to run a Group Company Consolidation to eliminate Intercompany Transactions at group level. This cancelling effect happens because Intercompany Control Accounts are linked to the same GL Category and GL Subcategory within the Consolidation Entity. However, note that intercompany transactions remain in the Subsidiary Companies for reporting purposes.
Method Two: Journal Posting
Alternatively, post a journal in the consolidating entity at year-end.
- Log into the Consolidation Entity.
- Go to General > GL Journal Manager > Create New Journal > GL Journal.
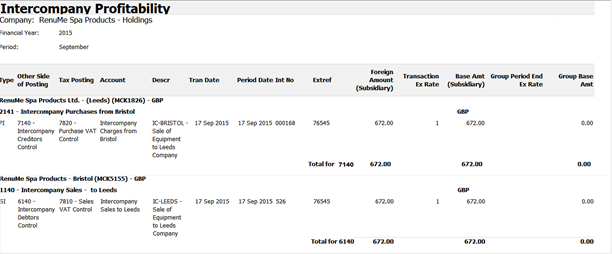
Step Two: Run Intercompany Reports
- Log into the Consolidation Entity.
- Go to Reports > Report Manager > Consolidation Reports.
- Select one of the following:
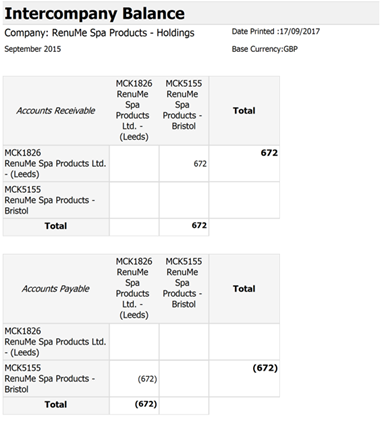
- Consolidated Balance Sheet – Split By Subsidiary: This displays the elimination of intercompany balances.
- Intercompany Profitability: This details the intercompany charges in each subsidiary during the selected period.
- You can export the report to Excel to determine any profit elements.
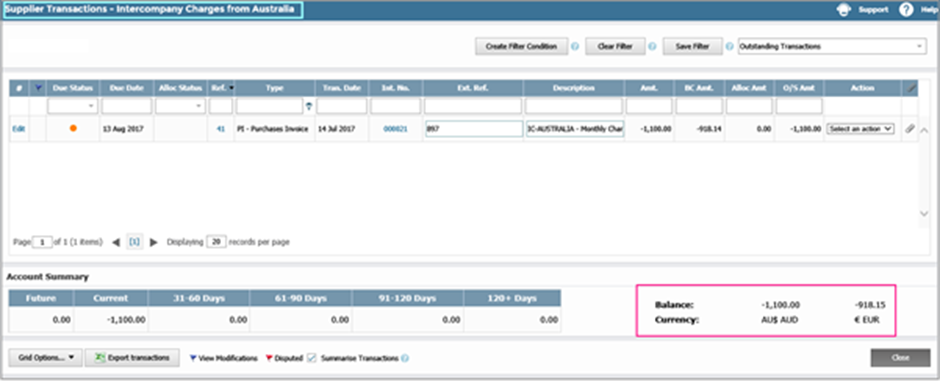
Intercompany Transactions using multiple currencies
In this example, two subsidiaries with different base currencies, want to create an Intercompany Transaction:
- RenuMe Spa Australia in AUS$
- RenuMe Spa France in €

Their accounts are as follows:
- Intercompany Supplier (Vendor) Account (Australia)
- Intercompany Debtor Control Account (Australia)
- Intercompany Customer Account (France)
- Intercompany Creditor Control Account (France)
The same instructions relating to single currencies apply except for the following:
- Unlike single currency groups, multiple currency groups must have separate Creditor Accounts for different currencies. The currency of the Creditor Account (France) must match that of the Debtor Account, AUD$.
- The currency used to set up the creditor and debtor accounts will determine which entity will bear the cost of foreign currency fluctuations.