Introduction
Once you have set up your company, you are ready to set company details and settings. It is important to review defaults that impact transactions before using the system as amending them later could lead to disruption.
Add background information including contact information, uploading your company logo, and setting your financial year. You can also generate a unique encryption key here to allow direct integration with a third-party system (e.g. your e-commerce website). Contact support to find out more about our Web services integration API.
Go to Setup > Company Details & Settings to open a Company Master Record.

See:
 Company details and settings (2.1) - AIQ Academy
 Default Settings (2.4) - AIQ Academy


Company Details

The Company Details tab contains the details to be used on printed items, such as Invoices and Statements. Record the standard name, address, and contact information for your new company here.
-
Locale Name: The locale determines how the system menus are presented and how other functions such as tax operate. Select a locale relevant to the jurisdiction in which the company will operate.
- Base Currency: Ensure that you select the correct base currency. The base currency cannot be changed by a user once the new company is created. If you selected the incorrect base currency and the new company has been created, contact your local support team and they will be able to help.
- Company Registration No: This will appear on relevant documentation printed from the system (e.g. invoices).
- Industry Classification: Select an Industry that best matches the company's business. This optional field is used for classification purposes.
- EDI Identifier: This is added to an EDI file generated by the system to help identify the company when submitting files through an EDI gateway.
- VAT Registration Number: The VAT number will be printed in the footer of all outgoing documents (Sales Orders, Sales Invoices, Purchase Orders and Customer Statements). The VAT registration number must be correctly populated before connecting to HMRC for MTD.
- Company (Entity) Group: If the company is part of a group reporting structure you can associate the company with the particular group here.
- Company Logo: If you have not done so, next to Upload Logo File, click Browse and select the logo you want to appear on documents. The file can be in jpeg, png, gif, or bmp format (size 300 x 84 px).
Complete or amend any other fields and click Save.
DeleteSettings

- Edition: This is the Edition that was chosen at Company creation stage. Your System provider will have explained the various Editions, their functionality, and pricing. Contact support@accountsiq.com if to need to change editions.
- Price Precision: This refers to the number of decimal points you want to appear on Sales Item Invoices, Purchase Item Invoices, and Purchase Orders.
- Customer Numbering, Supplier Numbering: You can select whether you want system-generated numbering or to start at a designated number. The later can be useful if you are moving from an old system. To do this, untick the auto-numbering option, and enter the relevant number.
- Show Credits as positive on Supplier Account Screen: You can set the credits as positive if that is the way you are used to working.
- Highlight Overdue Purchase Orders: Set this option to have colour coding on the purchase order listing to highlight the overdue purchases orders.
- Prevent from selling items with no stock on hand: This is an important setting to understand if your company tracks and values stock in its accounts. Please ensure you read Managing below on hand quantity before changing this setting as it has implications for how the system values your stock and your Profit and Loss and Balance Sheet
Review and amend all the other fields, as necessary and click Save.
DeleteApproval Settings
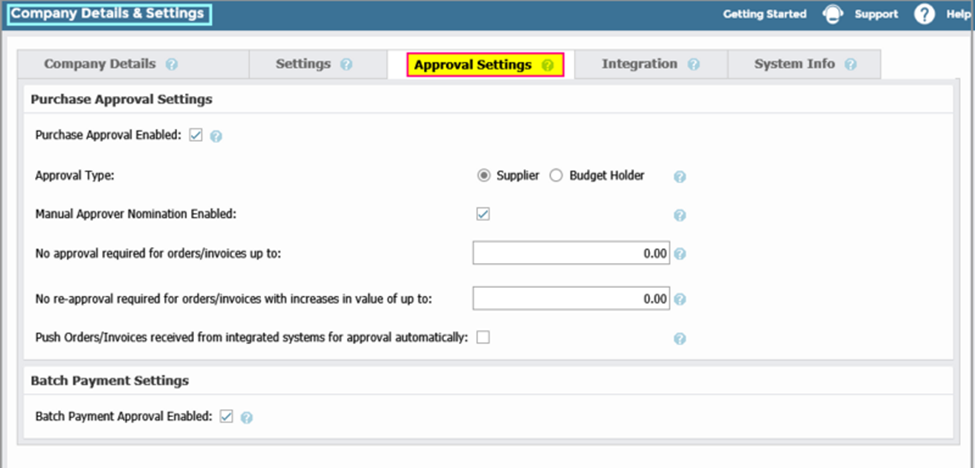
Approval is not mandatory and can be set at any time. Both purchases and payment approval will become available in the the system when you set them here:
- Purchases Approval enables additional system functions that allow you to set up approvers, set their spending limits, and determine where requests should be routed if their limits are exceeded.
- Supplier Batch Payments Approval workflow enables users to prepare a payment run, send it for approval to a person with the relevant authority. The approver then can approve (or adjust the payment run) and then proceed to process the payments.
Complete the following as needed:
- Purchase Approval Enabled: Check to turn on Purchase Approval Workflow within your company. This will enable the routing of Purchase Order and Purchase Invoice Requests to designated people within your organisation with the authority to approve expenditure.
-
Approval Type:
- Supplier Based: Requests go to approvers based on the supplier associated with the purchase order or invoice. Approvers can be associated with a given supplier and can have spending limits set for a given order/invoice. Once these limits are exceeded you can designate the person who the approval request should be routed to by the approval engine in the system.
- Budget Holder Based: This involves approval being tied to the available budget on a budget area/BI Code/project etc. Approvers must then be linked to areas of the business (i.e. BI Codes) for the approval of orders and invoices. Budgets are imported and maintained at BI Code level in the system. The BI Code on an order/invoice will then determine who the approver should be based on their set approval limits.
-
Manual Approval Enabled: This is enabled for Admin users only. It determines whether manual approver nomination is available for Purchase Orders/Invoices.
- If not turned on, the workflow will select the approver as normal. This may be appropriate if allowing certain purchases to by-pass normal approvers would introduce control weaknesses.
- If turned on, when saving Purchase Order and Invoices, you can nominate an approver other than the system default. Manual approval can still control spending can as only approvers with the relevant approval limit can be nominated. If you want all approvers available for selection, they need to be set up with no approval limits. Here are some cases where you may opt for manual approval:
If an approver associated with a particular supplier or budget is absent and unable to process approval requests.
If the order/invoice needs to be approved by a person other than the approver linked to the particular supplier.
No approval for orders/invoices up to: You can exclude orders and invoices entering the approval workflow if their value is below a designated value maintained here. This is useful if you wish low value purchases to be automatically approved and not generate approval requests.
- Push Orders/Invoices received from integrated systems for approval automatically: If your order or invoice originated from an integrated third-party system (e.g. Invoice Scanning solution), you can use this to stop them being automatically forwarded to workflow approval. This means you can review their assigned GL Account and BI Codes before sending them for approval.
- Batch Payment Approval Enabled: Check to turn on the approval of Supplier/Vendor Batch Payment runs. This lets you prepare and then submit these runs to the relevant batch payment approver . Note that the approver must have system access to log in and approve the run before it can be processed.
Click Save when complete.
See:
 Using Purchase Approval for Budget Holders
Using Purchase Approval for Non-Budget Holders
Integration
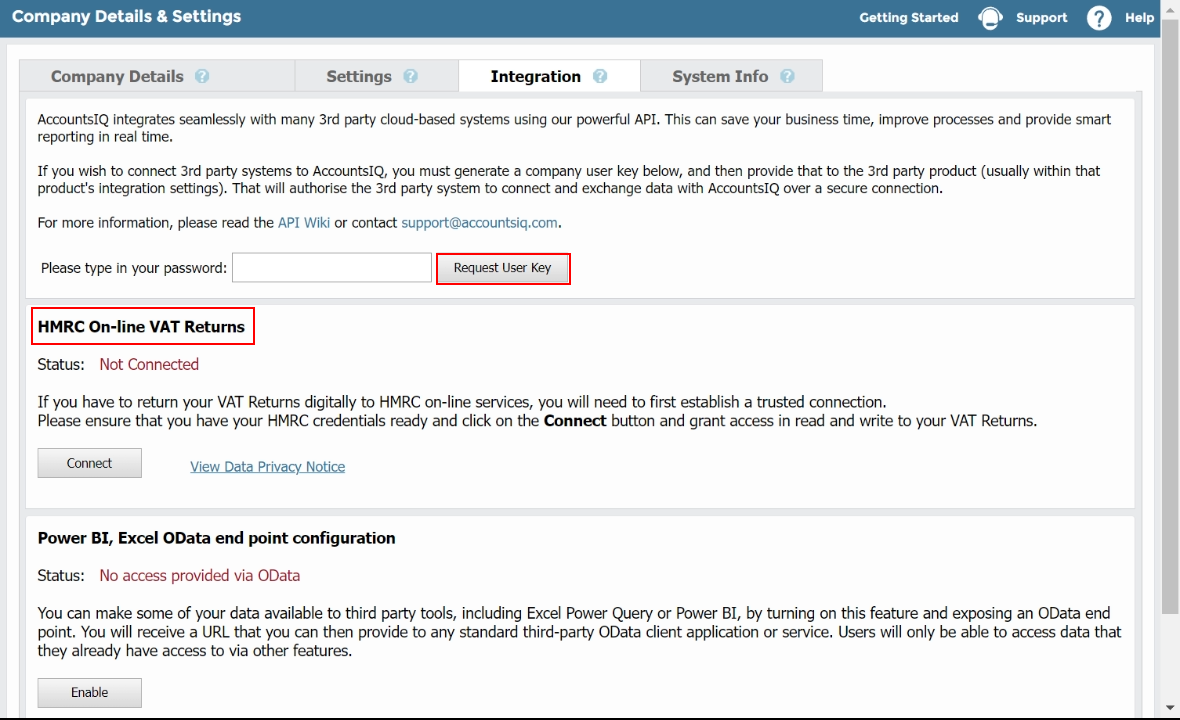
- Integration: You can integrate AIQ with third-party systems. Your system provider will provide you with the relevant information, including an Integration User ID. To integrate you also need a valid User Key, available in this tab. This is also used in Intercompany Transactions.
- MTD: UK-based clients with the appropriate HMRC credentials can also report VAT returns within the relevant timeframe.
- Power BI, Excel OData end point configuration: Enable or disable connection to extended reporting capabilities.
See:
 Creating an Integrations Application and Inviting a Developer to the Developer Portal
 Using the Developer Portal and New API Endpoint
 Submitting Entity VAT Returns via MTD
 Setting up MTD for Group VAT Returns
 Submitting Entity VAT Returns via MTD