
Introduction
You can record Sundry Receipts from your company’s Bank Accounts. These are one-off expenses rather than being for a Supplier (Vendor). Examples include salary, payroll, or tax liabilities.
Receipts will be debited to the selected Bank Account and credited to a selected General Ledger Account.
See:
 Bank Receipts and Payments (6A.3) - AIQ Academy
 Bank Credit and Debit Journals
Accessing Sundry Bank Receipts
You can access Sundry Bank Receipts in three ways:
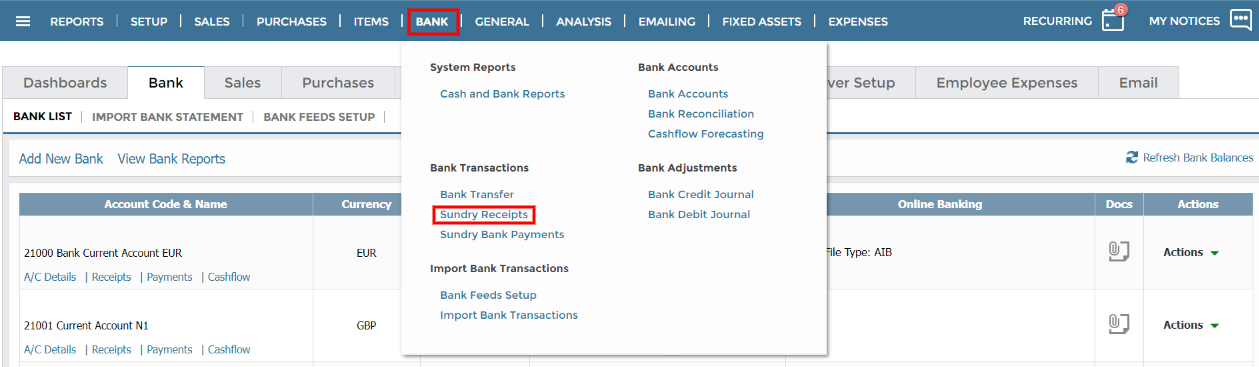
Option 1: Blue Banner
From the top-level menu Bank, select Sundry Bank Receipts.
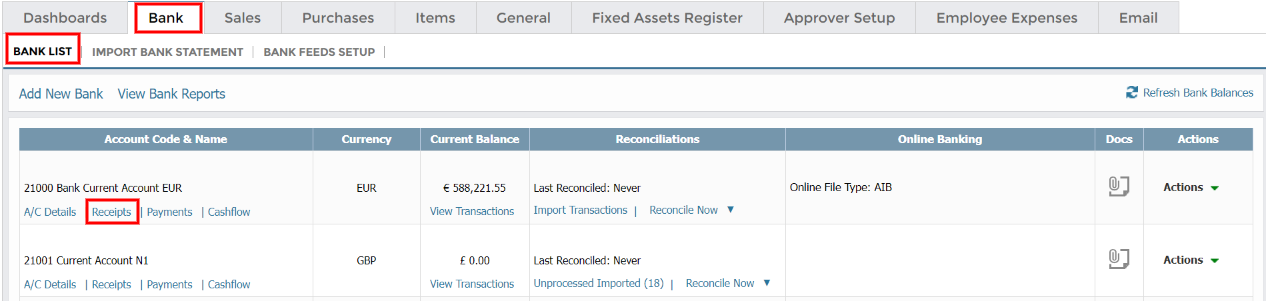
Option 2: Bank List grid
Go to Bank > Bank List. Find your account in the grid. Under Account Code & Name, click Receipts.
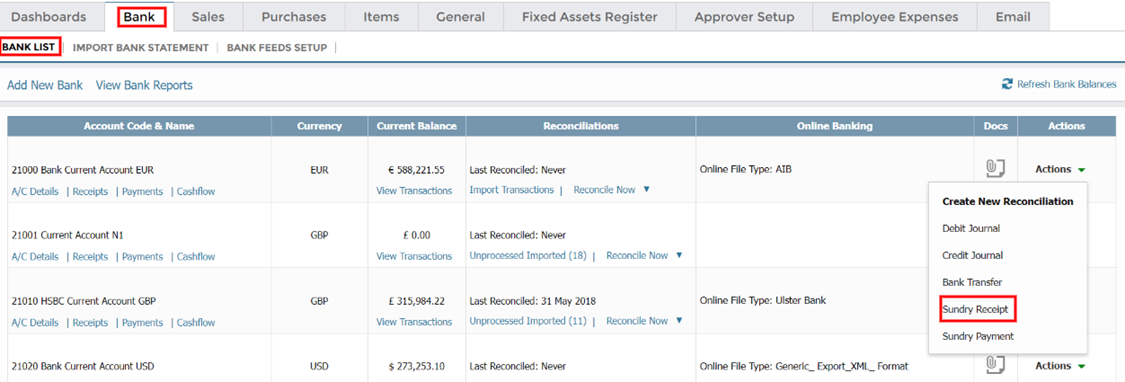
Option 3: Bank List Actions
Go to Bank > Bank List. Find your account in the grid. Under Actions, select Sundry Receipts.
Creating a Sundry Bank Receipt
Navigating the screen
You can record as many lines in a batch as needed. If you close the screen with data entered, it will be saved, and appear the next time you enter the screen.
The account lookup field automatically drops down when the cursor enters the field. You can start typing the account code and the system will look up the matching account(s) as you type.
To allow for quick data entry you can use keyboard shortcuts to navigate the data grid:
- TAB: Advances to the next cell in the grid
- TAB + SHIFT: Goes back to the previous cell in the grid
- ENTER: Advances to the next cell in the grid
- F6: Use to make a copy of the current line and insert a new line with the same details. This is a useful function if you are creating payment records with similar details, such as recording several Receipts to the same General Ledger account but with different cheque references.
- F8: Use to delete the current line. If this does not work, try F8 + FN.
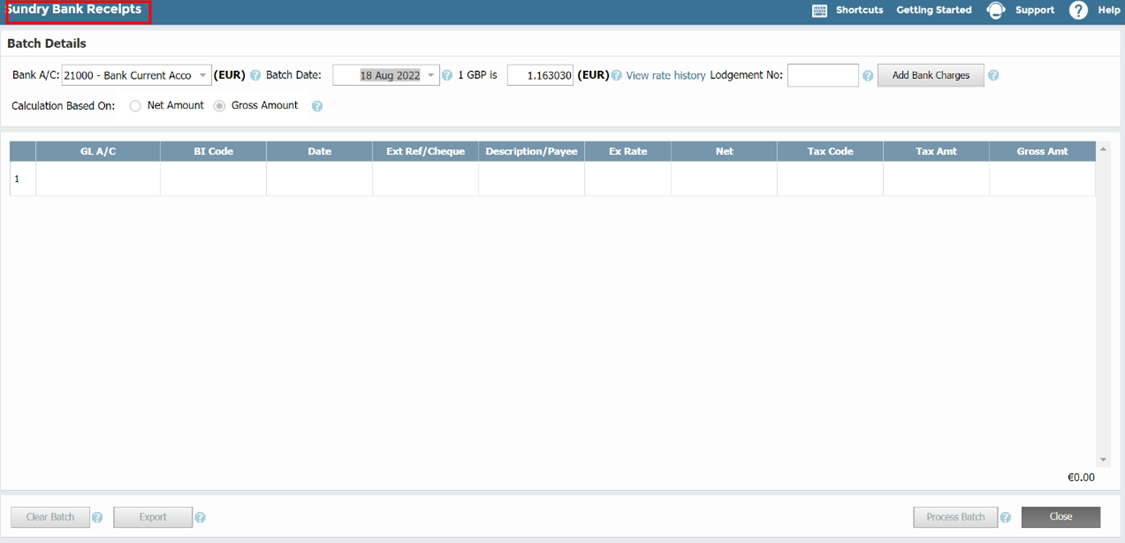
Batch Details
Note the following fields under Batch Details:
- Bank A/C: Select the Bank Account you want to make Receipts to from the dropdown list. This list shows the Bank's related General Ledger Account Code, the Bank Name, and its currency code. The currency code of the bank appears in brackets beside the selected account.
- Batch Date: This is the default date assigned to each new line in the batch. It saves you from recording the date each time you complete a line. You can override this at any point before processing a batch.
- Lodgement Reference: This field is only available if you are entering receipts. You can use it to group Receipts by lodgement reference meaning the reference will appear as one line on your Bank Reconciliation for all related receipts.
- Add Bank Charges: Click to open a Credit Bank Journal screen to record any Bank Charges associated with this Batch of Receipts.
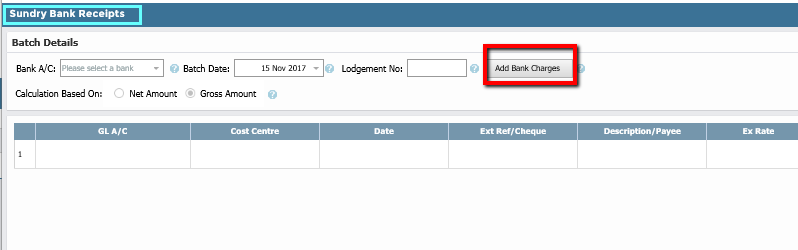
- Calculation Based On: Specify the reference field you want to use for calculating the net, tax, and gross values. For example, if you select ‘Gross Amount’ and when processing a bank receipt enter the gross amount and then a tax rate, then the net amount will be calculated by referencing the gross amount and the rate. In this case, the net amount field will be locked from editing.
Similarly, if you manually change the tax amount value, the gross amount will remain static and the net amount will change based on the tax amount change. As you will be entering the gross amount in most cases for bank receipts, the calculation reference defaults 'Gross Amount' on these screens.
If you need to enter the net amount for a bank receipt or payment, simply change the reference field option and the net amount field will serve as the reference value when calculating the tax and gross amounts. You can change this option as you enter each line depending on which whether you are entering a gross or net tax amount. The calculation behaviour will change accordingly.
Line Details
- G/L A/C: Enter or select the General Ledger code which should be credited from the dropdown list.
- BI Code: If you are using BI Codes, you can record a BI Code reference against each receipt line. The transaction created will then have the department reference assigned to it and it will appear on related reports.
- Date: The transaction date on each line defaults to the batch date selected at the top of the screen. However, you can change it to any valid date. If you enter a date that is greater than the current General Ledger period, then the system will warn you that you are posting to a future period.
- Ext Ref/Cheque: This is the reference that will appear on your bank statement for reconciliation purposes, so it is important that it is meaningful. For receipts, it is likely to be the cheque reference or any other Receipt identifier.
- Description/Payee: Enter a description of the receipt for informational and tracking purposes. It will also appear on the Bank Reconciliation. This could be a more detailed reference or an identifying description. For example, if you are recording receipts, you could enter a description of the person/company from whom you are receiving the cash and the month/year of receipt, such as "IT Equipment – Tommy Butler – 07/17".
- Ex Rate: If you have selected a foreign currency bank, the exchange rate column will appear in the grid. This defaults from the currency rates table, but you can change this to the current exchange rate if required.
- Net: This is the net amount of the Receipt before any tax (if applicable). The system will calculate this if you enter the Gross Amount.
- Tax Code: If tax is applicable to this transaction, you can enter or select the relevant code here. If no tax applies, such as in the case of expenses, leave it blank. If you subsequently change the Net Amount, the system will then use this new Tax Rate to calculate the new Tax Amount.
- Tax Amt: Enter the tax amount applicable to the transaction. This is equal to (net x tax rate). Because there may be odd tax amounts associated with some direct Receipts, you can change this amount by entering an alternative amount. The system then calculates a new Tax Rate based on the input amount.
- Gross Amt: This is the sum of the Net Amount and the Tax Amount. If Tax is applicable, you can get the system to calculate the Net Amount, based on the applicable Tax Rate, by entering/changing the value displayed.
- Totals: The Gross total of all Receipts in the batch appears both at the top of the tab and the bottom of the grid.
- Clear Batch: Click to clear the grid and delete all lines. Use this option if you wish to cancel an existing batch and start again.
- Print Batch: Click to print the contents of the grid.
Completing and Processing the Batch Receipts
- Once you have finished entering lines, click Process. This creates the associated bank Receipt transactions (BP).
- After creating the batch, a link appears at the bottom of the page where you can view the newly created records. Clicking this link will open the Transactions Browser with the associated transactions shown. When you have returned to the bank listing window you will notice that the bank balance has been reduced by the total value of the Receipts recorded (if they are not future dated).