Introduction
The Data Importer lets you populate predefined Excel templates and import them into AccountsIQ. The Import Templates are available in Office 97-2003 and Office 2007 formats.
The Data Importer can import:
- Static information such as Chart of Accounts, VAT (Tax) Codes, and BI Codes.
- Existing Supplier (Vendor) or Customer records for company setup, including codes, names, addresses, contacts, and bank details.
- Transactional information such as invoices or payroll journals.
With the Transactions Importer, you can import the following:
- Purchase transactions
- Sales transactions
Guidelines for successful importing
Use separate templates for each company
You must download the Import Templates from each company individually. It is not recommended to import data using a template from a different company as this company may have a different setup. Before attempting to import data, set the correct currencies, financial year, and client locale during the creation routine or in the main system.
Use newly downloaded templates each time
Use a newly downloaded template each time as it will contain any changes made in the system, for example, updates to the General Ledger codes, Supplier defaults, or Customer information. Make sure you download the Import Templates from the correct database.
Use the correct template format
The template is available to download in file format. Any Excel version after 2007 is compatible. Excel for Mac is not compatible with the Transaction Importer and will not generate the data file.
Use a test Entity
Always import in a test entity first to check that the transaction types are correct.
See:
 GL Journal Importing from Excel


 Customer Data Importer
  Supplier Data Importer

 Trial Balance and Banks Importer
 Opening Financial Position Importer
 Chart of Accounts Data Importer
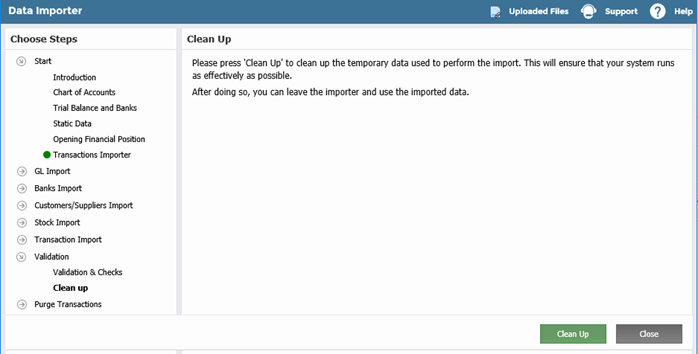
Clean Up
Clean-up should only be completed when a data import is complete and the files are no longer required.
If you are satisfied with your import and would like to clear any previously uploaded template before a new import:
- Go to Data Importer > Validation > Clean Up.
- Click Clean Up.
Prepare the Template
When completing a worksheet, always read the instructions provided in each worksheet.
- Go to Setup > Data Importer > Start >Transactions Importer.
- Click the link to download the Transactions Template File and save the file as a Microsoft Excel Macro-enabled file (.xlsm format).
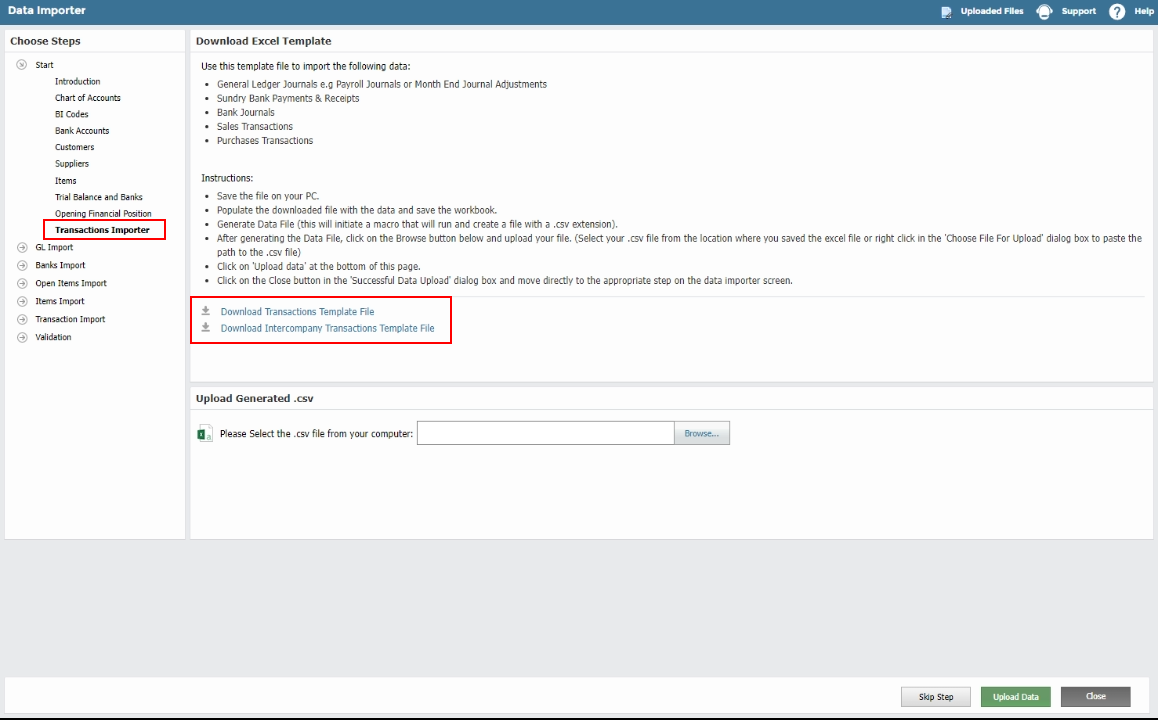
- If Macros are not enabled, click Enable Content and Enable Editing.


- Fill in the required fields, following the Guidelines for Data Entry, below. See the sections relating to each of the worksheets:
- Purchases Transactions
- Sales Transactions
- Save the file.
Guidelines for Data Entry
Follow these guidelines before you import the data. The data must be prepared appropriately before attempting to import.
General:
- The import tool cannot accept data prepared from any other workbook format. It must be downloaded from the Setup > Data Importer.
- Complete each field according to the requirements provided in the worksheet.
- Complete each field according to the requirements provided. For help filling in the template, click on the + in the top left-hand corner of the template to show the guidance for each column.
- Select data from each dropdown list, for example, General Ledger codes.
- Do not change column headings or worksheet names.
- Do not add or delete any columns in the existing worksheets.
- Populate the templates from the first row (row 5) and do not leave any blank rows.
- Do not leave blanks in the Code columns.
- Check for blanks in the mandatory fields.
- Do not change or delete tab names.
- Do not add extra tabs.
Entering transactions:
- If you create PI/PN in Purchase Transactions and SI/SN in Sales Transactions tabs, this will respectively create Purchase Batch Invoice/Debit Notes and Sales Batch Invoice/Credit notes (not Item invoices).
- When importing invoices/Credit notes for Customers/Suppliers in a foreign currency, make sure you have a correct difference between the Total amount and Base Currency Amount. The template will not apply an exchange rate to the imported value.
- We suggest importing in smaller chunks (approx. 1000 lines) as they will be easier for you to check once imported. This will lessen the risks of the data importer timing out and partially importing transactions.
- The Maximum number of lines in one invoice is 100 lines however we don’t advise going over 20-30 lines as above 30 lines, the invoice PDF may get distorted.
Using Codes:
- Only use Bank GL codes in the GL code (Column F) if you are raising a PP Purchase Payment or an SR Sales Receipt.
- Make sure to use correct GL Codes to avoid incorrect transaction types being applied and incorrect postings.
- Check that the customer and supplier codes exist in the system and are spelt correctly.
Formatting non-numerical data:
- Do not use special characters (e.g., apostrophes, ampersands, accents, etc.).
- Save non-numerical data according to the requirements example, for example, save dates using the date format.
- Ensure that dates are valid.
Formatting numerical data:
- Use the ‘Paste Values’ option when pasting data into the template. This will eliminate any formulas used to calculate those values.
- Numerical data must correlate with the type of transaction.
- Values must be two decimals. Round the values to two decimals before pasting them into the template (use the =ROUND () Excel formula).
- Ensure that there are no totals added to the bottom of any worksheet.
- Ensure that the financial information is accurate.
Entering Data not found in a dropdown
If you see a triangle in the top-left corner of any cell containing a dropdown list, it means what you have typed in or copied in doesn’t exist from the list of choices:
To override the dropdown cells:
- When you have a cell with a dropdown, the template will not allow you to type in it, but you can copy the code only from another spreadsheet and “paste as value” in the template (for example, V01, GEN, or GL codes).
Purchases Transactions Template
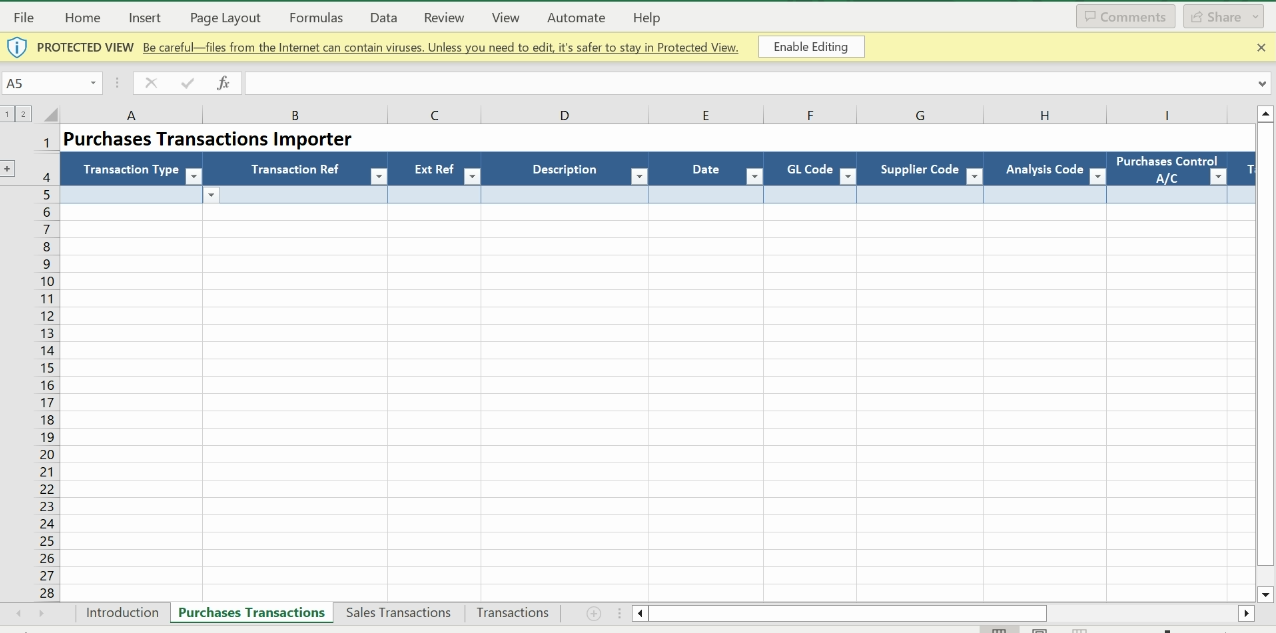
Complete the following:
-
Transaction Type (Mandatory): Nominate the transaction type from the dropdown (see additional notes on each below):
- PI Purchase Invoice
PN Purchase Debit Note
PP Purchase Payment
- PC Purchase Credit Journal
- PD Purchase Debit Journal
-
Transaction Ref (Mandatory): This must be numerical.
- For PI and PN, it tells the system to group into one invoice but does not appear in AIQ. It can be 1, 2, and so on. You can re-use the same Transaction Ref in the next template as it will not have any effect on the auto-incremented number generated by the system.
- For PP, PC, and PD, the Transaction Ref will be recognized in the entity as Int. No.
- Ext Ref (Mandatory): This is the invoice number. It allows you to identify the invoice in the Purchase Ledger.
- Description (Mandatory): Add a description Line.
- Date (Mandatory): Populate with the transaction date. Dates should be in the European format dd/mm/yyyy. If the dates are in US format (mm/dd/yyyy), the checkbox option: "Interpret the dates in the uploaded CSV file as US Date Format" will be available before import.
- GL Code (Mandatory): Enter the General Ledger account code. This must have the same Control Account as the Supplier.
- Supplier Code (Mandatory): Enter the Supplier (Vendor) code that relates to the transaction.
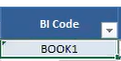
- Analysis Code: Select from the list of available BI codes for each line where applicable.
- Purchase Control A/C (Mandatory): Nominate the control account from the dropdown. This control account needs to be the same default control account nominated for the Supplier (Vendor).
- Tax Code: Nominate the Tax code from the dropdown.
- Tax GL account: Nominate the Purchase Tax (VAT) account from the dropdown.
- Net Value: This is the Amount without tax. If a foreign supplier, this must be in the currency of the supplier.
- Tax Value: This is the Tax amount. If a foreign supplier, this must be in the currency of the supplier.
- Total (Mandatory): This is the Total amount of the invoice with Tax. If a foreign supplier, this must be in the currency of the supplier.
- Base Currency Value (Mandatory): This is the amount in Entity’s Base currency.
Purchases Transaction Types Reference
Reference Types
There are three types of References in the system:
- Ref: This is the Audit Trail Reference and auto increments from 1 on all transaction types.
- Int. No: These have a different auto-incremented number depending on which type of transactions (SI, SN, BP, BC). For the SI Sales Invoice and SN Sales Credit Note, it is the invoice number.
- Ext. Ref: This is a free text alphanumerical Reference given by the user. For the PI and PN, it is the invoice number.
Purchase Invoice (PI)

If you want to create one invoice with three different lines, you need the same:
- Transaction type
- Transaction ref
- Ext ref
- Date and supplier code
Enter the Net, Tax, Total, and Base Currency values as positive values.
This will show as one Batch Invoice with three lines under Purchases > Batch Invoice.
Transaction Ref is not taken into account as Int No is auto-numbered by the system. AIQ system will create an auto-numbered Int No starting from 000001, 000002 incrementing only for Purchase Invoices.

Purchase Debit Notes (PN)

Enter the Net, Tax, Total, and Base Currency values as negative values.
View the transaction in Purchases > Batch Invoice.
Transaction Ref is not taken into account as Int No is auto-numbered by the system. The system will create an auto-numbered Int No starting from 000001, 000002 incrementing only for Purchase Debit Notes.
Remember to allocate the PN to the PI via the Purchases > Payments & Allocation screen if necessary.

Purchases Payments (PP)

- Leave the following columns blank: Tax code, Tax GL Code, Net Value, and Tax Value.
- Enter the Total Value in the supplier currency with negative values.
- Enter Base Currency value with negative values.
- Enter a bank GL code in the GL code (Column F).
- The system will use the Transaction Ref as Int No.
View the double entry in General > Transaction Browser.
Remember to allocate the PP to the PI via the Purchases > Payments & Allocation screen.

Foreign Currency Transactions
- You can only import payments for suppliers in the same currency as the currency of the bank. If your supplier is EUR, you can only import PP in a EUR bank account.
- If the supplier’s currency is different from the bank’s currency, either request Transaction data importing training or use the Bank payment import. Once your bank statement is imported, you can go to the Payments & Allocation screen to create PPs to match to PIs.
Purchases Credit Journal (PC)
Transaction importer>Purchase Transactions tab:

- The system will use the Transaction Ref as Int No.
- Leave the following columns blank: Tax code, Tax GL Code, Net Value, and Tax Value.
- Enter Total and Base Currency values as positive values.
View the double entry from General > Transaction Browser:

Purchases Debit Journal (PD)

- Leave the following columns blank: Tax code, Tax GL Code, Net Value, and Tax Value.
- Enter Total and Base Currency values as negative values.
- The system will use the Transaction Ref as Int No.
View the double entry from General > Transaction Browser:

Sales Transactions Template
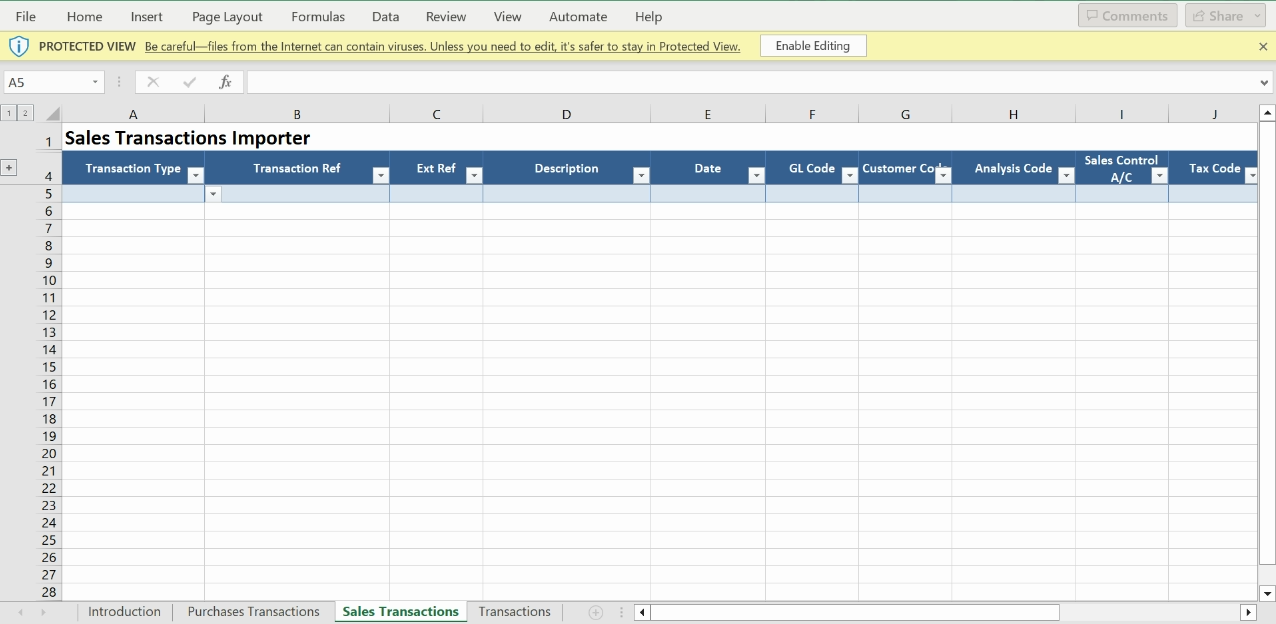
Complete the following:
-
Transaction Type (Mandatory): Nominate the transaction type (see additional notes on each below) from the dropdown:
- SI Sales Invoice
- SR Sales Receipt
- SN Sales Credit Note
- SC Sales Credit Journal
- SD Sales Debit Journal
-
Transaction Ref (Mandatory): This Ref must be numerical.
- For SI and SN, this tells the system to group the transactions into one invoice but will not appear in AIQ. It can be 1, 2, and so on. You can reuse the same Transaction Ref in the next template.
- For SR, SC, and SD, the Transaction Ref will be recognized in the entity as Int. No.
- Ext Ref (Mandatory): This is a secondary Ref provided by the user. It allows you to identify the invoice in the Sales Ledger. Note that this is NOT the Invoice no, the Invoice No is the Int No and is auto-allocated. More details are below.
- Description (Mandatory): Add a Description Line.
- Date (Mandatory): Populate with the transaction date. Dates should be in the European format dd/mm/yyyy. If the dates are in US format (mm/dd/yyyy), the checkbox option: "Interpret the dates in the uploaded CSV file as US Date Format" will be available before import.
- GL Code (Mandatory): Enter the General Ledger account. This must have the same Control Account as the Customer.
- Customer Code (Mandatory): Enter the Customer code that relates to the transaction.
- BI Code: Select from the list of available BI codes for each line if applicable.
- Sales Control A/C (Mandatory): Nominate the control account from the dropdown. This control account needs to be the same default control account nominated for the Customer.
- Tax Code: Nominate the Tax code from the dropdown.
- Tax GL account: Nominate the Sales Tax (VAT) account from the dropdown.
- Net Value: This is the amount without tax. For foreign customers, this must be in the currency of the customer.
- Tax Value: This is the tax amount. For foreign customers, this must be in the currency of the customer.
- Total (Mandatory): This is the total amount of the invoice with Tax. If the Customer is in foreign currency, then populate with the foreign currency value.
- Base Currency Value (Mandatory): This is the amount in Entity’s Base currency.
Sales Transaction Types Reference
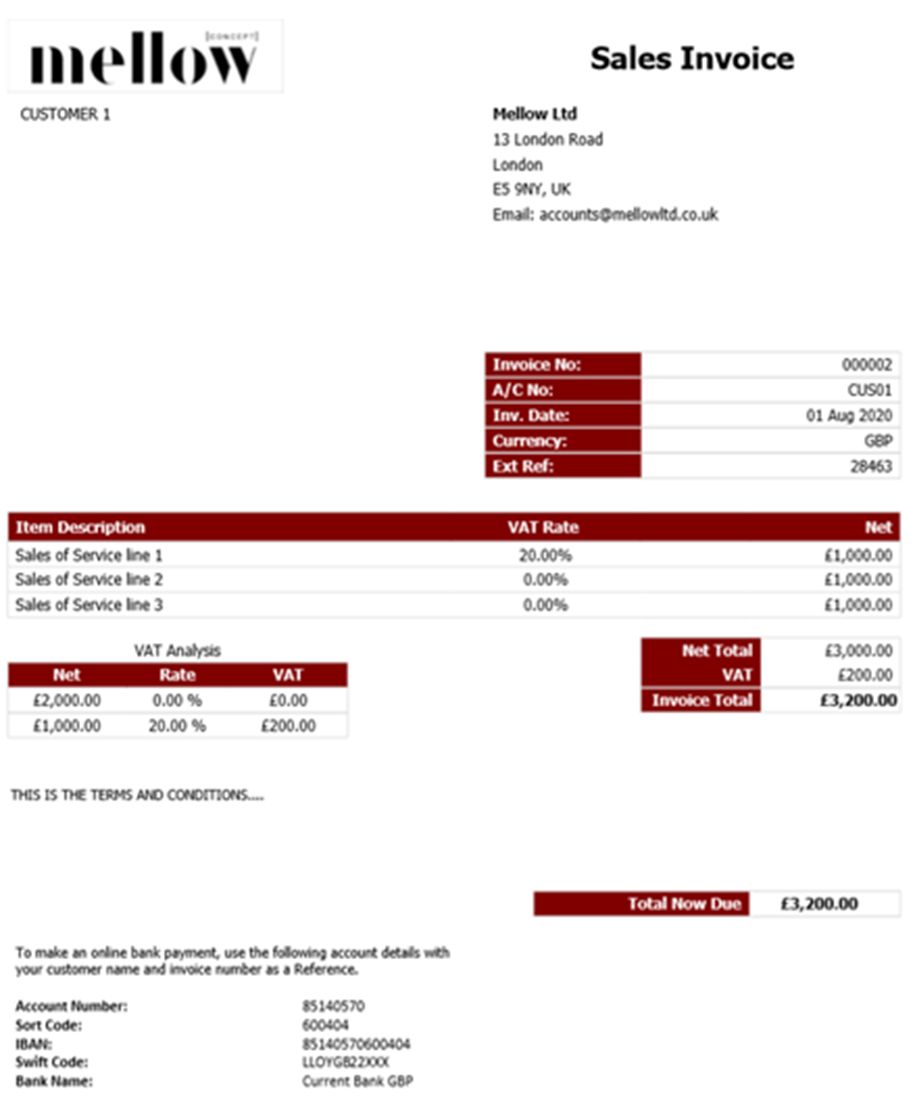
Sales Invoice (SI)

If you want to create one sales invoice with several lines, you need the same:
- Transaction type
- Transaction ref
- Ext ref
- Date
- Customer code
Enter the Net, Tax, Total, and Base Currency values as positive values.
This will show as one Batch Invoice with three lines under Sales > Batch Invoice.

PDF printout of the invoice:
Intercompany
If you are using an Intercompany Customer, it will send the corresponding Intercompany Purchase Invoice for acceptance to the linked receiving entity. At arrival, the PI Ext Ref will be validated as it needs to be unique in that database.
Auto-Numbering
AIQ will create an auto-numbered Int No which will be the invoice number. This also applies to Sales Credit notes.
- Go to Setup > Company details & Settings > Settings tab.
- Under Customer Numbering, untick Auto Invoice Numbering.
- Enter the desired starting number. In this example, it is set to 000001 so the next available invoice number will be 000002.
- Tick again to save the number.
- Click Save.
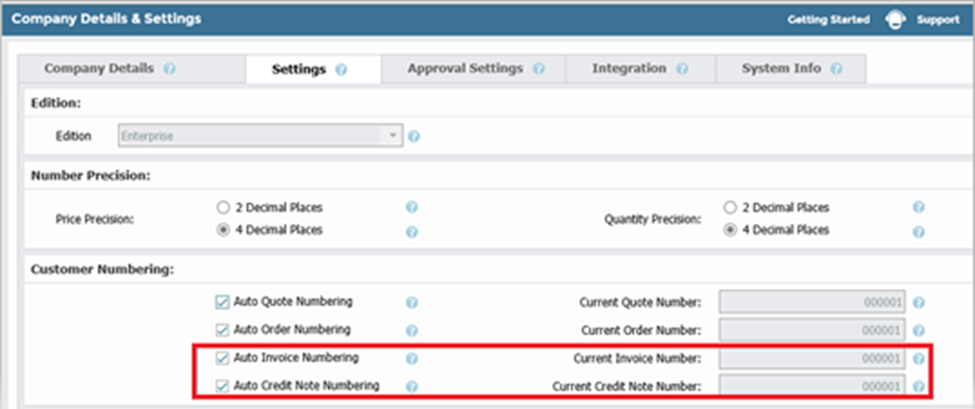
If SI auto-numbering is off, the Transaction Ref will become the Int. No. that represents the Sales Invoice No.


Sales Credit Notes (SN)

Enter the Net, Tax, Total, and Base Currency values as negative values.
In Sales > Batch Invoice:

Note that it has taken the next available number as set up in Company Details & Settings (see above).
Remember to allocate the SN to the SI via Sales > Receipts & Allocation if necessary.
Sales Receipts (SR)

- Leave the following columns blank: Tax code, Tax GL Code, Net Value, and Tax Value.
- Enter Total Value and Base Currency value with negative values.
- Enter a bank GL code in the GL code (Column F).
- The system will use the Transaction Ref as Int No.
View the double entry from General > Transaction Browser:

Remember to allocate the SR to the SI via the Sales > Receipts & Allocation screen if necessary.
Foreign Currency Transactions
- In this tab, you can import receipts for customers in the same currency as the currency of the bank. If your customer is EUR, you can only import SR in a EUR bank account.
- If your customer’s currency is different from the currency of the bank, either request for TRANSACTION tab training or use the Bank payment import. Once your statement is imported, you can go to Receipts & Allocation screen to create your SRs and match them to SIs.
- You can import receipts into different banks. If applicable, please factor the relevant fx rates for transactions into the values correctly.
Sales Credit Journals (SC)

- The system will use the Transaction Ref as Int No.
- Leave the following columns blank: Tax code, Tax GL Code, Net Value, and Tax Value.
- Enter Total and Base Currency Total values as negative values.
View the double entry from General > Transaction Browser:

Sales Debit Journals (SD)

- The system will use the Transaction Ref as Int No.
- Leave the following columns blank: Tax code, Tax GL Code, Net Value, and Tax Value.
- Enter Total and Base Currency Total values as positive values.
View the double entry from General > Transaction Browser:

Import the Template
Step One: Generate the Data File
When you have completed all worksheets correctly, go to the Generate Data File tab and click Generate Data Upload File to generate the CSV file.
This is the first stage of error validation. If there are errors, correct them and click Generate Data Upload File again.
You will find the CSV file in the same location as the macro-enabled Excel file. This file will be used to import all the data you added. During upload the system will check for format and that the CSV file is in the same location as the XLS file. You will receive confirmation if this is the case.

Step Two: Import the Data File
- Go to Setup > Data Importer > Transaction Importer.
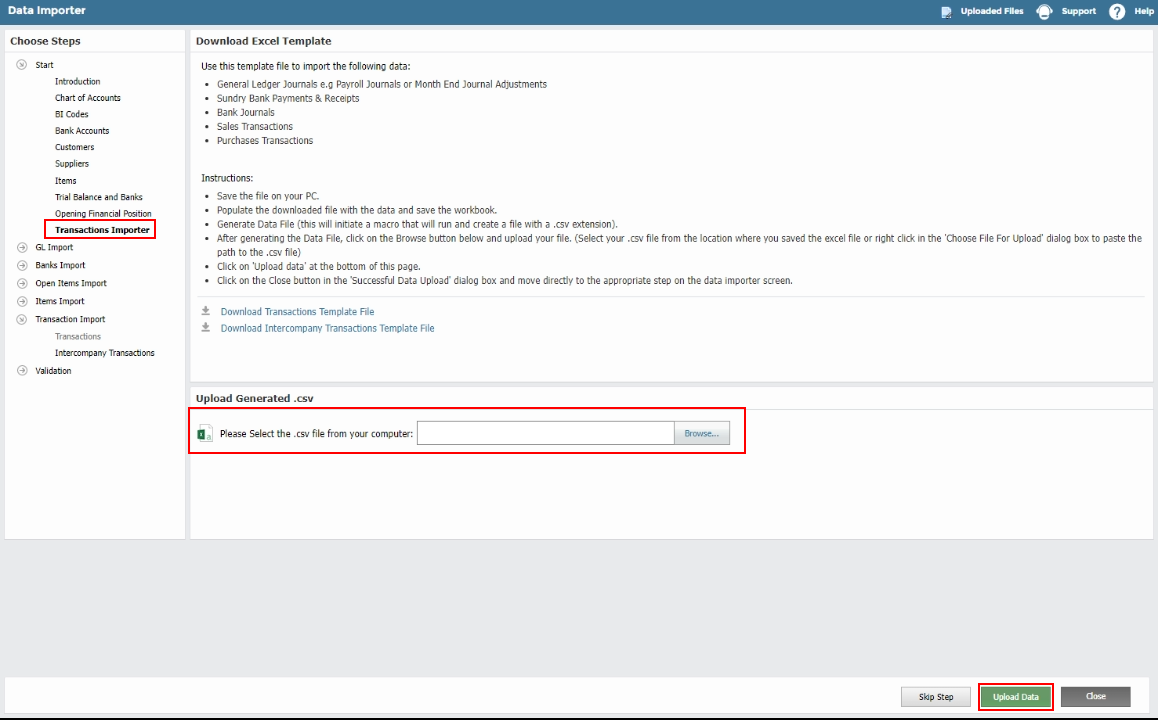
- Browse and select the CSV file you just generated.
- Click Upload Data. Do not double-click as it can bring in the information twice.
- Click Close NOT Next Step.
Step Three: Validation
The import file will be validated. If there are any errors, an error message will appear, along with an error file.
- Download the error file. It includes a new sheet, Import Errors, and a copy of the import file. This shows a summary of all errors found during validation, together with a link to the fields causing the error and the actual error message.
- Click on each link to see details of the error, cells causing the error will be highlighted in red with a note showing further details (hover over the highlighted cell to see the detailed message).
- Correct all errors and re-import the file as described previously. You can make corrections directly in the error file. If you have an error that you cannot resolve, please contact support.
Transactions Import
Now that the data has been imported, it can be applied to the AIQ system.
- Go to Data Importer > Transaction Import > Transactions.

- If no errors were found in the imported file in the previous step, either select:
- Reconciled if you want to import your transactions as reconciled, so they will not appear in the bank reconciliation screen. You can use this if you are importing historical data that has already been previously reconciled.
- Otherwise, click Un-reconciled. This is particularly relevant if the GL code includes a bank GL (For PP Purchase Payments or SR Sales Receipts).
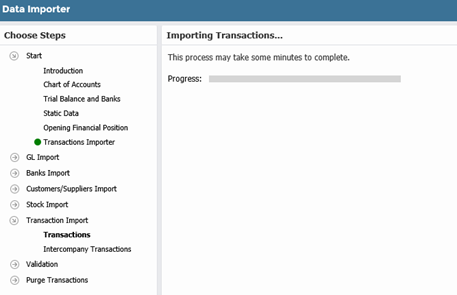
- Click Apply. You will see a progress bar.
Check if Transaction Import was Successful
Check that transactions have been imported correctly using these screens:
Transaction Browser
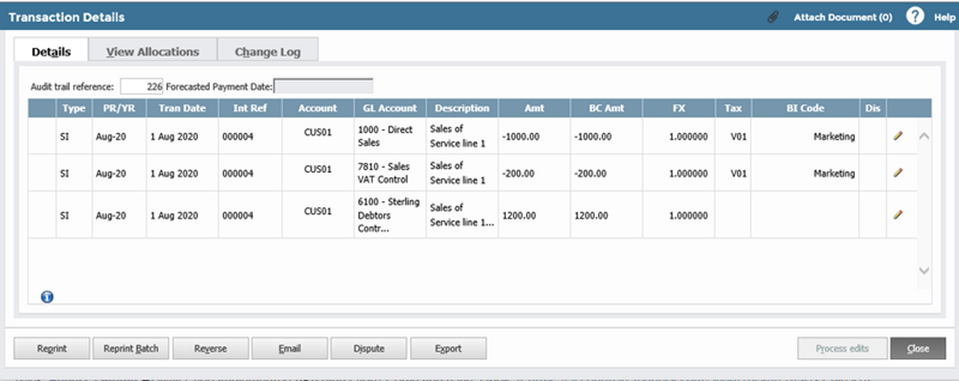
Edit one or more transactions by going to General > Transaction Browser and selecting the transaction ref.
If you see the double entry transaction screen, with all headings and without any error, it means the transactions have been imported successfully.
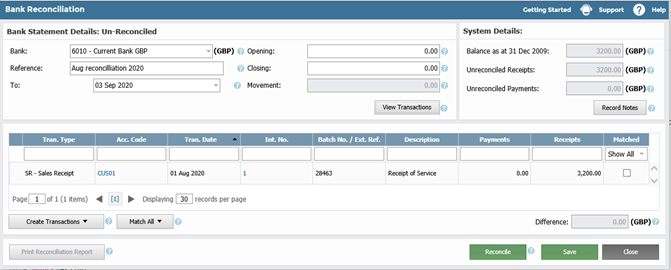
Bank Reconciliation
Go to Bank > Bank Reconciliation.
If you clicked import as un-reconciled, check that your SR or PP appears correctly in bank reconciliation.
If you click reconciled, check that they do not appear.
VAT Management
Go to General > Tax Management.
Under the Sales and Purchases tabs, check that your SI/SN and PI/PN appear in the VAT Management screens.

Making Corrections
If you have imported some data with errors, you will only be able to make minor edits.
Refer to the transaction browser guide.
If there are many edits to make, we suggest importing reversal invoices or journals to net off the initial import and re-import with correct data.
DeleteFAQs
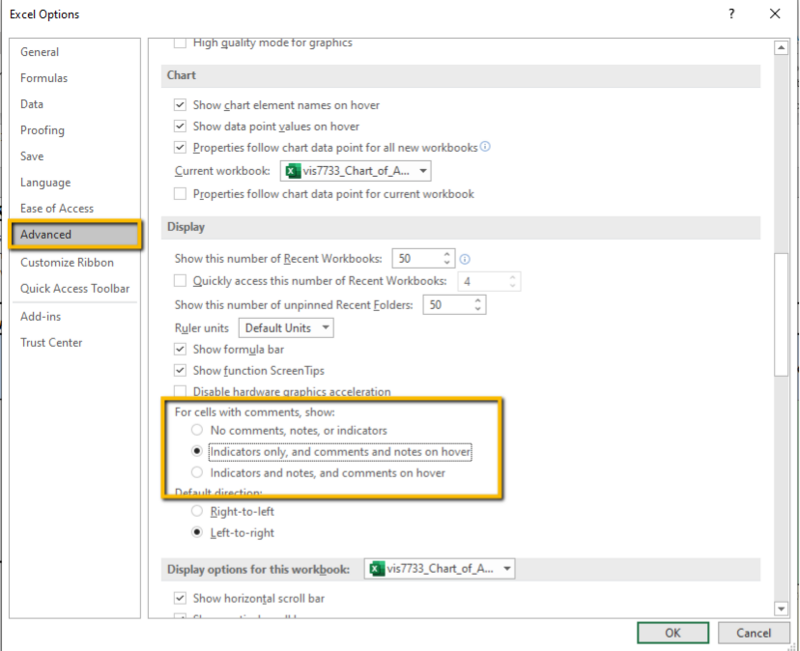
I can't see the notes in the error file.
You can control the appearance of notes in Excel:
- Go to File > Options > Advanced.
- Scroll down to the display settings. We recommend you select the "Indicators only, and comments and notes on hover" option. This lets you see detailed notes on errors when you hover over highlighted cells.